

 Michael’s Corner #113
May 2012
30 Years of CAD
This month marks 30 years of my involvement with Computer Aided Design… and it's been quite a ride. Six continents, ten countries, and 40 states. Having worked in the architectural field in the Bay Area for 4 years after getting my Bachelor of Architecture degree at the University of Cincinnati, in May of 1982 I answered an ad in the San Jose Mercury News for an "Architectural CAD Trainer"… and here I am, 30 years later, still having a great time!
Needless to say, Computer Aided Design has come a really looooong way since I first touched a computer keyboard. Some of which are covered this month! Specifically…
…Autodesk 360 in AutoCAD 2013
…A more elegant way of importing a custom menu [CUI/CUIX]
…The problems that result if PICKFIRST is set to <0>
…Irregular viewports revisited
So here's to 30 more! (…although my traveling may be substantially reduced by that time.)
If you would like to contact me directly, you can do that also.
Blessings to one and all,
Michael
Autodesk 360 in A2013
 The "cloud" is something I still can't get too excited about. I equate it to solar power and electric cars — wonderful in theory, but limited in practice by any number of variables on the part of the user.
Nonetheless, your AutoCAD 2013 comes with — among other features — 3Gb of free storage space in said "cloud" if you sign up for Autodesk 360. Here's the link to what it's all about.
I haven't gone through all of the Autodesk 360 features, but here are a few things you'll find.
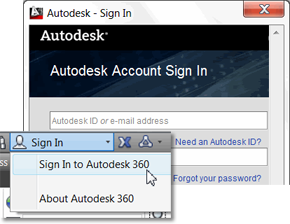
Autodesk Account Sign In
By now, you all probably have an Autodesk Account that you use when you register your Autodesk software. So when you click Sign In on the right side of your AutoCAD 2013 title bar, that's the account that you will need to use when signing in.
Settings to Sync
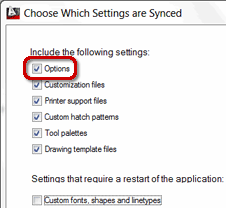 In addition to the storage space, Autodesk 360 will store selected settings to your account. Now this is getting interesting. If for no other reason than to, essentially, back up the contents of your Options, this is really nice!
Unless you're creating custom Fonts, Shapes, or Linetypes, you'll probably want to clear the check box at the bottom.
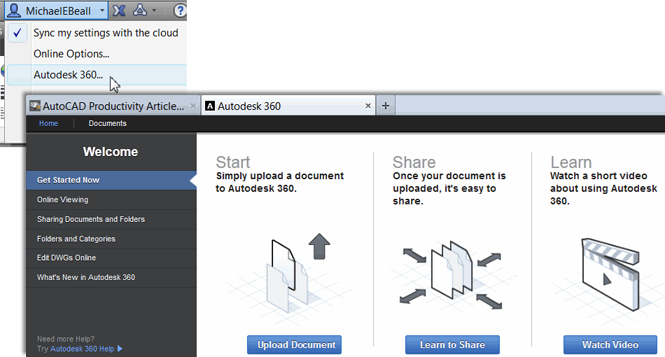
Accessing Autodesk 360
Once you have signed up, you will have some options up on the title bar, including accessibility of Autodesk 360 site where you will find several videos on the available features.
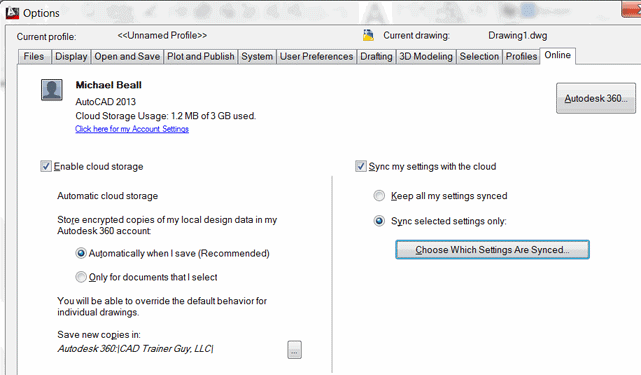
Online in Options
And finally, if you ever want to edit your settings, you can do so from the Online Options feature from the shortcut menu shown above.
All in all, pretty exciting and worth a look!
Power Tool
Importing a Custom Tab into A2013
I had a customer contact me about transferring their customized content from one computer to that of a new employee. In November 2010 I covered this process, but as I read over it, I think it was a bit confusing because I tried to cover too much, but more importantly, I discovered a quicker way to do it!!
The following procedure applies if you have created a custom .CUIX. If you don't have a custom menu file handy and would like to test this process, please feel free to use this one that we created in my 2011 Autodesk University AutoCAD Toolbelt session, AU11_TAB+PANELS.CUIX.
Note: If you opt to use the above menu, I would suggest you save it to the ..\Support folder of AutoCAD or any other place you will be able to remember when you get to the step where you need to find it.
As many of you know, the contents of your Ribbon are directly tied to your Workspace, however…
The following exercise loads the imported menu file so it will be available with ALL your workspaces. If any of you have questions on how to load a menu that will reside in a specified workspace, I would refer you to my website where you will find the steps for that process in my AU 2011 AutoCAD Toolbelt paper.
So check. This. Out.
How to Import a Menu File with a Tab and Panel for all Workspaces
Launch AutoCAD on the computer that is to receive the .CUIX.
Open the CUI.
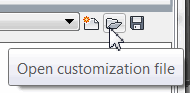
Click the Transfer tab to display Customizations in New File, then click Open Customization File.
Navigate to where you save your custom menu file [.CUI or .CUIX], select it, then click Open. If you're using the AU11 file mentioned above, the content will be displayed below the Ribbon node.
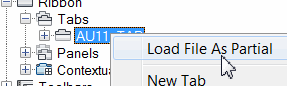
Expand the Ribbon and Tabs nodes, right-click on the tab name, then click Load File As Partial.
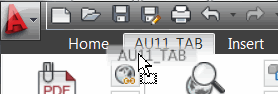
To see your tab on the Ribbon, click OK to apply your changes and close the CUI!
To reposition your tab, you can drag your tab position along the top of the Ribbon! Just be sure to save your workspace after you make edits to your Ribbon. [Workspace Switching
 Save Current Asselect your workspace name]
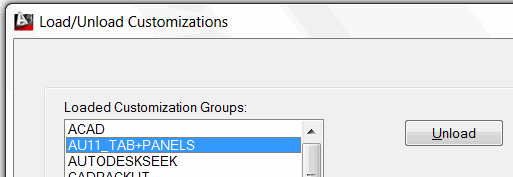
Gold Star Tip: To unload your custom tab, use the command CUILOAD, select the name of the menu to unload, then click Unload.
The Odd Spot
PICKFIRST
It's been 5 years since I've covered this ornery variable, so let me first say, I think the optimum setting for this variable is <1>. If, however, this variable is ever set to <0>, here's what that will do:
Disables the ‘double-click to edit’ feature on objects. The most obvious frustration will be the inability to double-click on a text object — Single Line or Mtext — to edit it.
Note: Do not confuse this with the variable DBLCLKEDIT — Double Click Edit — which is a variable that specifically addresses that ability. Or the lack, thereof.
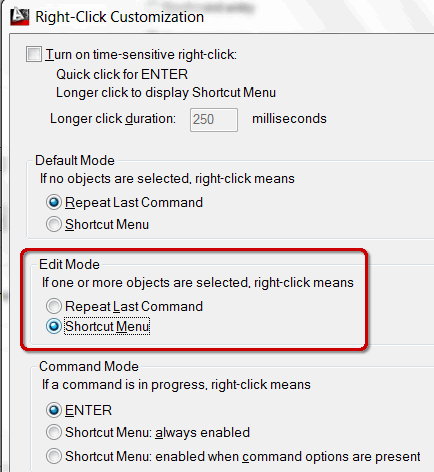
Disables the right-click menu if configured in Options. My preference for the Right-click menu is, essentially, to make it as useful as it was back in Release 14. [See screen capture for the Right-Click Customization feature found in Options
User Preferences tab].With PICKFIRST set to <0>, if you select an object, then right-click for a menu, you won't get the expected menu, per the setting under Edit Mode shown in the figure.
Disables click ‘n’ drag. If you want to simply ‘scoot’ selected objects to another location, you should be able to simply select them, then click on one of the highlighted lines and drag the selection. But you can't do that if PICKFIRST is set to <0>.
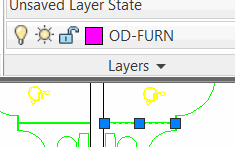
Disables ‘click to view’ of layer property. Although Rollover Tips that came along back in A2010 or so, many users simply click on an object to find what layer it's drawn on. The image on the left indicates the situation if PICKFIRST is set to <0>. Set it to <1> and you see a less confusing response in the layer dropdown list.

The Basics
Irregular-Shaped Viewports
When you need a viewport shape other than a rectangle, the first order of business is to be able to view the objects in Model Space at the desired scale. From there, you can create a polyline to essentially ‘crop’ the objects in Model space, then turn it into a viewport.
In the next exercise I'm using the drawing db_samp.DWG found in the ..\Sample\Database Connectivity folder of your AutoCAD installation.
How to Create an Irregular Shaped Viewport
 Right-click on a layout tab and make a new layout with a large viewport.
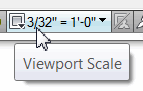
Double-click in the viewport, then set the desired scale from the scale list on the right side of the Status bar.
Return to Paper space and create any closed polyline, spline or circle to be the viewport. In this illustration, I created a polyline around the perimeter of the floorplan.
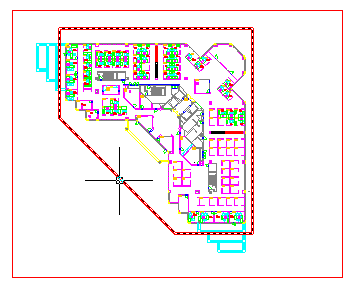
Note: You must use the Close option of the Polyline command if it is to be converted into a viewport. If you did not use the Close option, use Pedit and select the polyline, then use the Close option.
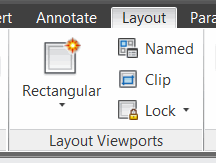 On the Viewports panel [], click Clip.
Note: If you're using AutoCAD 2013, go to the Layout tab
Layout Viewport panelClip, as shown in the figure.When prompted to select the ‘viewport to clip’, select the rectangular viewport.
When prompted to select the ‘clipping object’, select the polyline (or whatever object you created in Step 3, above.)
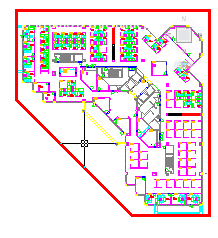 AutoCAD will convert the polyline into a viewport and erase the original rectangular viewport!
Left Field
The Mind of Man Plans His Way…
We all make plans and we've all learned that sometimes those plans are good for about, oh, maybe 30 seconds. Thirty years ago, my original intent was to go into the Architectural field, but God had other plans. Thankfully, He knew best and I have been very blessed. That's why my favorite verse is from Proverbs 16:9 "The mind of man plans his way, but the Lord directs his steps." Amen to that!
Donate to CADTutor
If you found this article useful, you might like to consider making a donation. All content on this site is provided free of charge and we hope to keep it that way. However, running a site like CADTutor does cost money and you can help to improve the service and to guarantee its future by donating a small amount. We guess that you probably wouldn't miss $5.00 but it would make all the difference to us.
Note from Michael: I want to thank all of my customers for continuing to retain my training services (some for over three decades!) and let you know your donations do not go to me personally, but to the ongoing maintenance of the CADTutor ship as a whole and to support the yeoman efforts of my friend and CADTutor captain, David Watson, to whom I am grateful for this monthly opportunity to share a few AutoCAD insights.
Share this page:


The Basics
- Dual Dimensions in a Dim…
- UCSICON Options
- "Best of" Basics: Irreg…
- Tool Palette Basics
- Original Dimension Value
- Possible Solutions to th…
- Avoid Using 'Standard' i…
- Shorten the Plot Scales…
- Update the Source File B…
- User Increment Angles fo…
- Drawing Information
- 'Sign Language'
- Rotate with the Copy Opt…
- Use the INSERT Osnap on…
- To or From the Current L…


