

 Michael’s Corner #24
December 2004
Holiday Gifts for Everyone
Have you ever found that Autodesk, bless them, will put really cool features and options in the commands of AutoCAD but, for some yet-to-be-identified reason, the default option is NOT the really useful one? The Extend and Trim commands have this really great option called Edge… but the default is set to <No Extend>. Take a look at the Basics article and you'll see what I mean.
Also in our December bag of presents is a quick overview of the Gradient hatch, a bit of insight into the frame feature of the Wipeout command and an idea for a command tool on your favorite palette. Have a safe and blessed holiday season then flip that calendar and get ready for more surprises in the New Year!
If you would like to contact me directly, you can do that also.
Blessings to one and all,
Michael
Gradient Hatch
One application of a Gradient hatch in A2004/A2005 is to accomplish a bit more depth in a rendered display without the use of 3D objects. Used in conjunction with the seemingly limitless colors from the color tables, the use of a gradient hatch can be quite effective.
Noteworthy Features of the Gradient tab
- You can choose two different colors for the hatch. The default is for one color with a slider for Tint and Shade.
- Click on one of the nine patterns to specify the one you want to apply (folks usually forget this part).
- By default the patterns are symmetrical (cylindrical patterns are across the top, the two spherical patterns are on the left, and the remaining four are parabolic… seriously). Uncheck the Centered check box for an asymmetrical pattern application.
- In the Angle drop-down listing you can choose from angles in 15 degree increments.
- In the Draw Order drop-down list, new in AutoCAD 2005 is the ability to Send Behind Boundary or Bring in Front of Boundary.
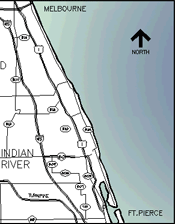
The map displays one of the parabolic gradient hatches, asymmetrically placed at 150 degrees and Sent to Back behind the text and north arrow "islands".
"Gold Star" feature in AutoCAD 2005: You can drag a gradient hatch from the drawing and drop it right onto a tool palette!
Power Tool
Node Snap on a Palette
 Last month I updated my palette review to incorporate the new Tool Palette features found in A2005. One of the new features was the ability of putting commands on the palette as an alternative to making your own button on a toolbar.
 One of the things we have to deal with constantly is what running object snap(s) are set. Sometimes we want Node to be on for awhile, then we want Endpoint for a pick or four. (And if you just want 'em Off, hit F3). It just so happens that the variable named Osmode holds the current condition of the Object Snaps The Osmode value for Node is 8. The Osmode value for Endpoint is 1. Here's how to make a palette tool to turn on Node as the running object snap.
Instructions to create a custom tool for Node Snap
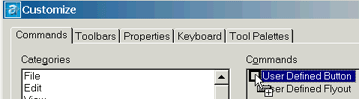
- Right-click on the tool palette of choice, then select Customize from the shortcut menu to open the Customize dialog box.
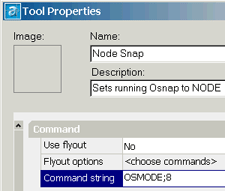
- Click the Commands tab, then in the Categories listing, click User Defined near the bottom of the list to display the two User Defined command options: User Defined Button and User Defined Flyout.
- Drag and drop the User Defined Button onto your tool palette, then close the Customize dialog box.
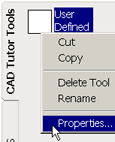
- Right-click on the User Defined button and click Properties to open the Tool Properties dialog box.
- Enter a Name and Description for the tool, then in the Command String field, type OSMODE;8
- Click OK to save and close Tool Properties, then test it!
If you would like to share some of the custom tools you have created for a palette, please let me know and I'll pass them along to our readers.
The Odd Spot
No Ortho or Polar with Wipeout
The Wipeout routine has been in pre-A2004 Express Tools and was then incorporated into the command structure of A2004 and A2005. Curiously, if you have not created a polyline to convert into a wipeout object and simply go with the default procedure of picking points for the wipeout object… Ortho and Polar cannot be enabled.
Solution?
Create a polyline first (using Ortho and/or Polar), then select that shape when using the default <Polyline> option of the Wipeout command.
Tip: Since the wipeout object has a frame of its own (and an option by which to turn the wipeout frame On or Off), when prompted to Erase the Polyline, enter Yes.
The Basics
Edge Option for the Extend and Trim Commands
 The Extend and Trim commands are siblings in that when one command is active, you can toggle to the other command by holding down Shift. Similarly, they also share the same settings of Project and Edge. By default, the Edge mode is set to <No Extend>, when in fact, the Extend mode may be more useful.
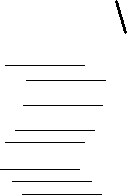
For example, in the illustration, if the short diagonal line was selected as the "Boundary Edge" in an effort to extend the horizontal lines, by default, you would receive the response of "Object does not intersect an edge". So try this:
Instructions to set the Edge option to Extend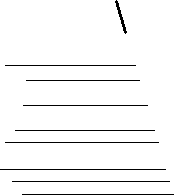
To close an open polyline after the Pline command has been completed, use Pedit, select the open polyline, then enter C for the Close option.
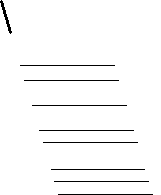
- Launch the Extend command, then select the desired "Boundary edge(s)" and press [Enter].
- Type E for the Edge mode.
Enter an implied edge extension mode [Extend/No extend] <No extend>:
- Type E for the for the Extend option.
- Now pick the objects to Extend.
 Tip: When prompted to select the objects to extend, type F for the Fence option.
Now pick the points that will create a "crossing line" (the Fence) to go across the objects to be selected.
Tip: When prompted to select the objects to extend, type F for the Fence option.
Now pick the points that will create a "crossing line" (the Fence) to go across the objects to be selected.
And as I mentioned, the same Edge setting of Extend is applicable in the Trim command as seen in the final illustration. For those of you into the whole Sysvar thing, the variable that holds this setting is Edgemode. A value of <1> means it is set to Extend (the extending of the selected Boundary or Cutting edge). If the value is <0>, it’s set to No Extend or effectively turned off.
Donate to CADTutor
If you found this article useful, you might like to consider making a donation. All content on this site is provided free of charge and we hope to keep it that way. However, running a site like CADTutor does cost money and you can help to improve the service and to guarantee its future by donating a small amount. We guess that you probably wouldn't miss $5.00 but it would make all the difference to us.
Note from Michael: I want to thank all of my customers for continuing to retain my training services (some for over three decades!) and let you know your donations do not go to me personally, but to the ongoing maintenance of the CADTutor ship as a whole and to support the yeoman efforts of my friend and CADTutor captain, David Watson, to whom I am grateful for this monthly opportunity to share a few AutoCAD insights.
Share this page:


The Basics
- Dual Dimensions in a Dim…
- UCSICON Options
- "Best of" Basics: Irreg…
- Tool Palette Basics
- Original Dimension Value
- Possible Solutions to th…
- Avoid Using 'Standard' i…
- Shorten the Plot Scales…
- Update the Source File B…
- User Increment Angles fo…
- Drawing Information
- 'Sign Language'
- Rotate with the Copy Opt…
- Use the INSERT Osnap on…
- To or From the Current L…


