

 Michael’s Corner #68
August 2008
Tables Revisited Circa 2009
First of all a huge "thank you" goes to my friend and colleague - Professor/Webmaster/Photographer/Gardener - David Watson for stepping in to spot me the month of July. His coverage was mighty timely and I hope you all found it as helpful as I did in coming to grips with the Ribbon of A2009.
This month I had intended on presenting my typical four articles, but as I got into my review of the current state of the AutoCAD Table, it consumed the entire month… just like it did when I covered the same topic in January 2005. Clearly it was time for an update.
Next month I promise to have the full compliment of articles along with maybe an extra one here and there.
If you would like to contact me directly, you can do that also.
Blessings to one and all,
Michael
AutoCAD 2009 Tables
 It's been awhile since I covered tables (January 2005) and since that time, the AutoCAD table feature has gone through some changes, so it's high time. This is also a timely article for those of you using CAP Designer 2009 from 20-20 Technologies (www.2020technologies.com) because you will now be able to generate true AutoCAD tables for your worksheet schedules. The table editing review below will use one of those schedules for reference.
Creating Table Styles
 Similar to Dimensions and Text objects, you specify how a table is to look by creating a Table style which contains the settings for the various cells of the table.
Instructions to Create a Table Style
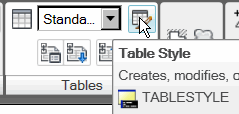
- From the Annotation tab of the A2009 ribbon, click Table Style to open the Table Style dialog box. You will also find it on the Styles toolbar, if you have that toolbar displayed [A2008, too].
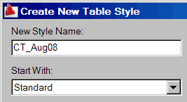
- Click New, then enter a name for the New Style and click Continue.
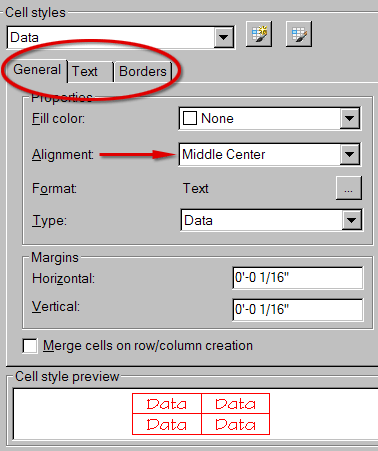
 By default, there are three primary cell styles: Title, Header, and Data. On the right side of the dialog box, the initial Cell Style is for Data cells. The Style properties that can be configured for that cell style - Color, Alignment, etc. - can be specified across the three tabs of General, Text, and Borders.
- In this figure, I have changed the alignment for the Data style to Middle Center.
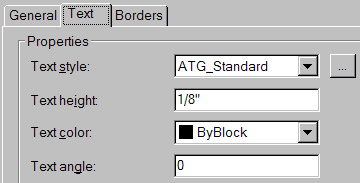
- On the Text tab, specify values for the Style, Height, Color, and Angle.
- The Borders tab contains several options similar to Microsoft Excel®.
- For each Cell Style - Data, Header, and Title - configure the desired properties from the General, Text, and Borders tabs.
- After configuring all the properties for the three styles, click OK, then Close the Table Styles dialog box.
![]() Note: On the Borders tab, check out the Double Lines for the Title style.
Note: On the Borders tab, check out the Double Lines for the Title style.
Why bother creating a unique Cell Style?
If the contents of your table will contain both text and, say, currency values, you may want to create one cell style named $$ and another one named Alpha. The $$ cell style can be configured with a Currency format and the Alpha cell style can be configured for the Text format. When creating additional table styles, simply use those specific cell styles, rather than specifying the values on the General, Text, and Borders tabs all over again.
Note: If you have a table that already exists in the drawing, you can use the Starting Table feature and select that table to be used, essentially, as a template.

Inserting Tables
 Once a table style has been created, let's look at inserting one onto Paper space (you may want to create table styles for both Paper space and Model space).
Instructions to Insert a Table
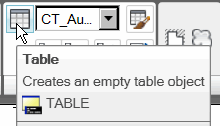
- From the Annotation tab of the A2009 ribbon, click Table to open the Insert Table dialog box.
- Under Columns & Row Settings on the right side of that dialog box, set the Columns to 3 and the Data Rows to 5, then click OK. (Since the Column width and Row height can be tweaked once the table is inserted, I don’t typically bother with setting those values.)

- Click OK, to close the dialog box and the table is attached to your cursor in the color of the current layer.
By default the Title cell is current and as you can tell, all text fields are Mtext objects. Enter the values as necessary, then press <Enter> or use the arrow keys to move to the next field.
Table Editing Considerations
The following is a review of the various features available for table editing. In this review I'll edit a schedule created using Draw Schedule in CAP Designer 2009 from 2020 Technologies, Inc.
Instructions To Modify an Existing Table
- Click Table Style to open the Table Style dialog box, then click the name of the table style to edit and click Modify.
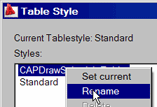 In this example, CAP Designer creates a table style named CAPDrawScheduleTable automatically. As with Dimension Styles, right-click on the name, then click Rename.
- Click Modify. This is also similar to the concept of Dimension Styles: Any modification to a table style will be reflected in any tables using that style.
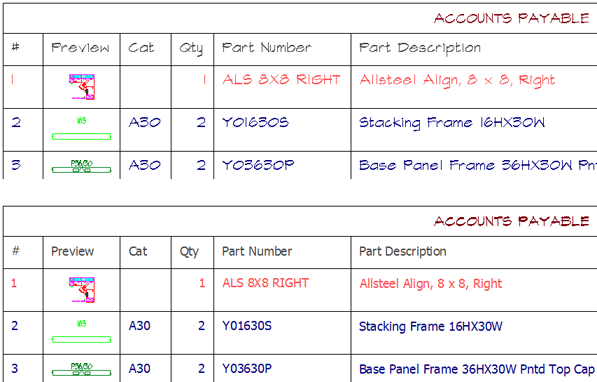
In the tables below, you see a ‘Before’ and ‘After’ of the results when the text style is changed for the Header and the Data cells.
As for editing the table, Where you click and How Many Times you click is important in editing a table.
Cell Editing Insights
 Double-click in a cell - The Text Formatting toolbar opens, the table row and column rulers appear and any text in the cell is highlighted, but not selected. Since all cell text characters are Mtext objects, when you right-click in the cell the shortcut menu is the same shortcut menu you get in the Mtext Editor with few exceptions.
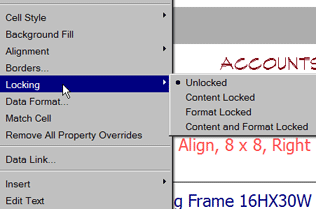 Single-click in a cell - The Table toolbar opens, four grips appear on the cell by which the cell can be sized, and the shortcut menu has cell-related options.

Insert Block
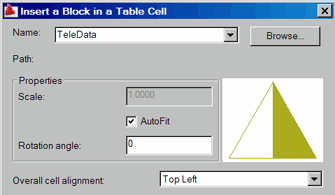 One of the features on the Table toolbar (or from the shortcut menu) is Insert
![]() Block.
Block.
Rather than setting the Cell Alignment to Middle Center with the insertion of each block, wait until you're finished inserting all the blocks, then select the entire row of blocks, then right-click and select Alignment![]() Middle Center.
Middle Center.
Note: Leave the AutoFit feature checked since you can't apply that feature once the block has been inserted into the table.
Instructions To Modify a Column Format
The following procedure will be useful to update the price columns in a CAP Designer schedule to the Currency format.
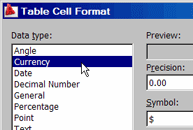
- Click once in any cell of the table to display the alpha-character headers for the table.
- Left-click on the header character to highlight the entire column.
- Right-click in the column and click Data Format to open the Table Cell Format dialog box.
- Click Currency, then click Additional Format.
- Number Separators, change the Thousands value to Comma, then click OK and close the open dialog boxes.
Grip Tips for Tables
There are some very specific functions of the grips of a table. Depending upon your setting for tool tips, you may see a tooltip when you hover over the displayed grips:
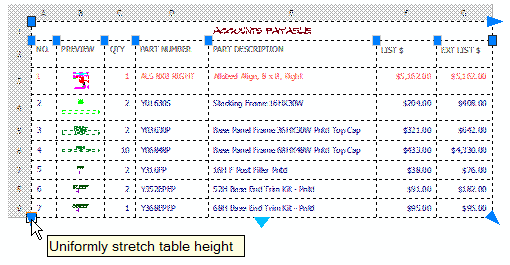
Top left grip - Repositions the table.
Header grips - Each header grip adjusts the width of the associated column. By default, adjusting the column width will not change the overall width of the table.
Note: To change the width of a column as well as the overall width of the table, hold the Ctrl key as you're repositioning the header grip, then click the new position.
Lower left arrow grip - Uniformly stretches the table height.
Top right arrow grip - Uniformly stretches the table width.
Lower right arrow grip - Uniformly stretches the table height & width.
Bottom Center triangle grip - Who knows. No, actually it's similar to the new multiple column feature of an Mtext object; you'll just have to check it out.
There are lots of other things tables can accomplish, but hopefully that gives you a substantial introduction to their current condition.
Left Field
The Mighty Pencil - A typical pencil can write 45,000 words or draw a line approximately 35 miles long. It's amazing what you will find as the "Surprise" in a Crackerjacks box!
Donate to CADTutor
If you found this article useful, you might like to consider making a donation. All content on this site is provided free of charge and we hope to keep it that way. However, running a site like CADTutor does cost money and you can help to improve the service and to guarantee its future by donating a small amount. We guess that you probably wouldn't miss $5.00 but it would make all the difference to us.
Note from Michael: I want to thank all of my customers for continuing to retain my training services (some for over three decades!) and let you know your donations do not go to me personally, but to the ongoing maintenance of the CADTutor ship as a whole and to support the yeoman efforts of my friend and CADTutor captain, David Watson, to whom I am grateful for this monthly opportunity to share a few AutoCAD insights.
Share this page:


The Basics
- Dual Dimensions in a Dim…
- UCSICON Options
- "Best of" Basics: Irreg…
- Tool Palette Basics
- Original Dimension Value
- Possible Solutions to th…
- Avoid Using 'Standard' i…
- Shorten the Plot Scales…
- Update the Source File B…
- User Increment Angles fo…
- Drawing Information
- 'Sign Language'
- Rotate with the Copy Opt…
- Use the INSERT Osnap on…
- To or From the Current L…


