

 Michael’s Corner #95
November 2010
Review of Random Ribbon Stuff
Horns, meet the Bull.
It was high time I addressed the issue of transferring customization files, so I figured it would be a good time to do it while Autodesk University was in session. As a matter of fact, everything in here this month turned out to be Ribbon-related, specifically:
…How to export your Workspace and/or Ribbon Tab (and any associated Panels).
…A quick way of maximizing your screen size.
…The Toolbars button on the Ribbon.
…Ribbon optimization technique.
Sales of The AutoCAD Workbench are going very well, thanks to many of you who have purchased your own copy of the book and/or .PDF.
If you think your college or university's AutoCAD course may benefit from The AutoCAD Workbench… or if you wish you had a text book chock full of AutoCAD insights like that when you were in school… let me know and I'll send an evaluation copy to your professor.
Meanwhile, I hope all of you celebrating Thanksgiving this month have a wonderful time wherever you may be and may we all remember to count our blessings daily.
If you would like to contact me directly, you can do that also.
Blessings to one and all,
Michael
Export Your Workspace or Ribbon Tab via the CUI
With the arrival of a new version of Autodesk's flagship product each year, I am frequently asked how to 'hold onto' settings that have been setup in the prior version. Typically, the Migrate Settings feature handles most of those settings, but what if you got a new computer (don't you wish) and now need to grab your cool stuff from your other system and put it on the new one?
Of particular interest is the exporting of a Workspace, since it is not immediately obvious how that might be done. (For more information on Workspaces, see Michael's Corner May 2009, November 2009, and February 2010). For those of you with a copy of my book, The AutoCAD Workbench (or the PDF), you will find the Workspace coverage on pp. 1 & 2, it's that important.
Here's the definition of a Workspace from the Help files: "Workspaces are sets of menus, toolbars, palettes, and Ribbon control panels that are grouped and organized so that you can work in a custom, task-oriented drawing environment."
Short version: The "edges" of your AutoCAD window.
Therefore, before beginning this exercise, you will first want to save the Workspace.
Note: When transferring AutoCAD features from one system to another, you will be creating a menu file, specifically, .CUI for AutoCAD 2009, or .CUIX for AutoCAD 2010 and AutoCAD 2011.
How to Export a Customization File Containing your Workspace
Type CUI to open the Customize User Interface.
Under the Workspaces node, right-click on the Workspace name you want to export, then click Copy.
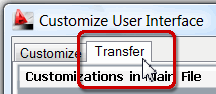
Click the Transfer tab.
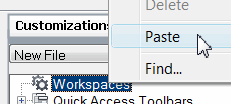
Right-click on the Workspaces node, then click Paste and the workspace will appear under the Workspaces node.
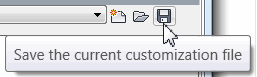
Click Save the Current Customization File.
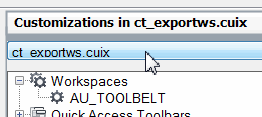
Navigate to the ..\Support folder of your version of AutoCAD, give the file a name, and click Save. I'm naming this file CT_ExportWS.CUIX.
If you're taking this customization file (that contains your Workspace) to another computer, copy the .CUIX file created in Step 5 (above) to AutoCAD's ..\Support folder of the target system, then proceed to the next exercise.
How to Import the Customization File to the Other System
Launch AutoCAD on the computer to receive the exported .CUIX, then open the CUI.
Click the Transfer tab, then click Open Customization File.
 Navigate to where you put the .CUIX file from the previous exercise and Open it. The Workspace name will appear under the Workspaces node.
Right-click on the name of the workspace displayed under the Workspaces node - AU_TOOLBELT in this exercise - then click Copy.
Click the Customize tab, right-click on the Workspaces node, then click Paste.
Click OK to save your changes and close the CUI.
Click Workspace Switching… and you should see the transferred Workspace in the list!
…but what about your custom tab and panel?
The following exercise is centered around the exporting of a customized Tab and Panel in AutoCAD 2010 or AutoCAD 2011. If you haven't created a custom tab and panel, take a look at Michael's Corner from August 2009, then come on back and follow these steps.
I'm using the Tab and Ribbon we will be creating in my class at AU2010 on November 30th… just in case any of you are taking a look at this column while you're there!
How to Export Your Custom Tab & Panel
Type CUI to open the Customize User Interface.
Navigate to the location of your customized tab. I typically encourage folks to put their customization files under Partial Customization Files
 CUSTOMRibbonTabs.
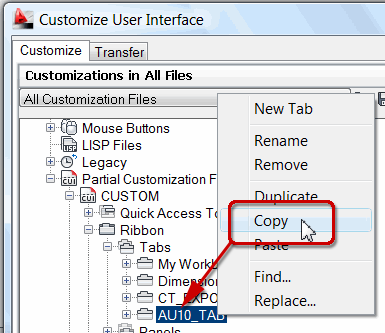
Right-click on your customized Tab, then click Copy
Note: When you copy a tab, any panels that are associated with that tab are automatically included in the copied content.
Click the Transfer tab, then expand the Ribbon node.
Note: Curiously, the following step is necessary to accomplish the task.
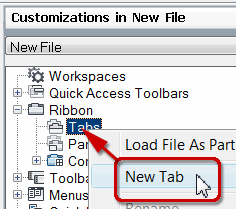
Right-click on the Ribbon node, then click New Tab and press [Enter] to accept the default name of 'New Tab'.
Now, right-click on 'New Tab', then click Paste.
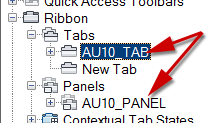
You will now see the 'New Tab', as well as your custom tab in the list. You will also see any custom panel that was associated with the tab under the Panels node.
Click Save the Current Customization File, then navigate to the ..\Support folder of your version of AutoCAD, give the file a name, then click Save. I'm naming this file CT_AUTAB-PANEL.CUIX.
Click OK to save your changes and close the CUI.
If you're taking this customization file to another computer, copy the .CUIX file created in Step 7 (above) to AutoCAD's ..\Support folder of the target system, then proceed to the next exercise.
Please note: You can include a Workspace and your custom Tab in a single file. I just separated these exercises in case some of you didn't have both, but only one or the other. The following exercise will be similar to the one above regarding the importing of a Workspace, albeit relevant to the importing of the tab and panel.
How to Import the Customization File with the Tab and Panel
Launch AutoCAD on the computer to receive the exported .CUIX, then open the CUI.
Click the Transfer tab, then click Open Customization File.
Navigate to where you put the .CUIX file from the previous exercise and Open it. The Workspace name will appear under the Workspaces node.
Right-click on the name of the workspace displayed under the Workspaces node - AU_TOOLBELT in this exercise - then click Copy.
Click the Customize tab, then navigate to Partial Customization Files
CUSTOM >RibbonTabs.Right-click on the Tabs node, then click New Tab.
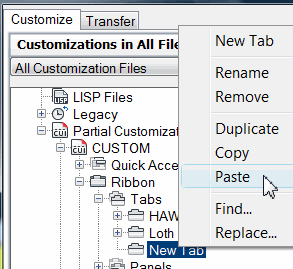
Right-click on the 'New Tab' node, then click Paste and you will then see your transferred tab and panel (AU10_TAB and AU10_PANEL in this exercise).
In the final few steps, you associate the newly imported tab with a workspace.
To add your new tab to a workspace, under the Workspaces node, click the name of the Workspace where you want this tab to live.
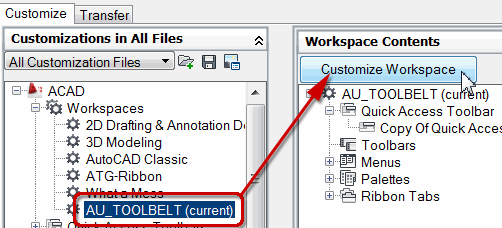
Under Workspace Contents, click Customize Workspace.
Now, under Partial Customizations Files
CUSTOM, put a check in the box beside your new tab. You will then see your new tab listed in your Workspace Contents.To see your tab on the Ribbon, click Done, then click OK to apply and close the CUI.
Hopefully you now feel a bit more confident about retaining your customization files… I know I certainly do!
And Now an Important Follow-Up to the Updating of Blocks on a Palette
This is a wonderful insight and I am so thankful to Kent Elrod (Sumco, USA) for bringing this to my attention.
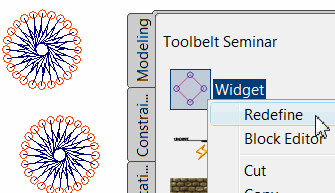
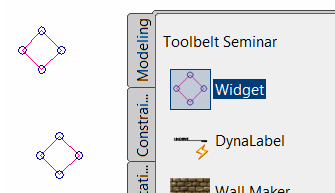
To briefly recap the condition proposed in Michael's Corner, September 2010, you have a block on your palette named Widget, and you have placed several instances of that block in a drawing named ABC. If the Widget block is modified in its Source file (the drawing file from which it was placed onto the palette), what do you do to update the instances of Widget in drawing ABC? My solution was waaaay too complex and Kent's solution is waaaay easier.
Solution: Open the drawing ABC containing multiple instances of Widget, right-click on the Widget block on the palette, then click Redefine. Most excellent!
Before
After
Note: When you change the block definition in the block's source file, right-click on the block on the palette and click Redefine Image to display the correct geometry for the edited block.
Power Tool
‘Full Screen’ Workspace
I had the opportunity to train some designers at Kimball Office recently, and as we were talking about Workspaces, one of them asked, essentially, how to eliminate as much as possible on the screen so you could reduce the 'clutter' if you are showing the client the drawing on your computer. Here's what I came up with…
How to Create a Full Screen Workspace
Ctrl + 0 Turns off all Ribbon and Toolbar elements. This is Clean Screen.
Ctrl + 9 Turns off the Command line.
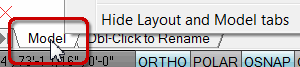
Right-click on the Model tab, then Hide Layout and Model Tabs.
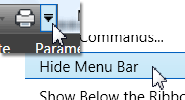
Click the Quick Access Toolbar dropdown, click Hide Menu Bar (assuming your menu bar is currently on - it's off by default).
Workspace Switching
Save Current AsZERO (or whatever)
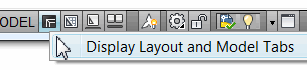 Note: Ctrl + 0 and Ctrl + 9 are toggles. To turn your Model and Layout tabs back on, right click on the Model button (which is only available if the Model and Layout tabs have been hidden), then click Display Layout and Model Tabs.
The Odd Spot
Toolbars Tool on the Ribbon in A2011
The Ribbon / Toolbar battle has now mellowed with age (albeit all of 3 years). Apart from involvement within the CUI, there was no immediately obvious way to include a toolbar in a Ribbon workspace… until now.
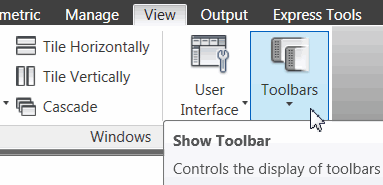
On the View tab of the AutoCAD 2011 Ribbon, at the far right end is the Windows panel – a panel that has gone through its fair share of changes – whereon you will find the Toolbars tool which will enable you to turn on your desired toolbars.
The Basics
A2011 Ribbon Cycling Button
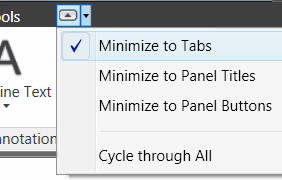 In AutoCAD 2011, at the end of the Ribbon tabs, there's a tiny Minimize button with an even tinier dropdown arrow containing a list of minimize options. Here's how these two tiny arrows work together…
From the option dropdown, select the desired Ribbon display.
Now click the Minimize arrow to toggle between the full Ribbon display and your selected option.
Very clever.
Left Field
Thanks Giving: Our son turns 21 in November. Good kids don't get a lot of press these days, so I wanted to take a moment and let the world know he's a pretty wonderful son. Thanks, Joshua, for loving your Mom and Dad and being such a delight; you're a good man. Happy 21!
Donate to CADTutor
If you found this article useful, you might like to consider making a donation. All content on this site is provided free of charge and we hope to keep it that way. However, running a site like CADTutor does cost money and you can help to improve the service and to guarantee its future by donating a small amount. We guess that you probably wouldn't miss $5.00 but it would make all the difference to us.
Note from Michael: I want to thank all of my customers for continuing to retain my training services (some for over three decades!) and let you know your donations do not go to me personally, but to the ongoing maintenance of the CADTutor ship as a whole and to support the yeoman efforts of my friend and CADTutor captain, David Watson, to whom I am grateful for this monthly opportunity to share a few AutoCAD insights.
Share this page:


The Basics
- Dual Dimensions in a Dim…
- UCSICON Options
- "Best of" Basics: Irreg…
- Tool Palette Basics
- Original Dimension Value
- Possible Solutions to th…
- Avoid Using 'Standard' i…
- Shorten the Plot Scales…
- Update the Source File B…
- User Increment Angles fo…
- Drawing Information
- 'Sign Language'
- Rotate with the Copy Opt…
- Use the INSERT Osnap on…
- To or From the Current L…


