

 Michael’s Corner #58
October 2007
Customizations & Conveniences
Customizing AutoCAD is not really that difficult. I'm not talking about anything fancy like Lisp routines or VBA, just using the features that are available to tweak a few more RPM's out of this thing. For example, if you want to populate all the title blocks on the various layout tabs with the project name automatically, how would you do that? Take a look at the opening article. Then in the Power Tool I propose a method to get the same arc length(s) for a revision cloud every time on any drawing life throws at you - and on the proper layer, even if the layer isn't in that drawing. Not rocket science, just eliminating the aggravation we encounter every now and then.
Then I wanted to follow-up an article from a couple years ago on cycling through stacked objects. Autodesk decided to make it a bit like rubbing your belly and patting your head; you'll see what I mean if you look over the Odd Spot. And then I have been remiss in not letting you all know how to lock the viewport display so you don't obliterate the plot scale when you roll your wheel mouse in a viewport.
Now go out there and share what you've learned just so you can brighten up somebody else's day. You'll be their hero.
If you would like to contact me directly, you can do that also.
Blessings to one and all,
Michael
Drawing Properties to a Field
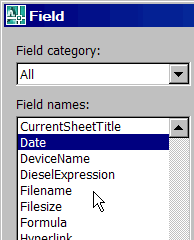
Here's what we know: Fields are text objects that are associated with information associated with the current drawing or objects in the current drawing. Information such as the Filename and Create Date, just two of the Field names in the extensive list of available bits of information.
But what if you need to link a Field to something that's not in that list, but is pertinent to the drawing, such as the Designer's Name? Many of my customers have attributed title blocks with a common attribute such as DESIGNER. That attribute occurs on all the title block sizes from A to E. Here's how to get the Designer's name (or the Project Name or any other attribute that's consistent in all the title blocks) to automatically populate that field.
To do this, we will implement the little-used Drawing Properties feature and create a Custom property, then access the value for that custom property for the Field.
Instructions to Associate User-Defined Drawing Properties to a Field
 Click File
 Drawing Properties to open the Drawing Properties dialog box.
Note: On the Summary tab you will find several areas in which you can add information regarding the current drawing. All of these areas - Title, Author, Subject, Keywords, Comments, and Hyperlink Base - are listed under Field names in the Field dialog box.
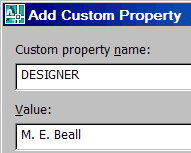
- Click the Custom tab, then click the Add button.
- In this exercise, I'll use DESIGNER as the Custom Property Name and M. E. Beall as the Value. Then click OK to add that custom value to the list.
- Click OK to close the Drawing Properties dialog box.
- On your attributed title block, double-click one of the attributes to open the Enhanced Attribute Editor.
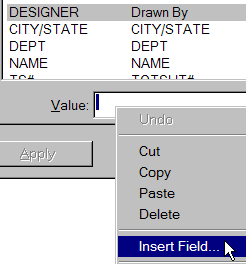
- Click the attribute to which you want to assign the custom property, then right-click in the Value text box, and click Insert Field to open the Field dialog box.
- Now scroll to find the custom property name in the Field list, then click OK.

Job done!
Idea: When creating your title blocks (or editing your existing ones) accommodate the default Summary values listed above by using them as the attribute definitions in each title block size. This way, when you enter the project name in, say, the Subject field, the project name will appear in all the title blocks where you have used "SUBJECT" as the attribute definition.
Power Tool
Custom Button #1: Consistent Revision Cloud
The Revision Cloud command is a wonderful routine, but the most aggravating feature is that the Arc Length is about as fickle as the weather. One day it could be 1/2″ the next it's set to 487′. (It's actually related to the current Dimscale, but let's not go there.)
I've always wanted to run a series in the Power Tool section on fun macros or modified commands you can add to your tool palette, so here's the first one.
The first step is getting the Revision Cloud button onto your tool palette, then we'll modify the Command String. [For additional button and palette insights, I have written about custom buttons on a palette in January 2006, August 2006, and April 2007.]
Instructions to Add a Toolbar Button to a Palette
- Open the toolbar from which you will be copying the command - the Draw toolbar in this exercise - and also open the Tool Palette window. (If you want to make a new palette first, right-click on a the current tab, then click New Palette and name it.)
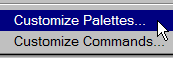 Right-click on the title bar of the tool palette title bar (or in between icons on the palette) and click Customize Palettes to open the Customize dialog box.
- Move the Customize dialog box aside, it's simply the key to get in the "door" for the process of copying a button to the palette.
 Click and drag the Revision Cloud button from the Draw toolbar and drop it onto your palette. Now you can Close the Customize dialog box; it has served its purpose.
At this point, you've done nothing more than copy the button onto the palette. Now we need to modify the Command String to specify the Arc length and Style, as well as specify the desired Layer, Color, and Linetype. Before editing the Command String, however, you need to know what the prompts are for the Revision Cloud command itself. It reads…
Minimum arc length: 2′-0″ Maximum arc length: 6′-0″ Style: CalligraphySpecify start point or [Arc length/Object/Style] <Object>:
When editing the command string "macro", think of what you would type at the Command line in response to the prompts.
Instructions to Edit the Command String of a Command on a Palette
- Right-click on the Revision Cloud button on the palette, then click Properties to open the Tool Properties dialog box.
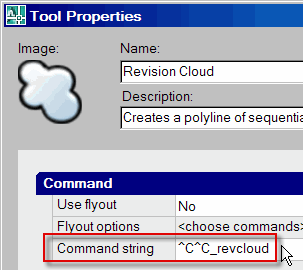
Here's what the Revcloud's Command String means:
^C^C - Cancel; essentially hits the ESC key
_revcloud - The underscore in front of the command means to use the English version of the command. You can delete it.
space - You will also notice there's a space after the command; you can back that out, too. (See the semi-colon comment below.)
- Edit the Command String to read as follows (it is not case sensitive; I did that so you could see it better):
Here's what the additional characters mean:
; - Presses Enter; it's easier to discern a semi-colon than a space when pressing Enter in a macro
A - The Arc option of the Revcloud command
24 - Specifying the minimum arc length
72 - Specifying the maximum arc length (the maximum arc length cannot exceed 3x the minimum. Your call)
S - The Style option of the Revcloud command
C - The Calligraphy option (you can use N for the Normal option if you prefer)
Note: Nothing follows the last character
At this point you have a button on a tool palette that launches the Revcloud command, specifies the Min/Max arc length, and also specifies the Style to be used.
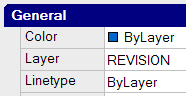
Bonus Points: Create a layer in the current drawing named "Revision" and give it a color. Edit the General area of the Tool Properties window to read as shown in the figure, then click OK. You will then have a button that can be used to create a revision cloud on the proper layer (yes, even if it's not in the current drawing) in addition to those features specified in the command string. Way cool.
The Odd Spot
Cycle Thru Follow-Up
It's been awhile since I covered this [specifically, about four years - December 2003], but prior to AutoCAD 2007, to cycle between objects that were essentially stacked on each other, you held down the Ctrl key, then clicked to cycle between those objects. Beginning in A2007, there was a bit of a change.
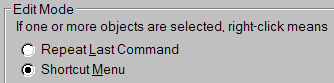
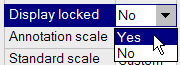
For those of you with A2007 and beyond, if you have objects that are stacked (i.e., the edge of the reflected ceiling plan layer is also where the wall line is, which is also where the carpet line is, etc.), here's what you need to do to select objects that essentially occupy the same X,Y location.
Instructions to Cycle Through Stacked Objects in A2007+
- Launch the desired edit command (this only works with editing commands - such as Move, Erase, etc. - where a pickbox is enabled).
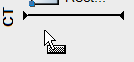
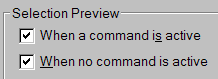
- Place your pickbox over the location where you suspect more than one object and if the Selection Preview feature is enabled (ToolsOptions…
Selection tab), one of the objects under the pickbox will highlight… and, of course, it won't be the one you want to edit…
- [Here's where it gets interesting] Hold the Shift key down and tap the Spacebar and AutoCAD will cycle between the objects that are under the pickbox. Seriously.
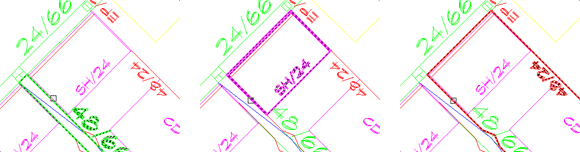
…which is not totally unlike rubbing your belly and patting your head while jumping on one leg.
The Basics
Locking a Viewport
From the "Don't you hate it when…" files. On a layout tab, you get your viewport perfectly set with the plot scale, then you click in the viewport and roll your wheel mouse… and totally mess up your plot scale!?!
Solution: Lock your Viewport.
Instructions to Lock a Viewport: Option 1
Since you will be using the shortcut menu in this routing, this option requires that the Edit Mode of the Right-Click Customization (Tools![]() Options…
Options…![]() User Preferences
User Preferences![]() Right-Click Customization… button) be set as shown.
Right-Click Customization… button) be set as shown.
- While in Paper space, click on the viewport frame to lock.
- Now right-click and select Display LockedYes.

Instructions to Lock a Viewport: Option 2
If, for some reason that I'm sure is perfectly valid (although none come to mind), you have turned off the Right-Click Customization and you don't get a shortcut menu when you select an object, use this option.
 While in Paper space, click on the viewport frame to lock.
- Open the Properties window (CTRL+1).
- Under the Misc section, change the value for Display Locked to Yes.
Note: For another viewport tidbit, take a look at the Power Tool in April 2005 on maximizing viewports… because that routine works even if the viewport is locked! Very nice.
Left Field
A Cake Baking Icon - Duncan Hines was a Kentucky native. Hines worked as a traveling salesman in the 1940's before lending his name to a line of sugary treats. www.duncanhines.com/newDuncan/pub/about-us/.
Donate to CADTutor
If you found this article useful, you might like to consider making a donation. All content on this site is provided free of charge and we hope to keep it that way. However, running a site like CADTutor does cost money and you can help to improve the service and to guarantee its future by donating a small amount. We guess that you probably wouldn't miss $5.00 but it would make all the difference to us.
Note from Michael: I want to thank all of my customers for continuing to retain my training services (some for over three decades!) and let you know your donations do not go to me personally, but to the ongoing maintenance of the CADTutor ship as a whole and to support the yeoman efforts of my friend and CADTutor captain, David Watson, to whom I am grateful for this monthly opportunity to share a few AutoCAD insights.
Share this page:


The Basics
- Dual Dimensions in a Dim…
- UCSICON Options
- "Best of" Basics: Irreg…
- Tool Palette Basics
- Original Dimension Value
- Possible Solutions to th…
- Avoid Using 'Standard' i…
- Shorten the Plot Scales…
- Update the Source File B…
- User Increment Angles fo…
- Drawing Information
- 'Sign Language'
- Rotate with the Copy Opt…
- Use the INSERT Osnap on…
- To or From the Current L…


