

 Michael’s Corner #114
June 2012
Layers and Old-Timers
Sometimes I'll look back over what I wrote for any given month and find that I'm pulling from the same box of tricks. This month — in addition to showing a new feature in AutoCAD 2013 — I'm reaching back about 15+ years for some still-powerful dialog box-driven commands, as well as dipping into the always prolific arena of Layers. Here's what's in store this month:
…Customizing the Panel on your Ribbon to launch Rename
…Adding the setting for Background Mask to Quick Properties
…Uncovering the subtle VPFreeze setting when freezing layers in Viewports
…The new Preview feature in AutoCAD 2013 for Layer States
The other thing you'll notice in the is collection, is that 3 out of 4 of them can be used when working on drawings that didn't originate with you. And that's what I find is probably the most frustrating topic when you're working with AutoCAD. How to ‘fix’ someone else's drawing, if not to simply make it more to your liking.
Bottom line, it's all about being more productive. Now it's time for David and I to tend to our respective gardens, although my suspicion is that his contains more than just chili peppers and tomatoes like mine does.
Hope you all have a delightful summer… or whatever season is rolling in on your side of the planet!
If you would like to contact me directly, you can do that also.
Blessings to one and all,
Michael
Add Rename to a Panel's Dialog Box Launcher
 We haven't done any Ribbon customization recently, so this month I wanted to show you a little item in the corner of some Panel title bars called the Dialog Box Launcher.
Since this will require a custom Tab and Panel, I'll refer you to my August 2009 coverage on that particular topic. Once you have created your custom tab and panel, join us with this exercise.
I decided to launch the Rename dialog box, because A) It's a very powerful and little-known routine, and B) I haven't covered it for 9 years! The command itself hasn't changed one bit, so the article [see the Power Tool of Michael's Corner June 2003] is still true as the day it was posted!
How to Launch a Dialog Box from the Ribbon
Create a custom tab and panel, then open the CUI.
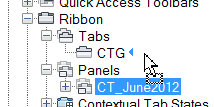
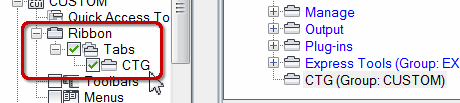
Navigate to the location of that panel — [Partial Customization Files
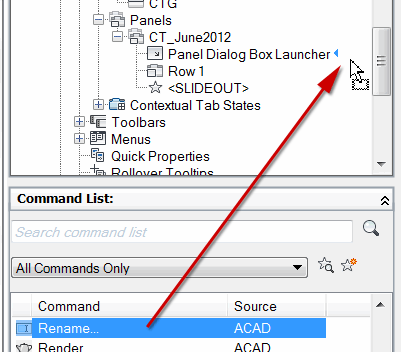
 CustomRibbon] — then expand the Panel node. Under the Panel node you see the Panel Dialog Box Launcher, Row 1, and <SLIDEOUT>.
Under the Command list, scroll down to the Rename command.
Now drag the Rename command up and release it next to the Panel Dialog Box Launcher when you see the small triangle.
Note: Curiously, you won't see a plus sign beside the Launcher to indicate something has been assigned to this node. However, if you click on Panel Dialog Box Launcher, you will see a reference under the Properties section, over in the lower right, regarding the Ddrename command.
 Important: If you have not already associated your custom Panel with your custom Tab, be sure to drag that panel up and release it next to the tab. This process is easily overlooked in the initial making of a custom tab and panel, so I just wanted to make sure this association was made.
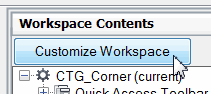 Now, to assign the changes you made to your Workspace, go up and click on the name of the (Current) workspace, then in the upper right corner, under Workspace Contents, click Customize Workspace.
On the left, you will notice that the screen jumped to the location of the Ribbon. Put a check in both the boxes for Tabs and the name of your Tab. You will also see the name of your tab under the Workspace Contents section.
Under Workspace Contents, click Done, then click OK to close the CUI and apply your settings.
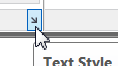
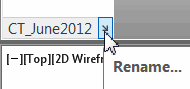 Open your tab, then click on the small arrow in the corner of the title bar to launch the Rename dialog box!
Power Tool
Toggling the Background Mask in Quick Properties [QP]
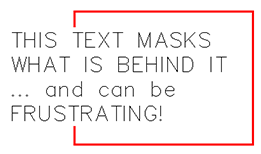 While we're on the subject of commands that are the equivalent of buried treasure, I'm encountering a spate of questions regarding text boxes that are opaque, as shown here. This condition could be used in a positive context, of course, but the primary culprit here is the Background Mask feature of the Mtext command. [See the Odd Spot, Michael's Corner July 2005].
For conditions where you have Mtext objects using the Background Mask feature — which was the circumstance I had recently with a new customer — here's a solution that you can add to the power of the Quick Properties feature.
How to Add a Background Mask Toggle to Quick Properties
Draw any object — Line, Circle, Rectangle — then launch the Mtext command and add a line of Mtext.
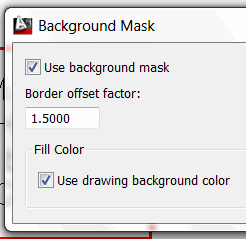 Before you close the editor, right-click in the editor, then click Background Mask.
Check the box for Use Background Mask as well as the box for Use Drawing Background Color, as shown in the figure.
Click OK to close Background Mask, then close the editor. You should see that the Mtext body masks the object you drew, similar to the illustration above.
Click on the Mtext, then turn on Quick Properties (the QP on the Status bar), to open the Quick Properties window for that text.
Right-click anywhere on the black frame of the window, then click Customize. This opens the CUI, albeit specifically for the Quick Properties settings for Mtext objects. Mtext should be highlighted in the middle portion of the CUI.
On the right, under Text, scroll down and put a check in the box for Background Mask, then click OK to save your changes and close the CUI.
To test this, select the Mtext you just created that has the Background Mask turned on, and the Quick Properties window will display with an option for Background Mask… and the current setting is probably Yes.

 Click the Browse button to open the Background Mask dialog box, then empty the check box to Use Background Mask, then click OK.
Note: If you have lots of Mtext objects that have a background mask, select all the objects, then when the Quick Properties window comes up, choose Mtext from the list, then continue with step 9, above.
The Odd Spot
VPFreeze in a Viewport
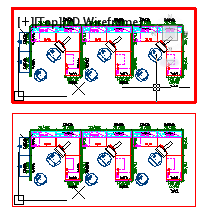 The majority of my customers work in drawings where they are doing space plans for corporate facilities. Frequently, they will have more than one viewport and want to freeze components in one viewport, but not in the other.
That's exactly what the Freeze feature will do… if it's configured that way.
It was five years ago when I addressed the Block nesting feature, and that answer still holds true. But if your viewport-specific freeze is not working, try this.
 Launch the Freeze routine — Home tab
![]() Layers panel — and you may see the following:
Layers panel — and you may see the following:
Current settings: Viewports=Off, Block nesting level=Entity

Select an object on the layer to be frozen or [Settings/Undo]:
If your setting for the Viewports is Off (per the above emphasis), then you will want to enter S for the Settings option, then V for the Viewports option and then set the condition to Vpfreeze, like this…
Enter setting type for [Viewports/Block selection]: V

In paper space viewport use [Freeze/Vpfreeze] <Freeze>: V
That should do the trick!
The Basics
Layer States Preview in A2013
 Over the years I have written about Layer States — a popular feature among my facility planning customers — so as I was wandering through AutoCAD 2013, I found a pretty slick feature that I know you will appreciate if you use Layer States. Since it's been about five years since I specifically covered this topic, we'll make a couple of quick layer states, then we'll look at the new feature in A2013!
How to Create and Preview a Layer State in A2013
Open the drawing db_samp.DWG found in the ..\Database Connectivity folder under AutoCAD's ..\Sample folder. Alternatively, you can open a drawing you are familiar with that has a few layers you can turn Off or Freeze.
On the Layers panel, click the dropdown list where you probably see ‘Unsaved Layer State’, then click New Layer State.
Enter ORIGINAL as the New Layer State Name, then click OK.
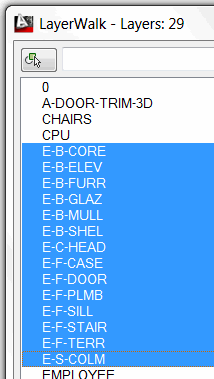
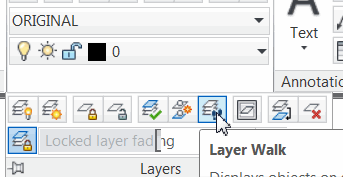
Expand the Layers panel to display additional tools, then click Layer Walk. If you're not familiar with this favorite of mine, take a look at Michael's Corner, May 2004.
Select all the layers that start with E-*.
Right-click in that list of layers, then click New Layer State.
Enter WALLS for the name of the layer state, then click OK.
At the bottom of the LayerWalk dialog box, check the box to Restore on Exit, then click Close. This will revert the drawing back to the way it was before you opened Layer Walk.
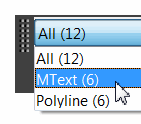
Now, to fully appreciate this new feature in A2013, click the dropdown list for the Layer States, then just position your cursor on the one labeled WALLS… and you see a preview of that layer state! Hover over the layer state labeled ORIGINAL, and that one is displayed!
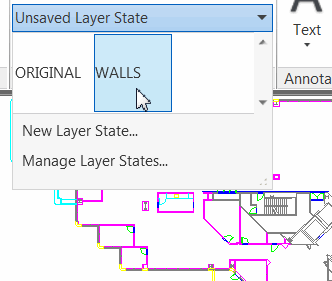
To enable that layer state condition, click the name in the list.
I train folks on Layer States in every AutoCAD training I present, so I can't wait until they see this updated Preview feature in A2013!
Left Field
The Longest Day
When I was in school, I remember the longest day being June 21st and the shortest day as December 21st. Over the last few years, I've heard a newscast saying the longest day is on the 20th. So here's what I found out.
First, the longest day is the day when the Summer Solstice occurs, and the Summer Solstice happens when the Sun reaches its farthest point north of the equator. This occurs annually on June 20 or June 21 in North America, depending on your time zone.
However, since the CADTutor website is based just moments away from the GMT monument, we'll defer to that designation. That said, the 2012 summer solstice will occur on… JUNE 20 2012 at 23:09 GMT!
Donate to CADTutor
If you found this article useful, you might like to consider making a donation. All content on this site is provided free of charge and we hope to keep it that way. However, running a site like CADTutor does cost money and you can help to improve the service and to guarantee its future by donating a small amount. We guess that you probably wouldn't miss $5.00 but it would make all the difference to us.
Note from Michael: I want to thank all of my customers for continuing to retain my training services (some for over three decades!) and let you know your donations do not go to me personally, but to the ongoing maintenance of the CADTutor ship as a whole and to support the yeoman efforts of my friend and CADTutor captain, David Watson, to whom I am grateful for this monthly opportunity to share a few AutoCAD insights.
Share this page:


The Basics
- Dual Dimensions in a Dim…
- UCSICON Options
- "Best of" Basics: Irreg…
- Tool Palette Basics
- Original Dimension Value
- Possible Solutions to th…
- Avoid Using 'Standard' i…
- Shorten the Plot Scales…
- Update the Source File B…
- User Increment Angles fo…
- Drawing Information
- 'Sign Language'
- Rotate with the Copy Opt…
- Use the INSERT Osnap on…
- To or From the Current L…


