

 Michael’s Corner #119
November 2012
Thankful for… Easy Customization!
Although I am thankful for many, many other things (including our son, Joshua, who's birthday was the 3rd), but professionally speaking, I'm very thankful that customizing AutoCAD is such fun, especially since I am not a VBA or a LISP master like my friends Ben and Lee. This month we take a look at more automation that can be parked up on the Quick Access Toolbar, along with some fundamentals that are less than intuitively obvious. So when you unpack this critter you will find…
…How to create a drop-down icon on the Quick Access Toolbar
…A trick to zooming out just a little since your wheel mouse can't be used for that anymore in A2013
…The setting you will need to invoke the new A2013 Strikethrough feature in single line text
…Where to find the setting to display the Polar angle value and vector when you use that feature
To all of you in or from the US of A, I want to wish you a glorious and Happy Thanksgiving, and may each and every one of us remember to count our blessings every day.
If you would like to contact me directly, you can do that also.
Blessings to one and all,
Michael
Add Your Own Drop-down Menu to the QAT
 It looks like I've covered all the other customized dropdown options: Adding another tool to a drop-down on the Quick Access Toolbar, and adding another tool to a drop-down on the Ribbon.
This month I thought we could make our own drop-down on the Quick Access Toolbar with our own collection of tools. (Thanks to my customer, Bridgette in Lincolnshire, for asking about this in our training last summer. You and your team were quite an inspiration!)
In this exercise, we'll add a couple View positions, and a Visual Style.
How to Create a Drop-down on the QAT
Type CUI, then press [Enter] to open the Customize User Interface.
Under Customization in All Files, expand Quick Access Toolbars.
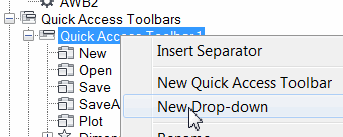
 Right-click on Quick Access Toolbar 1, then click New Drop-down. Enter a name for the drop-down. Mine is MC_Nov12.
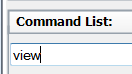
Under Command list, in the Search Command List field, enter 'view' to narrow the list to only those with the word 'view' in their name.
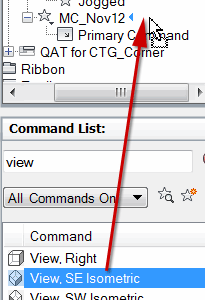 Drag the command View, SE Isometric up and release it next to the NAME of your drop-down, not Primary Command.
After you release the command next to the name of the drop-down, the command will appear below Primary Command. I know, very curious.
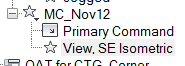
Drag up the command View, SW Isometric and release it just below the first one when you see the line below it.
Change the word in the Search field to 'Visual', then drag up a few of your favorite Visual Styles.
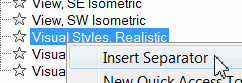 To make the list look more organized, right-click on the command prior to your first Visual Style, then click Insert Separator.
Click OK to save your edits and close the CUI.
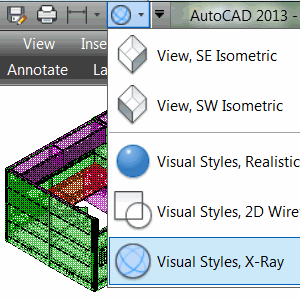
…check out your new drop-down on the Quick Access Toolbar!
Power Tool
Create a QAT Button to Zoom / .9X
Why back in the DOS days (that would be before wheel mice), you could launch the Zoom command, then enter .9X to reduce the display to 90% of the current view.
Some of you may have noticed that AutoCAD 2013 doesn't allow you to do that trick anymore of going back and forth with your wheel mouse to accomplish this same subtle reduction in the view (right, Juul?).
Similar to the procedures we've seen in previous articles this year (specifically March and September this year) here's yet another button idea for your Quick Access Toolbar.
How to Add Zoom/.9x to the QAT
-
 Open the CUI. Under Command List, click Create a New Command to create Command1.
 Click your new Command1 to open the Properties panel on the right side of the CUI.
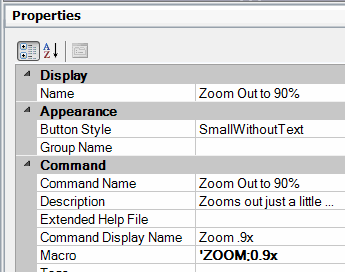
Add the values similar to those shown in this figure for Name, some type of Description, and Command Display Name. Your button will now be alphabetized in the Command list.
Edit the Macro field to read as follows:
'ZOOM;0.9X
Note: The apostrophe runs the ZOOM command transparently, which means you can click this button while a command is still running.
To add a button top to your command, under the Command list, click your new Zoom command to display the Properties.
In the Properties grouping, under Images, click the open field for Small Image.
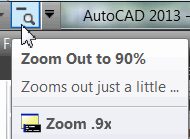 Now, up in the collection of Button Images, click on an image that looks appropriate for this command; something in the magnifying glass/Zoom collection.
Click OK to save your edits and close the CUI… then check out your new button!
The Odd Spot
AutoCAD 2013 Strikethrough Character
 I was covering the features of Mtext not long ago, and discovered a new option on the Formatting panel of the contextual Text Editor tab when adding Mtext: Strikethrough.
Being a proponent of both single as well as multiline text — use the appropriate tool for the job — I was wondering if you have that option when editing single line text. The answer is 'Yes', but let me show you how I found it.
The Logic
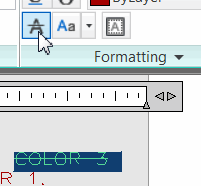
By default, when editing single line text, a 'frameless' editor is displayed, but the right-click menu has no option for Strikethrough.
If you use the Strikethrough on Mtext, then Explode it, you still have the Strikethrough characters for the single line text object.
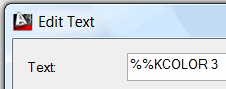 Set the variable DTEXTED to <1> for the legacy Edit Text dialog box for editing single line text.
Double-click the single line text with the Strikethrough characters, and you see your answer: %%K
As my buddy Hugh Bathurst always said, "Job done!"
The Basics
Polar Tooltip & Vector
 When you rotate or move selected objects, you can do so without any restriction, or you can turn on Ortho… or Polar. If you use Polar and you don't see the tooltip displaying the angle and/or the dotted vector, you may possibly think it's 'broken' and not use it. So let's fix that.
How to Set the Display of the Polar Tracking Vector
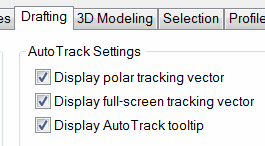 Right-click anywhere in the Command line, then click Options to open the Options dialog box.
On the Display tab, check all the boxes at the top under Auto Track Settings, then click OK to save your settings and close the Options dialog box.
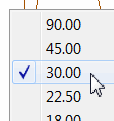
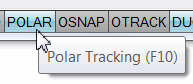
On the Status bar, right-click on Polar Tracking, then click 30.00 in the list.
Note: Setting the angle doesn't turn the feature on, so make the Polar icon/word is blue. You can also toggle it On/Off with [F10]
Launch the Rotate command, select an object, press [Enter], then specify a base point.
 When prompted to specify the rotation angle, move your cursor around to see the tooltip with the distance and angle, as well as the dotted vector!
Hopefully that clarifies any confusion you may have had regarding the settings, and enables you to display the information you want when using this often-overlooked feature.
Left Field
Just a Few Fun Facts on Thanksgiving
• Benjamin Franklin wanted the turkey to be the national bird of the United States. (This from the guy that supposedly flew a kite in a lightning storm)
• Sarah Josepha Hale, an American magazine editor, persuaded Abraham Lincoln to declare Thanksgiving a national holiday. She is also the author of the popular nursery rhyme "Mary Had a Little Lamb".
• Abraham Lincoln issued a 'Thanksgiving Proclamation' on October 3, 1863 and officially set aside the last Thursday of November as the national day for Thanksgiving.
• The annual Macy's Thanksgiving Day Parade tradition began in the 1920's.
• In 1939, President Roosevelt proclaimed that Thanksgiving would take place on November 23rd, not November 30th, as a way to spur economic growth and extend the Christmas shopping season.
• Congress to passed a law on December 26, 1941, ensuring that all Americans would celebrate a unified Thanksgiving on the fourth Thursday of November every year.
• Mashed potatoes, pumpkin pies, popcorn, milk, corn on the cob, and cranberries were not foods present on the first Thanksgiving's feast table.
• Lobster, rabbit, chicken, fish, squashes, beans, chestnuts, hickory nuts, onions, leeks, dried fruits, maple syrup and honey, radishes, cabbage, carrots, eggs, and goat cheese are thought to have made up the first Thanksgiving feast. Amen to that menu!
Donate to CADTutor
If you found this article useful, you might like to consider making a donation. All content on this site is provided free of charge and we hope to keep it that way. However, running a site like CADTutor does cost money and you can help to improve the service and to guarantee its future by donating a small amount. We guess that you probably wouldn't miss $5.00 but it would make all the difference to us.
Note from Michael: I want to thank all of my customers for continuing to retain my training services (some for over three decades!) and let you know your donations do not go to me personally, but to the ongoing maintenance of the CADTutor ship as a whole and to support the yeoman efforts of my friend and CADTutor captain, David Watson, to whom I am grateful for this monthly opportunity to share a few AutoCAD insights.
Share this page:


The Basics
- Dual Dimensions in a Dim…
- UCSICON Options
- "Best of" Basics: Irreg…
- Tool Palette Basics
- Original Dimension Value
- Possible Solutions to th…
- Avoid Using 'Standard' i…
- Shorten the Plot Scales…
- Update the Source File B…
- User Increment Angles fo…
- Drawing Information
- 'Sign Language'
- Rotate with the Copy Opt…
- Use the INSERT Osnap on…
- To or From the Current L…


