

 Michael’s Corner #52
April 2007
Introduction to Sheet Sets & Some Customizing Insights
When AutoCAD 2005 was nearing completion, Autodesk approached me to write a book for them on transitioning from AutoCAD 2000 to AutoCAD 2005. Released as Autodesk Official Training Courseware (AOTC), it included coverage on the new features of tool palettes, gradient hatches… and sheet sets. This month I thought I would at least introduce you to what that Sheet Set Manager window is all about. When you get your new software this month (as many of you are moving from A2004 up to A2007 or A2008), I also wanted to introduce you to those dynamic blocks on the sample tool palettes, specifically the one that has a built-in bubble with a number and you can edit the length of the line after you add a title and a plot scale.
In the Odd Spot, I wanted to follow-up on my coverage in August 2006 on adding a command to the tool palette by showing you how to add a blank button to a palette. Once you have one of those, you can copy it to other palettes and customize the command string of that blank button to do anything you want. Quite Quul (I just made that word up; you can use it). And finally, just a final word on adjusting the dimensions in a drawing by changing the value for the Overall Scale Factor.
If you would like to contact me directly, you can do that also.
Blessings to one and all,
Michael
So, You Want To Know About Sheet Sets?
 What I'm going to do here is give you the key features of Sheet Sets. The things that I first wrapped my head around as I was learning about this new concept that was to be introduced in A2005.
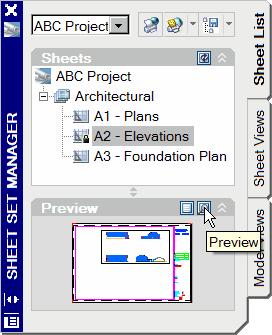
 The Sheet Set Manager in its simplest form is a window in which you can organize the drawings for a project. That's about it; plain and simple. Yes, it has useful features like letting you choose the title block/border sheet you want to use for each size page, and providing a dialog box in which you can number and name your "sheets", along with many other features, but at the end of the day, it's a giant organizational tool for existing drawings.
Key Concepts Regarding Sheet Sets
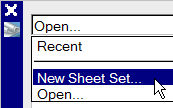
- The easiest and most practical way to create a sheet set is to use the Example Sheet Set which is one of the options when you New Sheet Set from the Sheet Set Manager drop-down list. I'll base the rest of these items on that resulting sample sheet set for an "Architectural Imperial Sheet Set".
- It's all about layouts (and, to a lesser extent, named views). A "sheet" listed in the sheet set contains a link to a layout in an existing drawing (DWG). If you are beginning a drawing from scratch, you can add a new sheet to the sheet set, at which point you can give the sheet a number and a name, enter a filename (which will be the name of the resulting DWG), and inserts the requested layout. When using the Architectural Imperial Sheet Set, a predefined title block with a border is used.
When you use the sample sheet set, several subsets are provided such as "General", "Architectural", "Structural", etc. Just like you would organize a set of working drawings for a project, the Sheet Set Manager provides a forum in which you can organize your DWG files.
Try this:
- Right-click on the sample sheet set's subset named "General", then click "Import Layout As Sheet"
- Click Browse For Drawings and navigate to AutoCAD's Sample folder. In A2006 thru A2008, select "Blocks And Tables – Imperial", then click Open.
- The name of the drawing will appear in the list, with a check box that’s checked. Click Import Checked to add the D-size Plot layout to the sheet list. Please notice this drawing is not opened, just added to the sheet set list.
- Sheets are added to the Sheet Set Manager independently of the current drawing. This simply means that you could be in a new drawing and still create an entire sheet set.
- If you have a template (DWT) with layouts that contain page setup configurations, you can add a New Sheet to the sheet list using one of the layouts from that template.
For those of you with a template containing your title blocks, try this:
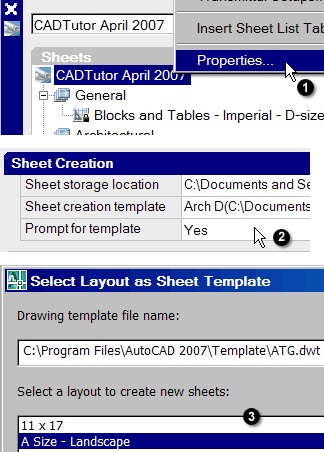 Right-click on the Sheet List name at the top of the Sheet Set Manager, then click Properties to open the Sheet Set Properties dialog box in which many of the values have been preset.
- Under the Sheet Creation area, change the Sheet Creation Template to be your .DWT file, then in the Prompt For Template field, change it to Yes. Click OK to close the Properties dialog box.
- To use one of the layouts from your template, right-click on one of the subsets in the sheet list, then click New Sheet to open the Select Layout as Sheet Template dialog box.
- Click the browse button and select your template, then select a layout from the list.
- In the New Sheet dialog box, enter a Sheet Number and Sheet Title and you see that those become the name of the resulting DWG. Click OK to add that sheet to the list.
- Double-click your new sheet to open the drawing with the specified layout tab from your template.
- You can choose a named view from any drawing to add to a sheet. When you add a view to a sheet in the sheet set, the drawing with the named view is attached as an Xref, and a viewport is created in the layout of the sheet. Because the geometry of a named view is attached as an Xref, this method of creating a sheet enables you to have more than one drawing displayed on your sheet.
- Named views are found in Reference Drawings. The path for Reference Drawings is established on the Model Views tab of the Sheet Set Manager. The Add Location node enables you to specify folders where your drawings are located.
If you have a drawing with a named view, try this:
- Just to get an idea of how this works, delete any existing viewports that are on the current layout.
- Click the Model Views tab, then right-click the Add New Location node, then click, um… Add New Location.

- Navigate to the folder where your drawings are located, then click Open.
- Expand the drawing node to display the views available, then right-click on the named view and click Place On Sheet.
- Before specifying the insertion point, right-click to display a list of plot scales, then click one. Do it again just to see how it works.
- Now specify the location of the view and a viewport will be created, the resource drawing will be Xref'd, and in A2008, a label will be added.
Hopefully that helps you understand the general idea of sheet sets. More could be written, of course, but the intent here was mostly for exposure. The AutoCAD Help feature would be a great place to turn as an additional resource.
Power Tool
Dynamic View Labels
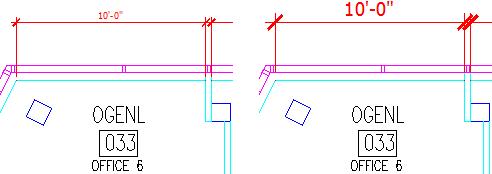
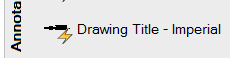 Sometimes I totally forget to show my customers this easy way in which they can add labels to viewports. The dynamic block for Drawing Title has been on the Annotation tab of the Tool Palette window since about A2006.
When you're on a layout tab, click the Drawing Title – Imperial tool, then move into the drawing and place it as necessary. The insertion point of the block is configured so you can snap to the lower left corner of the viewport frame for the drawing title to be placed just right.
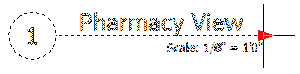
Double-click the block and make the desired changes to the Scale, the Name, and the Number. On the end of the horizontal line there is a Stretch parameter assigned so you can adjust the length of the line and retain the integrity of the attributes.
The Odd Spot
Follow-Up: Blank Tool on a Palette
Last summer [August 2006] I was quite delighted to let you know about the improved method by which to get a command button onto a palette. While training in Birmingham (Alabama, USA) this week, I reminded my students that they can actually get a blank button onto the palette with one extra step. Here are all the steps…
Instructions to Add a Blank Button to a Palette in A2007 & A2008
- Open the Tool Palette window (CTRL+3).
- Type CUI to open the Customize User Interface dialog box. Position the Tool Palette and the CUI so you can see each of them.
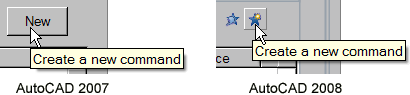
- In the lower left portion of the CUI there's a Command List area. In A2007 you will see a button labeled "New". In A2008 you have two icons (of course, why would you need words when you can have pictures?! Moving on…). Click the one with the starburst in the corner labeled "Create a New Command".
- After clicking that button, you will see the new item in the Command List, Command1.
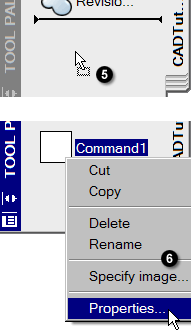
- Click on Command1 in the list, then pick and drag it onto your palette.
- To add a macro to the button, right-click on the button, select "Properties…" and then edit the Command String as necessary in the Tool Properties window. Here are a couple ideas:
^C^COSMODE;8 This routine cancels the current command, launches the Osmode variable (the semi-colon essentially presses Enter), then sets the binary value for Osnap to 8 which is Node snap only. To find the Osmode value for the osnap settings you like, set up the osnaps, then run Osmode and see what the value is. That’s what you would use in the command string on your button.
^C^CTFRAMES For those of you who have inserted raster images for your logos, in order to move them you have to have the frame of the raster image on. After moving the image, you probably would prefer to have the image frame off. The Tframes command is one of the Express tools that "toggles frames" for raster images as well as wipeout objects.
Remember, if you want to add a raster image for your button, in the Tool Properties window, right-click on the blank area under Image, then click Specify Image.
The Basics
Dimension Scale
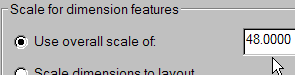 Sometimes you just need to bump the size of all the dimension elements up a little bit. Maybe your view is a little smaller than you had originally intended or you just need to punch up the dimensions for a particular plot. The solution is to simply edit the factor for the Overall Scale Factor. Veterans refer to it as the Dimscale… which is also the name of the dimension variable.
Instructions to Edit the Size of the Dimension Elements
- Open the Dimension Style dialog box, then click Modify.
- On the Fit tab, change the value of the Overall Scale as needed.
- Click OK, then click Close the Dimension Style Manager to see your changes!
If you will need to have different sizes of dimensions for various drawing applications, you may want to consider having two (or more) different dimension styles.
Left Field
Aflac - Those of you in the US may find it interesting to know that, apart from sounding like a duck, AFLAC stands for American Family Life Assurance Company
Donate to CADTutor
If you found this article useful, you might like to consider making a donation. All content on this site is provided free of charge and we hope to keep it that way. However, running a site like CADTutor does cost money and you can help to improve the service and to guarantee its future by donating a small amount. We guess that you probably wouldn't miss $5.00 but it would make all the difference to us.
Note from Michael: I want to thank all of my customers for continuing to retain my training services (some for over three decades!) and let you know your donations do not go to me personally, but to the ongoing maintenance of the CADTutor ship as a whole and to support the yeoman efforts of my friend and CADTutor captain, David Watson, to whom I am grateful for this monthly opportunity to share a few AutoCAD insights.
Share this page:


The Basics
- Dual Dimensions in a Dim…
- UCSICON Options
- "Best of" Basics: Irreg…
- Tool Palette Basics
- Original Dimension Value
- Possible Solutions to th…
- Avoid Using 'Standard' i…
- Shorten the Plot Scales…
- Update the Source File B…
- User Increment Angles fo…
- Drawing Information
- 'Sign Language'
- Rotate with the Copy Opt…
- Use the INSERT Osnap on…
- To or From the Current L…


