

 Michael’s Corner #65
May 2008
Memorable May
One of the reasons I enjoy writing this column each month is that I get to learn about features that I had always wanted to look into but never had the time. The Layer Translator has been around for several versions and is something that those of you receiving drawings from outside sources may appreciate. My customers have - once again - come up with questions that brought me to the two legacy variables as well the variable to enable AutoCAD to remember the folders from which you open drawings. And, of course, there's another tool palette button idea for you, too.
I hope these insights bump your productivity a bit today so you can have a few more minutes with your family or favorite activity.
If you would like to contact me directly, you can do that also.
Blessings to one and all,
Michael
Layer Translator
Let's say you receive several drawings from the same contractor on a particular project and they use a layer named AR-Wall but your layer standard is A_Walls. AutoCAD's Layer Translator (located on the CAD Standards toolbar or from Tools![]() CAD Standards
CAD Standards![]() Layer Translator) may be the solution.
Layer Translator) may be the solution.
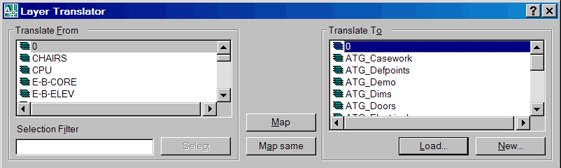
Ideally, you would have a "master" drawing or template which contains your layer list. Using Layer Translator, you can then "map" the other drawing's layers to your layers as you'll see in the following procedure.
Instructions to Map Layers of a Drawing to Your Layer Standard
- Open a drawing for which you would like to map their layer naming to yours. You may want to look at the drawing named "db_samp.dwg" in AutoCAD's ..\Sample folder.
- Open the Layer Translator dialog box where you will see the current drawing's list of layers under the Translate From listing…
- Click Load, then navigate to the drawing or template containing your company's standard layer list, then click Open and that layer list shows up under Translate To.
- Now you basically "connect the dots". Click one layer in the list on the left to Translate From, then you can click one or more layers (using Ctrl to click additional layers) under the Translate To list. After each "pairing", click Map. At that point, the Translate From layer you selected is now removed from the list. The goal of the exercise is to map all the layers from the left to the right. To map all the layers that have the same name in both lists - such as layer 0 and Defpoints - click Map Same.
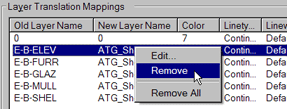
Sidebar A: If you get "happy fingers" and mistakenly grab the wrong layer from the Translate From list, you will notice after you click Map that the mapped layers are displayed in the Layer Translation Mappings list. Right-click on the layer mistakenly mapped, then click Remove to put it back in the Translate From list.
Sidebar B: If you need to add a layer on the Translate To side to accommodate a layer from the Translate From side, click the New button to open the New Layer dialog box.
- After translating all the layers, if you will be needing to use the same translation on other drawings you get from the same outside source, click Save to open the Save Layer Mappings dialog box and save a .DWS file.
- Click Translate to translate the layers.
Instructions to Use a DWS Translation File on Other Drawings
- Open the drawing from the outside source, then open the Layer Translator.
- Click Load and change the Files Of Type to Standards (*.dws), then navigate to the location where the DWS file was saved from the previous drawing.
- Select the DWS file, then click Open and the layers in the Translate From list that have been saved in the DWS file are mapped to the Layer Translation Mappings list. If additional layers remain in the Translate From list, you can map the additional layers and save the new DWS (or overwrite the existing one), or click Translate to complete the procedure.
Power Tool
Custom Button #7: Dimensions on a Button

When my interior design customers add systems furniture to a floor plan they received from an outside source, they need to put on a few dimensions to assist the installers in the accurate placement of the first panel and the other freestanding components.
You will need a drawing with a dimension style and a layer you want to put it on.
Instructions to Add a Dimension to a Tool Palette
- Set the desired dimension style and layer, then create a linear dimension.
- Open the Tool Palette window, then open the palette onto which you want to add the dimension.
- Click the dimension, then click on a highlighted element of the dimension (NOT in a grip) and drag it onto the palette.
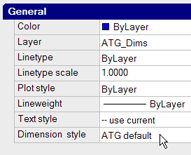
- When you click the black triangle next to the icon, you will see an assortment of dimension routines. To edit the assortment, right click on the dimension icon, then click Properties to open the Tool Properties dialog box.
Note: Under the General heading, notice that the Layer and the Dimension Style settings reflect the settings that were current when you added the dimension to the drawing.
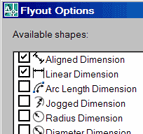
- Under the Command heading, click the Flyout Options field, then click the browse button on the right side to open the Flyout Options dialog box.
- Clear the checkboxes for those dimension features you will not me needing very frequently, then click OK to close both the dialog box for the Flyout Options and Tool Properties.
- Now you can go to any drawing that doesn't contain your dimension style or layer and when you add a dimension to the drawing from that tool palette, it will be just as you like it!
The Odd Spot
Legacy Settings
One thing that has bothered me over the last several versions is when a Node snap marker comes up when I get near an Mtext object or an Attribute! What's up with that?? The other thing that is bothersome is the new Shift+Spacebar thing to cycle through objects occupying the same location (See October 2007, Odd Spot).
Well, there's a solution to both of them. One of my top-notch customers at Iowa State reminded me of the fix for the cycle through objects thing (Thanks, Paul; I hope your brother enjoyed his new Bowling Green "baby"), and the other one I just bumped into researching another customer's problem.
LEGACYCTRLPICK Set this to <1> and the method of cycling between objects reverts to the method used for many years where you put your pick box over the item, then hold down the CTRL key and click through the objects (See December 2003, Basics).
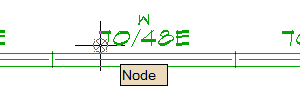
OSNAPNODELEGACY - Set this to <1> also and you effectively disable that curious Node snap feature that shows up when you're in the midst of a command requiring you to specify a point… and a Node snap pops up on the insertion point of an Mtext object or an Attribute.
The Basics
Rememberfolders
In many Windows applications, you have the ability to designate the folder in which that program ‘looks’ when opening a file. The question is, how do you make AutoCAD ‘look in’ a specific folder?
The Rememberfolders variable in AutoCAD has two settings:
<1> Whenever you Open or Save (essentially when you encounter the Select File dialog box), AutoCAD will remember the folder of the drawing you opened last. This memory will also carry over after you have closed AutoCAD.
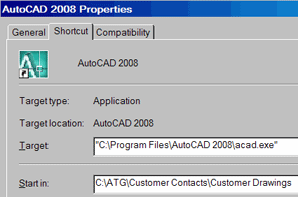
<0> Whenever you Open or Save, AutoCAD ‘looks in’ the folder specified as the "Start In" folder in the AutoCAD 2008 Properties dialog box of the AutoCAD icon you launched the program with. Use the following instructions to configure AutoCAD to consistently look in the same folder. [Note: This procedure may be subject to "Administration Privileges" on some systems.]
Instructions to Edit the "Start In" Folder for AutoCAD
- On your Windows Desktop, right-click on the icon you launch AutoCAD from, then click Properties.
- In the "Start In" field, enter the name of the folder you want AutoCAD to ‘look in’ each time you Open or Save a drawing.
- Click OK, then launch AutoCAD.
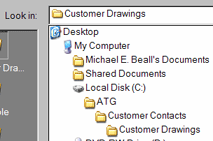
- Change the REMEMBERFOLDERS variable to <0>, then click Open and you will taken to the folder specified in Step 2.
Left Field
Big ole fishin' hole - Situated in south-east Siberia, the 3.15-million-ha Lake Baikal is the deepest (1,700 m) lake in the world and contains 20% of the world's total unfrozen freshwater reserve.
Donate to CADTutor
If you found this article useful, you might like to consider making a donation. All content on this site is provided free of charge and we hope to keep it that way. However, running a site like CADTutor does cost money and you can help to improve the service and to guarantee its future by donating a small amount. We guess that you probably wouldn't miss $5.00 but it would make all the difference to us.
Note from Michael: I want to thank all of my customers for continuing to retain my training services (some for over three decades!) and let you know your donations do not go to me personally, but to the ongoing maintenance of the CADTutor ship as a whole and to support the yeoman efforts of my friend and CADTutor captain, David Watson, to whom I am grateful for this monthly opportunity to share a few AutoCAD insights.
Share this page:


The Basics
- Dual Dimensions in a Dim…
- UCSICON Options
- "Best of" Basics: Irreg…
- Tool Palette Basics
- Original Dimension Value
- Possible Solutions to th…
- Avoid Using 'Standard' i…
- Shorten the Plot Scales…
- Update the Source File B…
- User Increment Angles fo…
- Drawing Information
- 'Sign Language'
- Rotate with the Copy Opt…
- Use the INSERT Osnap on…
- To or From the Current L…


