

 Michael’s Corner #112
April 2012
Small But Mighty
Anyone who's used AutoCAD for more than a week can tell you that you have to keep your eye on everything: Parameter grips on Dynamic Blocks, the presence of Layout tabs (or lack thereof), and the recently-included grip options in a shortcut menu.
They're all pretty small features, but the User Interface of AutoCAD is what enables us to bump our productivity up a notch. This month we'll look at each of those features, as well as the newly reinvigorated Command line. In a nutshell, this month's tools include:
…Understanding the new Command line in the newly-released AutoCAD 2013
…How to include a Rotation Parameter to make a Dynamic block
…Revealing where your Model and Layout tabs went if you happen to 'lose' them
…Using the multifunction grip on a Polyline to convert a segment to an arc
Hope you find these tools of productivity worthy of addition to your workbench!
If you would like to contact me directly, you can do that also.
Blessings to one and all,
Michael
AutoCAD 2013 Command Line Features
 As is the case every year about this time, blogs are New-Release heavy with coverage of the high-end improvements to the flagship product. But I'm more about the fundamental interface-related updates. And although it has been threatened in the past, I'm a fan of the good ole
 Command: line.
They have, however, changed the phrasing to something a wee bit more helpful, so you'll see "Type a Command" rather than the word "Command". That said, here are a few insights into what you can expect when you get your copy of AutoCAD 2013!
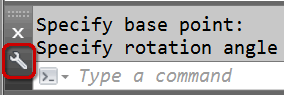
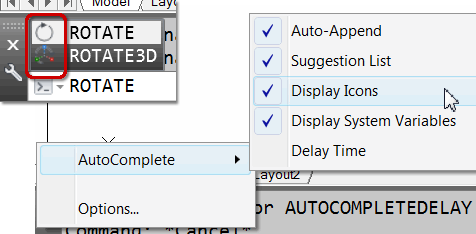
Customize Wrench (for the Command Line)
In addition to accessing Options, hang out on AutoComplete for a list of the settings for that feature.
The Display Icons setting will display the icon of the command, immediately preceding the command or variable.
You can set the Delay Time (in decimals of a second) for the AutoComplete feature, so it doesn't pop up so quickly.
Recent Commands
There's a very small little icon that looks like this, >_ and if you click it, it will list for you the last commands you launched (whatever method you may have used to launch them).
Colorful Option String
When you launch a command with options, such as Rectangle in this example, the options in the brackets are highlighted and each option letter is blue, by default.

Options Dialog Box  Display tab
On the Display tab in the Options dialog box, click the Colors button. Now click Command line to display an extensive list of 'Interface Elements'.

…and yes, any similarity to LA Lakers colors in the example is purely intentional.

Power Tool
Rotation Parameter for a Dynamic Block
 Section callouts, Elevation indicators, and other directional annotation can be much more efficient if you simply add a rotation parameter to the annotation block itself.
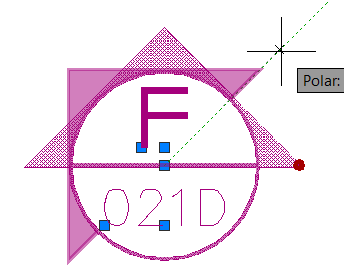
In the following example, I'm using the elevation marker shown in the figure. The circle has a separate line across the middle with attributes above and below the line. The hatched arrow is a polyline and a hatch. Feel free to create something similar, then begin the exercise where you start by creating a block.
How to Add a Rotation Parameter
After creating the desired geometry, launch the Block command, give it a name, select the objects, and specify a base point. My base point is the center of the circle. But before you click OK…
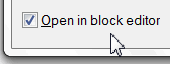 Check the box in the lower left corner to Open in Block Editor, then click OK.
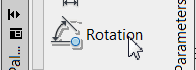 In the Block Editor, on the Parameters tab, click Rotation.
When prompted to specify the base point, specify the center of the circle.
Note: If the center of the circle was also the base point of the block, you may see the UCS icon positioned there, too.
When prompted to specify the 'radius of the parameter', turn on Ortho, move to the right, then click a point just beyond the perimeter of the block geometry.
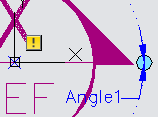 Enter 0 when prompted for the 'default rotation angle' to complete the parameter assignment. You will now see a blue rotation dot for the rotation parameter and a yellow exclamation box.
To associate an Action to the parameter, on the Action tab, click Rotate.
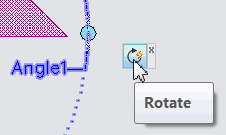
When prompted to select the parameter, click the blue text 'Angle1'. You will not need to press [Enter].
For the selection set, select those objects you want to have rotated when using the rotate parameter. In this exercise, I'm selecting the polyline with the three hatched sections. After selecting the objects to rotate, press [Enter].
After selecting the objects to associate to the rotation parameter, the yellow exclamation box goes away, verifying a successful assignment. You will also see the small Rotate parameter icon.
-
 Click Close Block Editor, then save your changes. To rotate the selected geometry, click once on the block to display the blue rotation parameter dot, then click the dot and spin it around!
The Odd Spot
Display Layout and Model Tabs
My suspicion is that everyone reading this article is familiar with Layout tabs. I'm also thinking that a serious percentage of you have had your Model and Layout tabs 'disappear'… typically, when you're in a really big hurry to plot.
When that happens, you will probably see what I call the 'Darth Vader' button on the Status bar. It's the darkest one down there and it only appears when the Model & Layout tabs have been hidden. But that was probably not a conscious decision.
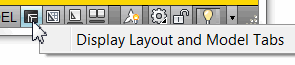 Next time those tabs go missing, right-click on the that icon, then click Display Layout and Model Tabs. (I know, you wish you knew about that last week.)
The Basics
Add an Arc to a Polyline
AutoCAD 2011 introduced the 'multi-function' grip; a concept that was applied to the standard square grip, as well as the dot-grip for hatches, and the rectangular multi-function grip located at the mid-point of polylines. Now when you hover in any type of grip, you get a shortcut menu.
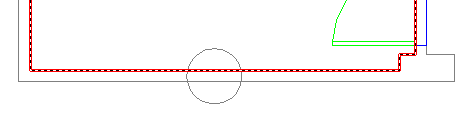
Let's say you have drawn a polyline around a room so you can calculate the area, but the polyline went straight through a circular column… and now you want to make the polyline follow the arc of the column.
How to Add an Arc to a Polyline
-
 Select the polyline to display the grips.
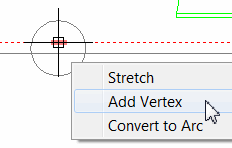
 Hover in the multi-function grip at the midpoint, then click Add Vertex.
-
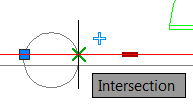 Use Intersection snap and add a vertex at one of the polyline/circle intersections. Repeat the process for the other side of the circle so you now have a vertex on both sides of the circle.
 Note: To quickly access the Intersection snap, use Shift + Right-click to open the object snap shortcut menu, then click Intersection. I typically set my Osnap to Endpoint and Node, then use this method if I need any other object snap for a single shot.
 Click the polyline again, hover in the grip in the middle of the circle, then click Convert to Arc.
-
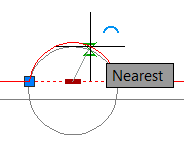 Use Shift + Right-click, then the Nearest option and click on the circle to complete the process!
The result is an arc segment within your polyline.

Left Field
Snaps on Western Shirts
So there we are, having just passed through security at the Phoenix airport, and my lovely wife of 25 years was snapping the sleeves back together for her over-shirt. She says, "Ya know why western shirts have snaps?"
I volunteered, "To make it quicker to get your dusty ole shirt off when you're at the end of the trail?" (We had been riding earlier that week)
"Nope. It's so if you have to get off your horse in a hurry and your shirttail catches on your saddle that you don't get dragged along."
…and THAT was my next guess.
Donate to CADTutor
If you found this article useful, you might like to consider making a donation. All content on this site is provided free of charge and we hope to keep it that way. However, running a site like CADTutor does cost money and you can help to improve the service and to guarantee its future by donating a small amount. We guess that you probably wouldn't miss $5.00 but it would make all the difference to us.
Note from Michael: I want to thank all of my customers for continuing to retain my training services (some for over three decades!) and let you know your donations do not go to me personally, but to the ongoing maintenance of the CADTutor ship as a whole and to support the yeoman efforts of my friend and CADTutor captain, David Watson, to whom I am grateful for this monthly opportunity to share a few AutoCAD insights.
Share this page:


The Basics
- Dual Dimensions in a Dim…
- UCSICON Options
- "Best of" Basics: Irreg…
- Tool Palette Basics
- Original Dimension Value
- Possible Solutions to th…
- Avoid Using 'Standard' i…
- Shorten the Plot Scales…
- Update the Source File B…
- User Increment Angles fo…
- Drawing Information
- 'Sign Language'
- Rotate with the Copy Opt…
- Use the INSERT Osnap on…
- To or From the Current L…


