

 Michael’s Corner #31
July 2005
New A2006 Dimensioning Features, Fields and Backgrounds
Tool palettes will rank as "Best New Feature" for years to come, but I think Fields easily take second place. I'm learning more about them myself and I'll contribute insights to this column as time and space permits. On the design side of things, I'm finding more drawings with curved walls so the new A2006 dimensioning features relating to arcs come in very handy.
The ability to add a background mask to Mtext objects showed up in A2005, but the Text Mask Express tool has been out there since dirt so I thought I'd run down some comparisons for you so you can make your choice. If you have AutoCAD 2004 or Express Tools with A2002 or previous, you only have Text Mask at your disposal. DesignCenter Part II covers that feature as it relates to blocks and specifically tool palettes.
In mid-June I received a notice from Autodesk that my AutoCAD Toolbelt seminar proposal was accepted for presentation at Autodesk University this year. There were over 1000 submissions from more than 400 individual presenters, so I am quite honored to have been selected. This year it will be held at a Walt Disney World Swan and Dolphin resort, Orlando, Florida: November 28 - December 1, 2005. For more information, go to http://www.autodeskevents.com/au2005/. My seminar (presently) is scheduled for Monday, November 28 from 1:00 - 2:30. If you are able to make it down there, please come by and say hello; I love to meet my readers!
If you would like to contact me directly, you can do that also.
Blessings to one and all,
Michael
Introduction to Fields in A2005 & A2006
Wonderful feature and very easy to implement. I could teach on fields for a couple hours but, alas, I only have this non-verbal venue so let me show you a cool application for a Field in AutoCAD 2005 and 2006.
Using the Field feature, you can now take some of the raw data laying around in AutoCAD, as well as your computer, and add it to the drawing as Mtext, an attribute, or as a simple field.
One application for a field is to access the stored file information and time/date information from your computer and create a plot stamp with the desired configuration. This is optimally done using Mtext.
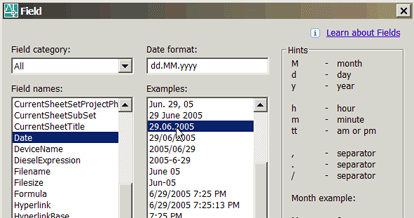
- Open the Field dialog with Insert
 Field. You could also just type FIELD.
 - In the Field Names listing, select Date, then select a format from the Examples column.
- Click OK to close the Field dialog box and you see the field text is attached to your cursor.
Note: You can change the Height or Justification at this point or after you have placed the text.
- Specify a location for the data field.
Tip: Turn off the gray background mask color for the data field on the User Preferences tab of Options. The gray background will not print, it just let's you know it's a field.
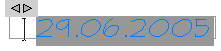
- To add the filename, double-click the date text to open the Mtext Editor, then position your cursor where the new data is to be placed and add a space.
- Right-click in the space and select Insert Field from the shortcut menu to open the Field dialog box.
- In the Field Names listing, click Filename and then check the desired options.

- Click OK to close the Field dialog box and insert the path and filename into the text field.
Tip: Since the Field value appears in the Mtext editor, you can add text as necessary. In the example, I added the "Drawing" and "Date" text in bold, then underlined the field values.
Power Tool
Arc Dimensions in AutoCAD 2006
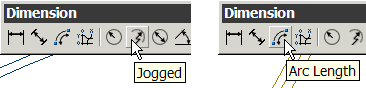
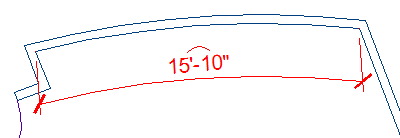
If you're doing bids on materials and you have an arc you need to dimension for the finish material/paint/plaster, etc., you need a more accurate accounting of the length of an arc than a linear dimension. AutoCAD 2006 brings two new arc-related features to the table: Arc Length and Jogged Dimension (for a long radius).
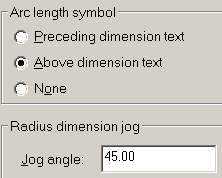
Dimension Style Settings for Arc Length and Jogged
The Symbols and Arrows tab of the A2006 Dimension Style dialog includes areas for Arc Length Symbol as well as Radius Dimension Jog. The following exercises are based upon the setting shown in the figure. If you don't have a drawing with an arc in it, just draw one and to see how it works. I'm using a drawing with Architectural units for the drawing units as well as the dimensioning units.
Instructions to Dimension the Length and Radius of an Arc
- Open the Dimension toolbar, then click the Arc Length button.
- Press <Enter>, then select the arc to dimension and place the dimension line. Note the arc length symbol displayed above the dimension text per the setting.
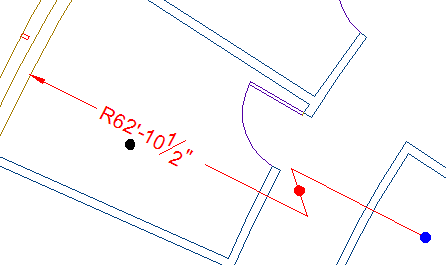
- On the Dimension toolbar, click the Jogged button and select the arc. This will create a radius dimension with a user-specified point for the placement of the center override.
- Follow the steps of the remaining prompts.
Specify center location override: [Blue dot]
Dimension text = 62'-10 9/16"
Specify dimension line location: [Black dot]
Specify jog location: [Red dot]
The Odd Spot
Background Mask: Mtext feature or Express tool
 Beginning in AutoCAD 2005, the Mtext shortcut menu has an item for Background Mask. Those of you who remember the Bonus Tools in R14 will also remember a Text Mask routine which is still around in the Express Tools of A2004 - A2006. Which is best?
First, they all do the same thing: create an opaque background for the selected Text (Express Tool only) or Mtext (Express or Mtext shortcut feature). With that understanding, let me review the simple differences between the Mtext feature of Background Mask and the Express Tool of Text Mask.
Background Mask
What it won't do
Dtext: The Background Mask routine in A2005/A2006 can only be invoked from the Mtext shortcut menu.
Separate words in Mtext: The background mask applies to the entire Mtext object. You cannot specify a word or phrase or paragraph to mask.
Instructions to Apply a Background Mask to Mtext in A2005/A2006
- Double-click on Mtext to open the Mtext editor, then right-click and select Background Mask.
- In the Background Mask dialog, check the box for Use Background Mask.
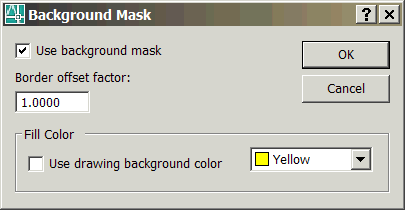
- Under Fill Color, select a color for the background mask.
Note: If you check the box for Use Drawing Background Color, the opaque rectangle behind the text will be the same color as your drawing screen, typically White or Black, depending on if you're in Model or Paper space.
- Click OK to close the dialog box, then click anywhere outside the Mtext Editor to close it and display the background mask.
Tip: To adjust the display of the fill color, you may want to change the justification of the text.
Express TextText Mask
What it will do
Dtext as well as Mtext: You can select both Mtext or Dtext objects to mask.
Multiple Mask types: The mask object is grouped with the selected text. Specify a Wipeout, Solid, or 3D Face as the masking object.
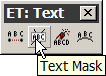
Instructions to Apply the Express Tool Text Mask to Text Objects
- Launch Text Mask from the ET: Text toolbar or by selecting ExpressTextText Mask. The default Masktype is a Wipeout. This is similar to the Use Drawing Background Color option in the Mtext Background Mask.
Current settings: Offset factor = 0.3500, Mask type = Wipeout
Select text objects to mask or [Masktype/Offset]:
- To achieve a colored background, enter M for Masktype, then S for Solid.
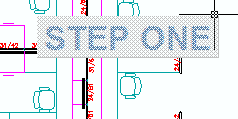
- Select a color for the Solid, then click OK.
- Now select the text objects for the text mask.
Major Tip: Since the text mask object is grouped with the selected text, it is important that you make sure the Pickstyle variable is set to 3. This enables the mask object to be moved or copied with the text.
The Basics
DesignCenter - Part II
Now that you're acquainted with what the DesignCenter is capable of, let's look at some more ways in which it can be used.
AutoCAD 2004 + DesignCenter
Although the tool palette feature was first introduced in AutoCAD 2004, the ability to drag objects (blocks, dimensions, etc.) directly onto a tool palette was not implemented until AutoCAD 2005. Therefore, in A2004 you use DesignCenter to populate an existing tool palette or create an entirely new tool palette from existing blocks or drawings.
Instructions to Add a Block to the Tool Palette in A2004 (works in A2005/A2006, too)
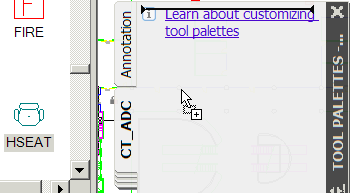
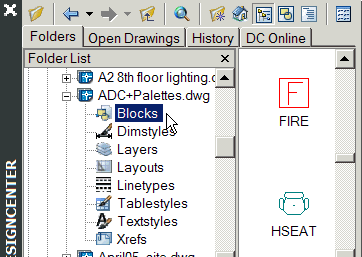
- Open DesignCenter [CTRL+2] and open the Tool Palette window [CTRL+3].
- In DesignCenter, navigate to the drawing containing the blocks you want to add to the palette.
- Click on the Blocks node under the DWG name on the left side of DesignCenter.
- In DesignCenter, drag the desired block from the right side of DesignCenter onto the palette.
Note: For more on Tool Palettes in A2004, take a look at my March 2004 column. For additional palette features that were added to AutoCAD 2005, take a look at the November 2004 article.
Palettes from DesignCenter
Regardless of your version - A2004 / A2005 / A2006 - if you have a drawing containing blocks, you can make a tool palette containing all the blocks from the drawing with a single click. Seriously. And what if you have a folder containing .DWG files you "Wblocked out" in an effort to make blocks you could insert into other drawings? Make a palette!
Instructions to Create a Palette of all the Blocks in a Drawing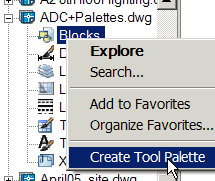
- Open DesignCenter [CTRL+2] and open the Tool Palette window [CTRL+3].
- In DesignCenter, navigate to the drawing containing the blocks.
- Right-click on the Block node, then click Create Tool Palette.
- Count backwards from 10 and you'll have a palette with the name of the drawing before you hit "0".
Instructions to Create a Palette of DWG Files in a Folder
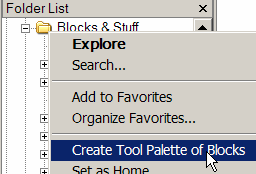
- Open DesignCenter [CTRL+2] and open the Tool Palette window [CTRL+3].
- In DesignCenter, navigate to the folder containing the drawing files. [Remember, only DWG files are displayed in DesignCenter.]
- Right-click on the folder node, then click Create Tool Palette of Blocks.
- See step 4, above.
Next issue we'll look at even more applications for DesignCenter!
Donate to CADTutor
If you found this article useful, you might like to consider making a donation. All content on this site is provided free of charge and we hope to keep it that way. However, running a site like CADTutor does cost money and you can help to improve the service and to guarantee its future by donating a small amount. We guess that you probably wouldn't miss $5.00 but it would make all the difference to us.
Note from Michael: I want to thank all of my customers for continuing to retain my training services (some for over three decades!) and let you know your donations do not go to me personally, but to the ongoing maintenance of the CADTutor ship as a whole and to support the yeoman efforts of my friend and CADTutor captain, David Watson, to whom I am grateful for this monthly opportunity to share a few AutoCAD insights.
Share this page:


The Basics
- Dual Dimensions in a Dim…
- UCSICON Options
- "Best of" Basics: Irreg…
- Tool Palette Basics
- Original Dimension Value
- Possible Solutions to th…
- Avoid Using 'Standard' i…
- Shorten the Plot Scales…
- Update the Source File B…
- User Increment Angles fo…
- Drawing Information
- 'Sign Language'
- Rotate with the Copy Opt…
- Use the INSERT Osnap on…
- To or From the Current L…


