 Michael’s Corner #60
December 2007
Five of 25… and No End In Sight
A quarter century is a long time to be in the CAD training profession, but it's been a fantastic ride and for 1/5th of that time I've totally enjoyed bringing AutoCAD insights to you from Michael's Corner. And here's what you'll find this month…
With all the Windows-compliant procedures, I just think the hyperlink is a wonderful feature to help keep track of other documents. This month there's a curve in associating a hyperlink with a block on a palette that I thought you should be aware of. The customized palette button this month is one that incorporates a few other features that I have covered in these pages having to do with the UCS, so I think you'll really appreciate the boost you get when you add it to a button or two. The Viewports dialog box brings some interesting to the table, especially when you're doing 3D-views in a layout tab. For the Basics this month I wanted to bring your attention to some "system management" issues you may be able to handle on your own having to do with the backup and autosave files.
Also, I just want you to know that I will be taking a break in January and will be back in February with a new collection of insights for 2008 (the year, not necessarily the version).
If you would like to contact me directly, you can do that also.
Blessings to one and all,
Michael
Hyperlinked Block on a Tool Palette
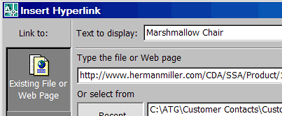
Personally, I think hyperlinks are an excellent (albeit rarely used) way to access other files that may be related to your drawing; such as a 3D drawing of a certain workstation, a cover letter, a 20-20 Worksheet (for those of you using 20-20 Technologies software), or a web page containing product information. [See my coverage of Hyperlinks in the Power Tool of November 2004; the procedure is virtually unchanged.]
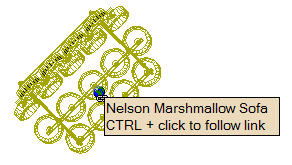
If, however, you hyperlink a block, then put the block on a palette, the link is lost. This condition came to my attention when a reader contacted me. In turn, I contacted Mark Douglas, Dynamic Block guru of gurus, and he had the answer.
Let me remind you that there are several ways to add a hyperlink to an object. One approach is to use and select the object to hyperlink, then specify the hyperlink file or website. When creating a block, you can check the Hyperlink box in the Block Definition dialog box. A third method - via the Properties window - turns out to be the solution.
With the understanding that the hyperlink added to a block while it's in the drawing environment isn't retained when the block is added to the palette, here's what you need to do to make it work.
Instructions to Effectively Hyperlink a Block for the Tool Palette
- Open the block in the Block Editor by right-clicking on it, then selecting Block Editor.
Note: Beginning in AutoCAD 2006, if you double-click a non-attributed block, the Edit Block Definition dialog box opens which initiates the Block Editor. If, however, you double-click an attributed block, the Enhanced Attribute Editor opens. Therefore, if you need to hyperlink an attributed block you will need to use the right-click method.

- In the Block Editor, select all the objects of the block, then open the Properties window.
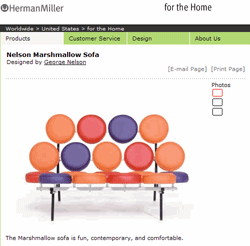
- In the Properties window, under General, click the ellipsis for Hyperlink to open the Insert Hyperlink dialog box. In this example I pasted the URL link to the George Nelson designed Herman Miller Marshmallow Sofa.
- Close the block editor, save the changes, then save the drawing. Now you can drag and drop the hyperlinked block onto your palette. At this point, when the hyperlinked block is placed in a drawing from the palette, the hyperlink is functional. Thank you, Mr. Duncan! [http://mdouglas.blogs.com/in_the_dynamic_interface]
Power Tool
Custom Button #3: Automating UCS Object & UCS World
When working on a drawing that's oriented at a non-orthogonal angle, it sure would be nice to be able to just whip that drawing around to be horizontal so you don't need ibuprofen by 10AM from kinking your head looking at the thing. Back in August 2004 I covered use of the UCS command to bring a selected line to horizontal, now let's put that on a button!
We will begin with the same process from October's coverage concerning how to add a command from an existing toolbar to a tool palette. In this case, we will be working from the UCS toolbar.
Instructions to Automate UCS Object and UCS World
- Open the UCS toolbar and open your tool palette window.
- Right-click on the title bar of the tool palette title bar (or in between icons on the palette) and click Customize Palettes to open the Customize dialog box.
- Move the Customize dialog box aside. As you will recall, it's simply the key to get in the "door" for the process of copying a button to the palette.
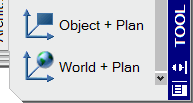
- Click and drag the UCS Object button from the UCS toolbar and drop it onto your palette. Also, drag and drop the UCS World button from the UCS toolbar onto your palette.
- You can now close the UCS toolbar and close the Customize dialog box; we got what we needed.
- On the tool palette, right-click the UCS Object button and edit the Command String field to read as follows. You will notice that spaces are replaced with semi-colons so that pressing Enter will be more obvious. While you're there, you can change the Name of the button if you want. I added the text + Plan in this example.
^C^CUCS;OB;PLAN;;
- On the tool palette, right-click the UCS World button and edit the Command String field to read as follows. You will notice that spaces are replaced with semi-colons so that pressing Enter will be more obvious. (Edit the Name as desired.)
^C^CUCS;W;PLAN;;
Note: The UCS Object routine will not work on Xrefs, but don't panic. All that's required is for a line to be drawn on the line in the Xref to be aligned. I have my students make a separate button for Xref alignment and the command string reads like this:
^C^CLINE;ENDP;\ENDP;\;UCS;OB;PLAN;;
Here's what the additional characters mean:
ENDP After launching the Line command, this kicks in the Endpoint object snap.
\ Backslash; Pause for user response (also used in last month's corner on Revision clouds).
The Odd Spot
Viewports
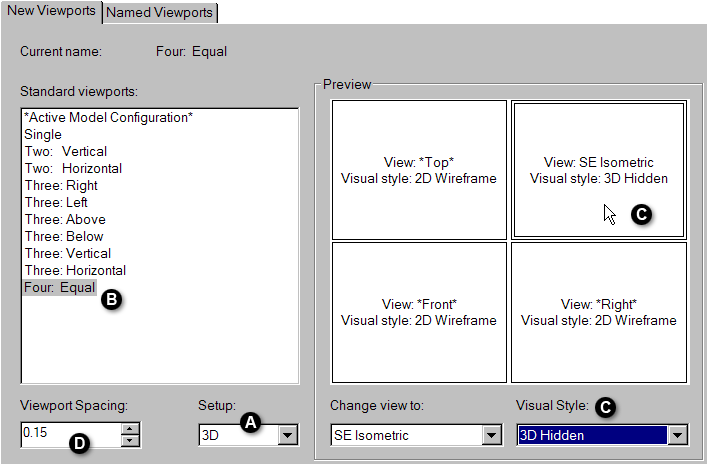
The Viewports dialog box is a relatively buried routine that assists in organizing your viewports.
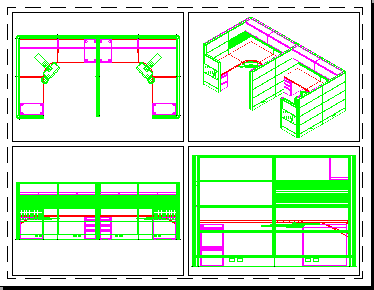
Found under , the Viewports dialog box has several features (be sure to launch the command when you are on a Layout tab). My favorite feature is the ability to create four viewports for viewing 3D objects.
Try this…
Open a 3D drawing, open a new layout tab, delete the default viewport, then run with the following tips.
- Configure the Setup to 3D.
- In the Standard Viewports list, click Four: Equal.
- Click in the desired viewport in the Preview area, then change the Visual Style.
- Adjust the viewport spacing to allow of a bit of a gap between viewports.
- Click OK, then pick two corners on the layout tab within which you want the four viewports to be created.
The Basics
Purpose Served: The .BAK, .SV$, and the .DWL
Disclaimer: The following coverage regarding the backup file, automatic save file and lock files is presented so you can be more aware of what AutoCAD does with these various file types and the purpose they serve. It is always recommended that you backup important drawings to alternative media. This is also presented in an effort to enable those of you without daily technical access or assistance a more complete understanding of these files so you can implement efficient "housecleaning" of your systems.

The BAK File: The BAK file is created from the current DWG when you Save the drawing. The BAK file defaults to the folder in which the related DWG file is saved. It is the same size as the drawing file from which it was generated.
The SV$ File: The Automatic Save file extension is SV$ (not the oft presumed AC$ which is a temporary file). You configure the time interval at which that file is saved in the Open and Save tab of Options. It is also the same size of the drawing file from which it was generated.
The DWL File: This is a lock file. I frequently refer to it as the little "traffic cop" file that is created when a drawing is opened so if someone else opens that same drawing while it's open, they receive the "Read Only" notice. This is only 1KB.
They all do their job, to be sure, but several months down the road, do you really need them? Probably not, so consider this: Crackerjack IT personnel notwithstanding, at any given time, on your system you have roughly three times the file size for every drawing out there.
Both the BAK and SV$ files are there to "save the day" if you have a system crash. Beginning with A2006, when you launch AutoCAD after having a system crash, the Drawing Recovery manager appears with the names and related files of the drawings open at the time of the crash (see November 2005 Basics).
As for the little DWL file, it will automatically go away when the drawing it was locking is closed. If there's a system crash (or any other "illegal exit" of a drawing), it sticks around since it never received the official notice the drawing is closed.
All of that is wonderful, but if you still have BAK, SV$ (and to a lesser extent, DWL files) on your computer or server that are older than, say, three months, I would seriously consider deleting them and getting that space back. In my travels I have seen customers whose systems were a bit sluggish and come to find out they have a very small purple wedge of "free space" when they looked at the properties of their C:\ drive. Just a thought.
Left Field
Why do earthworms come out when it rains? - Earthworms breathe through their skin, and when it rains the soil becomes muddy. If worms didn't get out onto the sidewalks and into the open air when it rains, they'd drown. Go figure.
Thank You for 5 Years
I would just like to take this opportunity to express my enormous gratitude to Michael for his fantastic work here over the last 5 years. Every month when his article comes in, I wonder how he manages keep up the quality - I guess he's just a quality guy.
So, on behalf of CADTutor and the thousands of people who read this article every month - THANK YOU!
David
Donate to CADTutor
If you found this article useful, you might like to consider making a donation. All content on this site is provided free of charge and we hope to keep it that way. However, running a site like CADTutor does cost money and you can help to improve the service and to guarantee its future by donating a small amount. We guess that you probably wouldn't miss $5.00 but it would make all the difference to us.
Note from Michael: I want to thank all of my customers for continuing to retain my training services (some for over three decades!) and let you know your donations do not go to me personally, but to the ongoing maintenance of the CADTutor ship as a whole and to support the yeoman efforts of my friend and CADTutor captain, David Watson, to whom I am grateful for this monthly opportunity to share a few AutoCAD insights.
The Basics
- Dual Dimensions in a Dim…
- UCSICON Options
- "Best of" Basics: Irreg…
- Tool Palette Basics
- Original Dimension Value
- Possible Solutions to th…
- Avoid Using 'Standard' i…
- Shorten the Plot Scales…
- Update the Source File B…
- User Increment Angles fo…
- Drawing Information
- 'Sign Language'
- Rotate with the Copy Opt…
- Use the INSERT Osnap on…
- To or From the Current L…


