

 Michael’s Corner #86
February 2010
Customizing for Fun & Profit
OK, so the ‘Profit’ would be the benefit of being more productive, rather than financial remuneration. Nonetheless, that's what I try to do in these articles; make you more productive so you increase (profit) in your personal time and reduce your overtime.
The main article is a bit code-heavy, but I have posted the necessary files out on my website so you won't have to start from scratch and with a minimal amount of effort can begin using the attributed, automatically incrementing block.
Other insights you will learn about this month include:
…Automating your favorite Workspace using a switch when you launch AutoCAD from the icon
…How to change the width of Mtext that was transferred to Paper space using CHSPACE
…The importance of the Support File Search Path
By the way, the compilation of over 300 tips from Michael's Corner is coming along nicely and I'm still hoping for a June 2010 publish date. All subscribers will get an email when the book becomes available. If you have yet to subscribe, just click the link over on the left panel.
If you would like to contact me directly, you can do that also.
Blessings to one and all,
Michael
Customize AutoCAD LT Using DIESEL (and AutoCAD, too!)
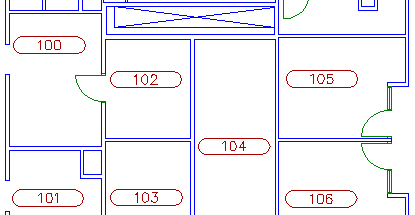
Several of my customers have requested an attributed block that would sequentially increase each time it is placed in the drawing. Well, at Autodesk University I learned of how to do this - even in LT! - and Kate Morrical had the answer.
Kate was one of my lab assistants and also happens to be Autodesk's Technical Marketing Manager for AutoCAD LT. She is a very sharp young lady and it was a delight to meet her and attend her session at AU this year. Her blog, LT Unlimited, is a great resource for not only LT users, but AutoCAD as well.
Briefly, DIESEL is the only programming language that AutoCAD LT will recognize. It's very clunky, but it can so some pretty cool stuff. For those of you who absolutely have to know what it stands for: Direct Interpretively Evaluated String Expression Language. If you found that enlightening, you may also like this DIESEL site I found which has some easily understood explanations.
Shortcut
On the "AutoCAD Stuff" link on my website, I have posted (2) DWG files and the .XPT (Exported Tool Palette) that are the ‘ingredients’ for the following procedure.
To See How It Works:
From the "AutoCAD Stuff" link, copy the two .DWG files and the .XTP to your system. I would strongly suggest you copy these files to your AutoCAD ..\Support folder.
Open CT_2010-AttDIESEL.DWG.
Open the Tool Palette window (Ctrl + 3).
Right-click on the title bar of the Tool Palette, then click Customize Palettes.
On the left side, right-click anywhere in the list, then click Import.
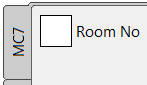 Navigate to the folder where you saved the files (hopefully the ..\Support folder, per Step 1), then click on MC_2010.XTP and Open it. The MC7 tab will become current on your palette.
Set the ATTREQ value to <1>.
Set the USERI1 to the number you want to start with, ex: 101.
Click the Room No. button on the imported MC7 tool palette, then click where you want the numbers!
Important: Please note, until you configure your Support File Search Path (covered in this month's Basics and in the next instruction set) you do not want click that button without the sample drawing open. The Room No macro calls for the "Label" block and if it's not in the drawing, AutoCAD gets stuck in a loop [… and I haven't learned how to trap for that yet.]
How To Use This In Any Drawing:
Open the LABEL.DWG, then make the desired changes to the Layer and Text Style.
Save the LABEL.DWG to the folder of your choice.
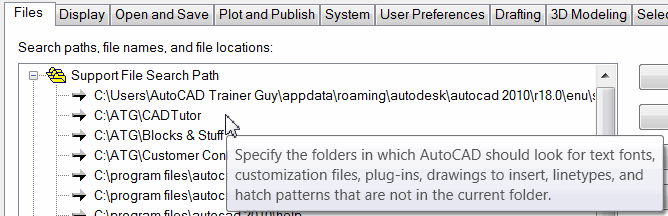
Open Options, then click the Files tab.
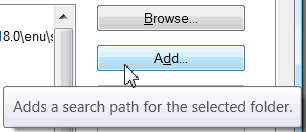 Expand the Support File Search Path node. If the location you saved the drawing to in Step 2 is not in the list, click the Add button, then Browse. (This is also covered in the Basics section below.)
Navigate to the folder specified in Step 2, above, then click on that folder and click OK. The path will now appear in the Support File Search Path list.
Click OK to save your changes and close the Options dialog box.
Congratulations! At this point, you have configured AutoCAD so that - after setting the USERI1 variable value - you can click the Room No. button on the palette and have it work in any drawing.
Geek Notes
The code found in the Command String of the Room No. button on the palette is…
*^C^C-insert;label;\;;;$M=$(getvar,USERI1);USERI1;$M=$(+,$(getvar,USERI1),1)
…which is why I gave you the sample files.
Launching the procedure must take place from a button on a tool palette, a menu, a toolbar, etc. It won't work by entering all the gibberish/code at the Command line (… reason No. 2 why I provided the sample files).
The block for the incremental numbering can only have one attribute - specifically USERI1 - which is the ‘hook’ to the numeral being updated, i.e., 101,102,103, etc. This can only be a single-attribute block, you can't have other attributes in the block such as "Room Name" or something.
To use this procedure in any drawing, any time, the block being inserted must be a .DWG saved in a folder that is on the "Support File Search Path" under Options
 Files tab.
The ATTREQ variable must be set to <1 > so the routine has a prompt to respond to.
The variable USERI1 must be set with the desired starting number (just type USERI1 at the command line) before launching the automated procedure.
Power Tool
Setting a Workspace Switch when Launching AutoCAD
I have two major bandwagons these days - Tool Palettes and Workspaces. In a recent training in Albany, NY (shout out to my friends at Accent Commercial Furniture!), one of their questions lead me to check out to see if you could configure the launching of AutoCAD to launch with a specified Workspace. Sure enough!
Set a Switch to Launch with a Workspace
On your Desktop, right-click on your AutoCAD icon (A2008 and beyond will work), then click Properties.
In the Target field, place your cursor after "…\acad.exe"
Add a space, then /W which is the switch that enables you to specify the name of a Workspace.
In quotes, enter the name of the workspace you want to launch AutoCAD with.

Why Bother?
It's like having someone automatically clean up your… kitchen.
After you've cooked a fabulous dinner, at the end of the meal, it sure would be nice to have someone clean up the kitchen. Similarly, at the end of your day, there's a good chance you have moved things around a bit or left Tool Palettes open, DesignCenter down in the corner or moved the command line to another location. With the Workspace switch enabled, you launch AutoCAD and your work environment is right back where you like it!
The Odd Spot
Mtext Width After Change Space
 The CHSPACE command (see Michael's Corner, August 2006) is a wonderful tool to transfer objects from one space to another. I found it curious, however, that after changing an Mtext object from Model space to Paper space, that the width was unwieldy; double-click on the text to edit it and you can't see the other end of the Editor. I couldn't Pan over far enough to see it, either.
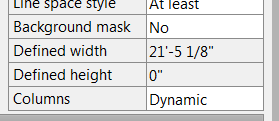
What made it more curious, was that the Defined Width value in the Properties window for that Mtext was not editable; it was grayed out.
Changing the Width of Mtext after Change Space
 Click on the Mtext object. If you can see the Mtext grips at both ends, read no further. If, however, you can't see the other end, read on.
Zoom out as far as you can, then regenerate the drawing with the REGEN command. (The REGEN causes AutoCAD to create a new "Display List".) Click on the Mtext to see if both grips are now visible.
Repeat Step 2 as necessary until you can see the grips at both ends of the Mtext when you select it. You should also be able to double-click the Mtext and see the other end of the Editor.
Change the width as desired using either grips or from within the Editor with the Ruler.
The Basics
The Importance of the Support File Search Path
Chances are, we all have at least a number or two programmed into our cell phone. Hit the key - or speak the name in some cases - and the number is dialed.
But that only happens because you programmed it in.
Similarly, if you want AutoCAD to retrieve images or files - such as what we did in this month's lead article - or run third-party programs such as CAP Designer from 2020 Technologies, you have to let AutoCAD know where you want it to ‘look’.
Specify a Support File Search Path
The easiest way to open the Options dialog box is by right-clicking in the Command line, then click Options.
Click the Files tab, then click the (+) sign beside the Support File Search Path node.
 To add the path to your file or program, click the Add button and you will see an empty box at the bottom of the Search Path list.
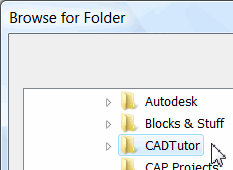 Rather than typing in the path, click the Browse button to open the Browse for Folder dialog box.
Navigate to the location of where the program is installed or the file has been saved, click on the folder, then click OK to add that path to the list.
Note: You are only specifying where the file or program ‘lives’, not selecting it.
Click OK to save your edits and close the Options dialog box.
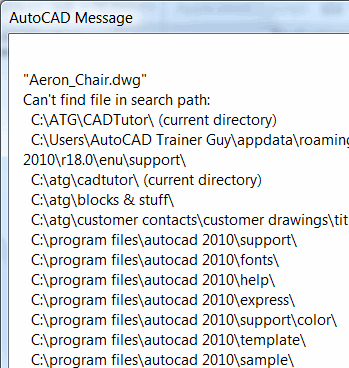
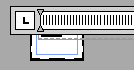
Now, the next time you get the dialog box shown on the left, you will know what AutoCAD is trying to do.
But more importantly, you'll know how to fix it.
Left Field
Chocolate is Good For You! OK, if you want to get technical, it's the cacao, the stuff that chocolate is made from, that is quite good for you; it is a powerful antioxidant. But chocolate is made from cacao plus other things, like sugar. The key to finding healthy chocolate is to select products with a high cacao content and quality, preferably organic ingredients. Dr. Andrew Weil "recommend[s] a piece of good-quality dark chocolate as a snack".
From: www.facts-about-chocolate.com
So Happy Valentine's Day!
Donate to CADTutor
If you found this article useful, you might like to consider making a donation. All content on this site is provided free of charge and we hope to keep it that way. However, running a site like CADTutor does cost money and you can help to improve the service and to guarantee its future by donating a small amount. We guess that you probably wouldn't miss $5.00 but it would make all the difference to us.
Note from Michael: I want to thank all of my customers for continuing to retain my training services (some for over three decades!) and let you know your donations do not go to me personally, but to the ongoing maintenance of the CADTutor ship as a whole and to support the yeoman efforts of my friend and CADTutor captain, David Watson, to whom I am grateful for this monthly opportunity to share a few AutoCAD insights.
Share this page:


The Basics
- Dual Dimensions in a Dim…
- UCSICON Options
- "Best of" Basics: Irreg…
- Tool Palette Basics
- Original Dimension Value
- Possible Solutions to th…
- Avoid Using 'Standard' i…
- Shorten the Plot Scales…
- Update the Source File B…
- User Increment Angles fo…
- Drawing Information
- 'Sign Language'
- Rotate with the Copy Opt…
- Use the INSERT Osnap on…
- To or From the Current L…


