More AutoCAD 2008 Insights
The more I work with AutoCAD 2008, the more I find to be excited about. This month I cover the Layer Override by Viewport feature which, for my customers, I think is the most immediately useable new component of the product. Then this week I was training in Los Angeles, and we were reviewing the Express feature of Layer Isolate… and discovered that Layer Isolate now comes with a Settings option that incorporates the new A2008 Lock and Fade feature. Whoa! Cool!
In the Basics I figured I may as well keep going with the general A2008 theme, so I offered up an introduction to the Dashboard palette. The Odd Spot is the odd man out; that's the only topic this month that doesn't have a specific A2008 element to it. I just found it interesting that Ortho tends to creep into areas that you wouldn't expect, so I wanted to share those with you… and how to temporarily disable (or Enable) Ortho as needed.
If you feel so inclined, email me and let me know how you're using the things you learn in these articles. It's always great to hear of practical applications.
If you would like to contact me directly, you can do that also.
Blessings to one and all,
Michael
AutoCAD 2008 Layer Stunner
Although the improvements to annotation will long be recognized as the grandest leap in AutoCAD 2008 (see June 2007), I think the very simple (albeit much needed) improvements to the A2008 layering machine are the most stunning.

The most obvious new feature is the ability to specify layer property overrides… by viewport.
Instructions to Specify Viewport-Specific Color Overrides
- Set a viewport to be current, then open the Layer Properties Manager and you will see several columns that are Viewport-specific.
- Select all the layers (right-click, then click ).
- In the VP Color column, click a color swatch, then click the color you want for all the layers in that viewport. Click OK to close the Select Color dialog box.
- In the layer list, select the layer(s) you want to emphasize in that viewport. In this example, I'll emphasize the seating.

- In the VP Color column for the layers you selected in Step 4, click the color swatch and select a color to emphasize the objects on that layer, then click OK to assign that color to the selected layers.
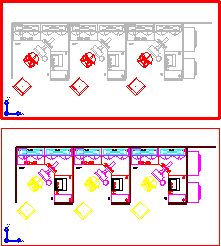
- Click OK to close the Layer Properties Manager and in the current viewport, you will see the color assignments you made for those layers!
Q: If you decide against the assignment of an override in a viewport, how do you turn it off?
A: Select the layers for which you want to turn off the override, then right-click and click (or In All Viewports).
Key Features in the A2008 Layer Properties Manager
 The STATUS Column - The Status column has a new icon to indicate a layer that has an override assignment. A bluish icon indicates a layer containing objects; if the icon is gray, there are no objects on that layer.
Customize Layer Columns - Right-click on a column head to display the list of headers currently displayed in the Layer Property Manager. Toggle On/Off the ones you don't want to see. Click to open the Customize Layer Columns dialog box where you can turn On/Off layers, as well as move them up or down in the list.
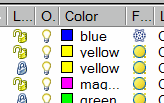
Tip: You can now drag column heads to another location… but being creatures of habit, I bet that doesn't last long. (In that case, they've provided us with the option on the shortcut menu to "Restore All Columns To Defaults".)
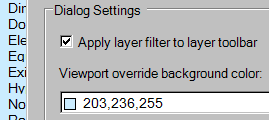
Layer Settings Dialog Box - At the bottom of the Layer Properties Manager is a button for Setting that opens the Layer Settings dialog box. In addition to the notification settings, you will find the feature that enables you to change the color used when indicating a layer with a viewport override.
Final Note on the A2008 Layer Features - The button to access the Layer States Manager is now on the Layers toolbar!

Power Tool
A2008 Layer Isolate Settings
 The Layer Isolate feature has been around since at least the Bonus collection back in R14. In AutoCAD 2008 they kick it up a notch by adding a Settings feature whereby you can opt to either turn Off the layers you don't select to isolate, or Lock them… which kicks in the new A2008 Fade control feature.
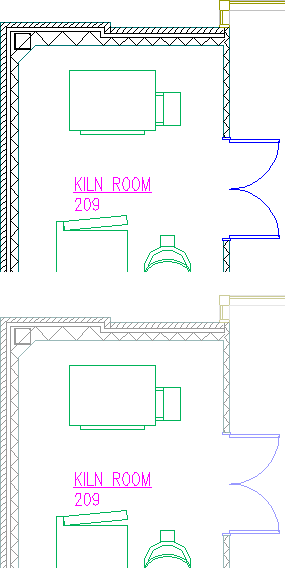 Here's the new prompt sequence with a running commentary…
Command: LAYISO
Current setting: Hide layers, Viewports=Off
In the past, any layer not selected to isolate was, by default, turned Off.
Select objects on the layer(s) to be isolated or [Settings]: S
Enter S to launch Settings.
Enter setting for layers not isolated [Off/Lock and fade] <Off>: L
You now have the option of Lock and fade; enter L for that option.
Enter fade value (0-90) <60>: [Enter]
The default of the fade percentage is 60% which should be just fine.
 In the figures, the furniture and text were selected to isolate, resulting in the building features to be faded. A lock icon indicates the locked layer when the cursor rolls across a locked layer.
The Odd Spot
Ortho Intrusions
 Ortho & Grips: In my training sessions for interior designers, my customers typically understand that in the battle between an object snap and Ortho, the object snap will win. What I discovered recently was that if you are connecting a grip to a grip, Ortho will win.
 Ortho & Fields: When adding a field to a drawing, for some reason, Ortho kicks in and keeps the field tracking along the bottom of the drawing.
 Ortho & Dynamic Block Editor: When you are in the Block Editor and it comes time to place the "lightning bolt" icon for the Action, if Ortho is On, the lightning bolt icon moves erratically.
Solution: In all of these instances, remember that you can hold down the Shift key to temporarily override Ortho if it is On… AND… if Ortho is Off, hold down the Shift key to temporarily turn it On!
The Basics
The A2008 Dashboard
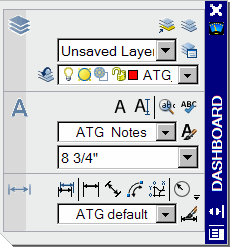 The Dashboard [Tools
![]() Palettes
Palettes![]() Dashboard] was introduced in AutoCAD 2007 with the advent of the new and improved 3D components. AutoCAD 2008 embellishes upon the theme to make it more flexible and even palette-like in its abilities.
Dashboard] was introduced in AutoCAD 2007 with the advent of the new and improved 3D components. AutoCAD 2008 embellishes upon the theme to make it more flexible and even palette-like in its abilities.
Key Features of the AutoCAD 2008 Dashboard
Add Control Panels - In AutoCAD 2008, the Dashboard starts off empty. Right-click on the title bar (put your cursor on the blue Dashboard icon and try the right-click) and under the Control Panels item you will find 16 panels that can be added to the Dashboard. In the figure, I have the Layers, Text, and Dimension panels displayed.
Note: To remove a panel from the dashboard, right-click in the area of the panel to be removed and click Hide.
Workspaces & the Dashboard - Contrary to how palettes work, the Dashboard is linked to the current Workspace [December 2005]. This means that if you change your Workspace, the Dashboard contents will probably change. Therefore, as you are building your Dashboard panel collection… and certainly before you close AutoCAD after working on the Dashboard… be sure to create and save a Workspace to insure that your panel content returns.
The Dashboard is a nice, compact feature that provides (yet another) method of command access. Next month I'll take a look at creating a custom panel for the Dashboard.
Left Field
The Middle of the Bible - In case you were wondering, Psalm 118 is the middle chapter of the entire Bible. The shortest chapter of the Bible is Psalm 117 which has only 2 verses. The longest chapter in the Bible is 119 with 176 verses. The Bible has 594 chapters before Psalm 118 and 594 chapters after Psalm 118.
Donate to CADTutor
If you found this article useful, you might like to consider making a donation. All content on this site is provided free of charge and we hope to keep it that way. However, running a site like CADTutor does cost money and you can help to improve the service and to guarantee its future by donating a small amount. We guess that you probably wouldn't miss $5.00 but it would make all the difference to us.
Note from Michael: I want to thank all of my customers for continuing to retain my training services (some for over three decades!) and let you know your donations do not go to me personally, but to the ongoing maintenance of the CADTutor ship as a whole and to support the yeoman efforts of my friend and CADTutor captain, David Watson, to whom I am grateful for this monthly opportunity to share a few AutoCAD insights.
The Basics
- Dual Dimensions in a Dim…
- UCSICON Options
- "Best of" Basics: Irreg…
- Tool Palette Basics
- Original Dimension Value
- Possible Solutions to th…
- Avoid Using 'Standard' i…
- Shorten the Plot Scales…
- Update the Source File B…
- User Increment Angles fo…
- Drawing Information
- 'Sign Language'
- Rotate with the Copy Opt…
- Use the INSERT Osnap on…
- To or From the Current L…


