

 Michael’s Corner #78
June 2009
NeoCon No.7!
This year marks the seventh year running that I have presented my AutoCAD Toolbelt seminar at the NeoCon World's Trade Fair (www.neocon.com)… and I have enjoyed it every year. To that end, the tips this month either come directly from one of my contract furniture customers, or relate directly to their daily AutoCAD involvement.
In May this year, I held an ‘open to the public’ AutoCAD Toolbelt Productivity seminar in Phoenix [if you would like me to come to your area, please let me know and I'll set one up]. As I expected, Tara (a longstanding customer now at WORKspaces), was interested in customizing the right-click shortcut menu. That solution is in the lead article. Then Dennis (one of three who attended from ethos), pointed out how to bump the number of drawing files listed in the A2009/A2010 Menu Browser. You'll find that in the Odd Spot.
The Power Tool is something I discovered in the A2009 CUI as I was setting up the lead article. And the Basics covers something brand new in AutoCAD 2010: the ability to rotate a viewport and either take the view with it or retain the view orientation; very cool.
Also, in case you missed it, Autodesk had me in the hot seat for their "Ask the Expert" series for 5 days in the middle of May. Gracious, that was a real exercise in humility! Of the 22 questions I was peppered with, I had to look up half of 'em. If you're interested, you'll find the entire series of Expert questions and answers at the "Ask the Expert" archives (http://autocad.autodesk.com/?nd=ask_the_expert_past).
Have a healthy and safe summer!
If you would like to contact me directly, you can do that also.
Blessings to one and all,
Michael
Edit the Shortcut Menu
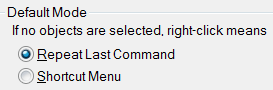
Those of us from the old school like to right-click to repeat the previous command when there is no command current. To that end, you folks are the target audience for this exercise. For reference, on the User Preferences tab in Options, you will find the Right-Click Customization button where you can set the Default Mode as shown.
The reason this is important to clarify, is because those of us using right-click to repeat the last command will find it easier to customize our object snap cursor menu (Shift + right-click) in the Main CUI rather than Partial which is where I typically encourage you to do your customizations.
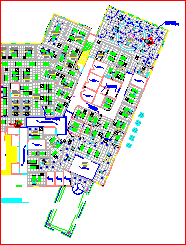
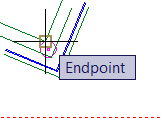
In the following exercise, we create a new item for the Object Snap Cursor menu that runs the Endpoint snap twice. This is something you may use when querying a Distance between two points, such as between the panels of a workstation and the lateral files, another panel run, or a wall.
Instructions to Customize the Object Snap Cursor Menu
Open the CUI, then expand the Shortcut Menus node.
Expand the Object Snap Cursor Menu node.
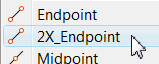
Right-click on the Endpoint item, then click Duplicate (essentially a Copy & Paste in one routine).
-
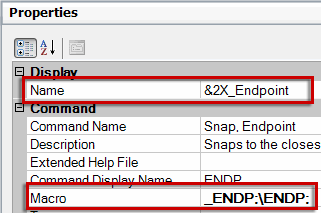 Click on one of the Endpoint items, then modify the Properties for the Name and the Macro as follows:
Name: &2X_Endpoint
Macro: _ENDP;\ENDP;Legend: (many of you know this from previous articles)
; Press Enter
\ Pause for user responseThe name must have the ampersand preceding whatever you want have displayed when the cursor menu is called up. Whatever you call it is up to you. In the macro, I am partial to using a semi-colon to indicate [Enter] rather than a space. The backslash pauses the macro so you can pick the point using the incurred endpoint snap. Neither the Name or the Macro are case-sensitive.
-
 Click OK to apply, save, and close the CUI, then try out your customized Object Snap cursor menu with Shift + right-click!
Power Tool
Edit the Rollover Tip Info
If you have A2009, you have probably encountered the vast array of tool tips, one of them being the Rollover ToolTips… and you promptly turned them off (Options![]() Display tab).
Display tab).
Let me encourage you to perhaps leave them on if you work on drawings from other sources. In this exercise, you will learn how to modify the information displayed.
Instructions to Edit the Information Shown in the Rollover Tooltip
Type CUI to open the Customize User Interface dialog box.
Expand the Partial CUI Files node (A2009) or Partial Customization Files (A2010), then expand CUSTOM then click Rollover Tooltips.
-
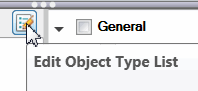 On the right side, click the Edit Object Type List button to open the list of AutoCAD object types.
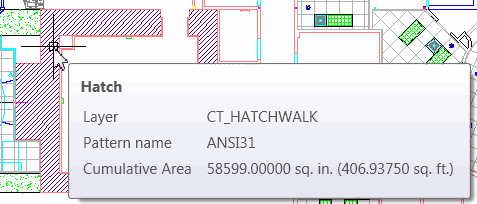
 In the object type listing, check the box for Hatch and the information on the right side of the CUI will now display additional, hatch-specific properties. You will also see the object type "Hatch" listed with an exclamation point beside it indicating no properties have been selected.
Under the General list of properties, I'm going to check Layer; under Pattern, Pattern Name; and under Geometry, Cumulative Area. You will now see that the Hatch item no longer has the exclamation point.
Click OK to apply, save, and close the CUI. Now when you ‘rollover’ an object in the drawing (albeit very slowly and with a pause), you will see the customized information for that object type!
The Odd Spot
A2009/A2010 Menu Browser Files
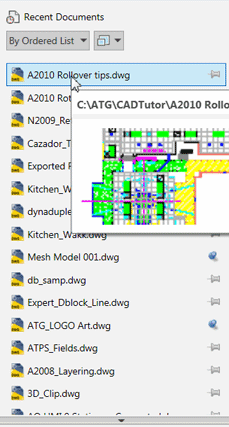
Beginning in A2009 (the first version with the big red "A" Menu Browser), you have the ability to specify the number of drawing files listed when you click said big red "A".
You will find this setting on the Open and Save tab of the Options dialog box.
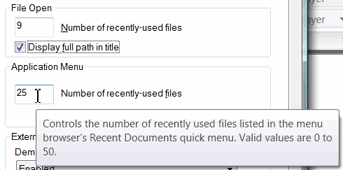
Note: The number of drawing files to list when using the File pulldown menu is still only 9.
For coverage on how to change the size of the Preview image, take a look at Michael's Corner, December 2008, Basics.
The Basics
Rotating a Viewport in A2010
Joining the bandwagon of reviews on cool AutoCAD 2010 features, I wanted to take you through the updated ability to rotate viewports.
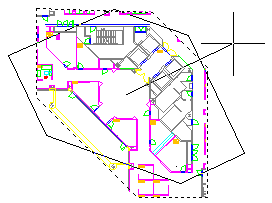
Humble confession. I didn't realize this, but you have been able to rotate viewports in previous versions, as you see in this image where I'm using A2008. The trick is, you can only rotate the viewports you Convert or Clip from existing objects! The problem, however, was that the objects IN the viewports didn't rotate. [To see how to make irregular viewports, take a look at Michael's Corner September 2003 - "Irregular Shaped Viewports".]
Instructions to Rotate a Viewport in A2010
Open a drawing, then begin a New layout tab and create a viewport to view the Model space objects.
Launch the Rotate command, then select the viewport to be rotated and press Enter.
At this point, you can rotate the viewport as necessary. At the completion of the Rotate command, the objects in the viewport are rotated as well as the viewport. The next few steps take you through how to make an object in the viewport horizontal by using the Reference option of the Rotate command. [Michael's Corner, April 2003, "Scale & Rotate"]
-
 Continuing with the Rotate command, when prompted to specify a Base point, you can specify a point on an object in the viewport if you want.
 At the prompt for Rotation angle, enter R for the Reference option.
-
 You are now given the opportunity to (accurately) pick two points that define the angle you want to be orthogonal to the layout.
Note: The Base point and the first point specified for the Reference angle can be the same point. The Base point is simply the pivot point, of course. You can use any two points to define the reference angle after that.
-
 When prompted for the new angle, enter the desired value. In this exercise, I entered 90 so the two points I specified for the Reference angle would be vertical in the viewport.
Note: To orient the UCS to the current view, use the View option of the UCS command, View from the UCS toolbar, or View from the Coordinate panel of the View tab on the Ribbon.
Relevant variable
VPROTATEASSOC
<1> View will rotate if the viewport is rotated
<0> View will not rotate if the viewport is rotated
Left Field
Vacation Preparation: For those of you vacationing in warmer climes, keep in mind that sharks can be placed in a tonic immobility state by turning them upside down. The shark remains in this state of paralysis for an average of 15 minutes before it recovers. (It's not so much the process of getting 'em upside down that I'd worry about, it would be how much of that "average" 15 minute window I had before they flipped back over.)
Donate to CADTutor
If you found this article useful, you might like to consider making a donation. All content on this site is provided free of charge and we hope to keep it that way. However, running a site like CADTutor does cost money and you can help to improve the service and to guarantee its future by donating a small amount. We guess that you probably wouldn't miss $5.00 but it would make all the difference to us.
Note from Michael: I want to thank all of my customers for continuing to retain my training services (some for over three decades!) and let you know your donations do not go to me personally, but to the ongoing maintenance of the CADTutor ship as a whole and to support the yeoman efforts of my friend and CADTutor captain, David Watson, to whom I am grateful for this monthly opportunity to share a few AutoCAD insights.
Share this page:


The Basics
- Dual Dimensions in a Dim…
- UCSICON Options
- "Best of" Basics: Irreg…
- Tool Palette Basics
- Original Dimension Value
- Possible Solutions to th…
- Avoid Using 'Standard' i…
- Shorten the Plot Scales…
- Update the Source File B…
- User Increment Angles fo…
- Drawing Information
- 'Sign Language'
- Rotate with the Copy Opt…
- Use the INSERT Osnap on…
- To or From the Current L…


