Creating an Image Rollover
Introduction
 The image rollover is a very common effect seen on many web pages. Despite this, it can still be used to great effect and is particularly useful for navigation buttons. Basically, a rollover is the effect you see when one image replaces another as your mouse moves over it. You can see the effect by moving your mouse over the image on the right. The initial image says "ONE" and when your mouse moves over this image, it is replaced with a second image that says "TWO".
Unfortunately, this effect cannot be created using HTML. Most image rollovers that you see on the web are created using Java Script. Java Script is a scripting language that enables you to write small programs or "scripts". Java script code can be embedded within HTML so that an effect like a rollover can appear quite seamless.
Fortunately, FrontPage can create rollovers for you and will generate all the necessary Java Script. This tutorial will show you how this is done. However, if you want complete control over your rollovers or if you want to experiment with other rollover effects, you will need to learn a little bit of Java Script. If this is the case, I recommend, Java Script for the World Wide Web by Tom Negrino and Dori Smith, ISBN 0-201-35463-2.
Terminology
In principle, creating an image rollover is a simple, 3-step process. FrontPage uses some straightforward terminology that you need to become familiar with. First of all, FrontPage refers to effects like image rollovers as being DHTML Effects. The "D" in DHTML stands for "Dynamic". Secondly, the 3-step process involves specifying an Event, an Effect and a Setting. An Event is something that happens such as your mouse moving over an image. This is known as a "Mouse over" event. An "Effect" is some reaction to an event. The possible range of effects will vary depending upon the event and object type. We will be using the "Swap Picture" effect to create the rollover. Finally, a "Setting" is used to control the effect. In our case the setting is the name of the image file that swaps with the original image but generally they will vary depending upon the effect.
Finally, it's worth mentioning here that although the meaning of the term "rollover" is generally accepted to include the swapping of images, FrontPage does not use the term in this context. FrontPage's "rollover effects" are used to apply formatting changes to text objects when a mouse passes over them. They cannot be used with images. As with many things in life, it's the terminology that's confusing and not the concepts. I will use the term here in it's more general sense.
Preparing your Rollover Images
Before you can set-up a rollover, you must create or acquire 2 images. The images can be two JPEGs, two GIFs or a JPEG and a GIF. The important thing is that they are exactly the same size. By that I mean that their pixel dimensions must be identical. The two images used for the example rollover at the top of this page are both 150 pixels wide and 150 pixels high. As with all images prepared for use on a web page, try to keep the image file sizes as small as possible. Save the image files in the "images" folder of your web.
Inserting the Image
 Open the page where you want to create the rollover or create a new page. Next, insert the first image in the usual way. Either use the Insert Picture button
 ![]() from the Standard toolbar or drag-and-drop the image file from the Folder List. If you cannot see the folder list, click the Folder List button
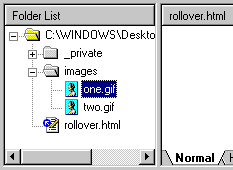
from the Standard toolbar or drag-and-drop the image file from the Folder List. If you cannot see the folder list, click the Folder List button ![]() to reveal it. In both cases, make sure that you are in Normal view. In the example on the right, the image file, one.gif is dragged from the File List and dropped in the rollover.html window.
to reveal it. In both cases, make sure that you are in Normal view. In the example on the right, the image file, one.gif is dragged from the File List and dropped in the rollover.html window.
Adding a Text Alternative
You may have noticed that sometimes when you place your mouse pointer over an image on a web page, a little flag appears containing some text. It looks rather like a tool-tip and it usually says something about the image. For example, if you place your mouse pointer over the image above, you will see a flag that says "Drag-and-Drop an Image". This can be very useful for giving the viewer more information or for containing hidden messages.
These text messages are known as alternatives because the browser will show the text as an alternative to the image if the image cannot be found or if the viewer is browsing with images turned off. Generally, it is good practice to add text alternatives to your images.
To add a text alternative to an image, follow the steps below:
- Click on the image in Normal view to highlight it.
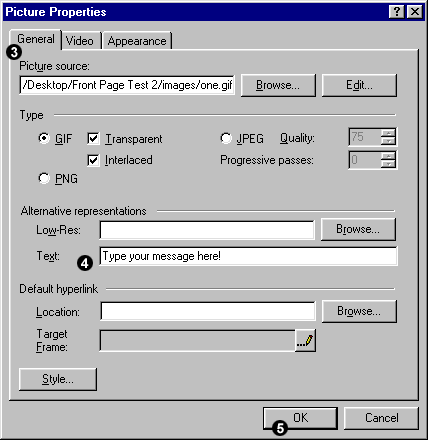
- Right-click on the image and select from the menu. You may also use from the pull-down menu or the keyboard shortcut Alt+Enter. Whichever method you choose, you will be presented with the Picture Properties dialogue box.
- Click the General tab on the dialogue box if it is not already selected.
- Type the message that you want associated with the image in the Text box under Alternative representations.

- Click the OK button to complete the process.
- Once you have added a text alternative you should test it to make sure it works. Click on the Preview tab and move your mouse pointer over the image. Keep the pointer still for a few seconds. Your message should appear at the cursor position.
- Click the Normal tab to move back to Normal view.
The process of adding text alternatives to images using the Picture Properties dialogue box is relatively simple. However, you may be surprised to know that it is even easier using HTML (no, really!). If you would like to know how this is done, click the information button ![]() for details.
for details.
Adding a Hyperlink
Once you have inserted the first image file, make any positional settings you may need. You must now decide whether you want to use the image rollover as a hyperlink. In most instances, when you meet a rollover on a web page, it is used as a hyperlink and people have become familiar with this. Although FrontPage is quite happy to let you create a rollover that does not operate as a hyperlink, this could be confusing for the viewer and I would advise against it unless you have a specific reason for doing so.
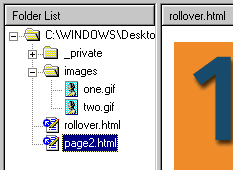
To add a hyperlink to the image, right-click the image and choose from the menu. Select the file you want to link to from the Create Hyperlink dialogue box and then click the OK button. You can also create a hyperlink using the Folder List. To do this, simply drag the file you are linking to from the Folder List and drop it on top of the image. In the example on the right, the file, page2.html has been dragged-and-dropped onto the image in the rollover.html window.
Creating the Rollover
Now that you have inserted the first image, added an ALT attribute and a hyperlink, you are finally ready to create the rollover effect. Follow the steps below:
- Click on the image in Normal view to highlight it.
- Select the Dynamic HTML Effects option from the Format pull-down menu. As soon as you do this, you will see a new toolbar appear on screen. This is the DHTML Effects toolbar and it allows you to specify an Event, an Effect and a Setting.
- Click the down arrow next to the <Choose an event> list and select Mouse over.
If this option is greyed-out, first make sure that the image has been highlighted and that you can see the image selection handles. If the toolbar option is still greyed out, click the information button for a possible solution.
 - Click the down arrow next to the <Choose an effect> list and select Swap Picture.
- Click the down arrow next to the <Choose Settings> list and select the option. When the Picture dialogue box appears, highlight the image file that you want to use for the rollover and click the OK button.

When you have completed the action, the DHTML Effects toolbar should look something like the illustration above. Notice that you can remove the rollover effect at any time by using the Remove Effect button.
Where is the Java Script Code?
 Even if you never intend to try working with Java Script yourself, it is important to know where FrontPage has created the code in order that you can maintain your site correctly.
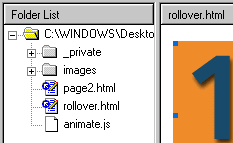
When you use a DHTML effect, Java Script code is created in two places. First of all, Java Script is inserted into the HTML code. You can see this by clicking on the HTML tab. Since this code is just an integral part of the web page, you needn't worry about it. However, some of the Java Script is written to an external file called animate.js and this file is created in the same folder as your web page. If, after adding an effect, you can't see the file in the Folder List, click on the list and hit the F5 button to refresh the view.
This file contains the Java Script that makes the effect happen. If you delete or move this file, the effect won't work. Wherever your web page goes, the animate.js file must go too.
Although the above is true for most of the DHTML effects, in fact, the Swap Picture or rollover effect that we have just created does not actually rely on animate.js but FrontPage creates the file anyway. Even more curious, you may notice that even if you delete the file, FrontPage will write a new one. Looks like there's no getting away from it, you just have to have animate.js even if you don't need it!
Other DHTML Effects
You may have noticed, while you were creating your image rollover, that there are lots of other DHTML effects that can be applied to both image and text objects. The best way to discover them is to play around with the various effects and settings. Click the information button ![]() to get some idea of what's on offer.
to get some idea of what's on offer.
Tips & Tricks
The rollover trigger trick
Sometimes you may want to cause an image rollover effect on one image by moving your mouse over a second or trigger image (known as a disconnected or disjointed rollover). This can be particularly useful if you want to give the viewer more information about a hyperlink before they click. In the example below, you can swap the image on the left by moving your mouse over the image on the right. Try it and see.

 Unfortunately, there's no way you can achieve this effect in FrontPage using the standard DHTML effects settings. However, it is a relatively straightforward business to create the effect by hacking the code that FrontPage creates for you. This can be achieved by two simple cut-and-paste operations in the HTML view. All you need to do is create the rollover effect you need first and then move the opening and closing anchor tags, <a></a> from before and after the rollover image so that they appear before and after the trigger image.
When you move to HTML view, look for the tag that begins <a onmouseover="document…>. This tag will appear immediately before the rollover image tag. Cut this opening anchor tag from its current location and paste it immediately in front of the trigger image tag. Finally, you must also cut-and-paste the closing anchor tag, </a> from immediately after the rollover image tag to immediately after the trigger image tag.
The process looks a little complicated because all the javascript code makes the tags quite long but essentially you need to edit the code that looks something like this…
<a javascript attributes><img rollover image attributes></a>
<img trigger image attributes>
so that it looks something like this…
<img rollover image attributes>
<a javascript attributes><img trigger image attributes></a>
When you have done this, click on the Preview tag and check that the effect works. If you think about what you have done logically, it is clear that the anchor tag is acting as the trigger for the rollover effect. It is not too much of a jump of the imagination to conclude that you could even have more than one trigger for the rollover, simply by copying the opening and closing anchor tags as many times as you wish. You can even use them with some text and have the text trigger an image rollover. The possibilities are almost endless. Experiment!
You can see from this example that working with FrontPage in Normal view can sometimes be quite limiting. It's a really good idea, therefore, to gain a basic understanding of HTML so that you are able to break these limits.
You will see lots of examples of image rollovers as you surf the web and some are better than others. I think some of the more subtle effects are probably the best. Here are some simple examples.
Jumping text
In the example below, the text appears to jump off the page as the cursor moves over it. This is easily achieved by creating two images in Photoshop, one with a drop shadow and one without.
The light-up button
Again, this is a very simple effect created in Photoshop, two button images are created, one that appears dull and a second that appears lit-up. The lit-up image swaps with the dull one when your mouse moves over it giving the impression of a light being turned on.
Black-and-white to colour
One of my favourite rollover effects involves the transformation of a black-and-white or "greyscale" image to a colour one. You will probably have seen lots of examples of this but it works best when the colour is vibrant. Here is a good example.
Focus
Another of my favourites is the blurred image that jumps into focus when your mouse passes over it. There are lots of uses for this effect and it is easily created in Photoshop by adding some Gaussian Blur to the original image.
Text Labels
Probably the most common use of rollovers is to display a text label over an image. This is particularly useful for navigation buttons or where you want to display an unadulterated image but still provide some direction for the user.
Experimentation is the key to success with image rollover effects. It's also important to use them sparingly. A web page stuffed full of rollover effects can be a bit overwhelming for the viewer. Keep it simple and make sure that if you do use a rollover effect, it's for a special reason and not just for the hell of it.
Donate to CADTutor
If you found this tutorial useful, you might like to consider making a donation. All content on this site is provided free of charge and we hope to keep it that way. However, running a site like CADTutor does cost money and you can help to improve the service and to guarantee its future by donating a small amount. We guess that you probably wouldn't miss $5.00 but it would make all the difference to us.
Local Navigation
Sponsored Links
The Basics
- Dual Dimensions in a Dim…
- UCSICON Options
- "Best of" Basics: Irreg…
- Tool Palette Basics
- Original Dimension Value
- Possible Solutions to th…
- Avoid Using 'Standard' i…
- Shorten the Plot Scales…
- Update the Source File B…
- User Increment Angles fo…
- Drawing Information
- 'Sign Language'
- Rotate with the Copy Opt…
- Use the INSERT Osnap on…
- To or From the Current L…


