

Animating Materials: Water
See also, Keyframe Animation
Introduction
One of the most frequent questions I am asked about Bryce is how to create water that ripples when it is animated. Actually, it's pretty straightforward if you know your way around the Material Lab and you have a basic understanding of keyframe animation.
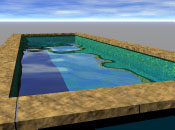
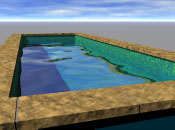
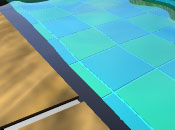
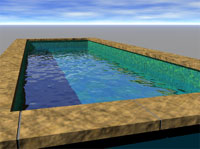
Just about everything in the Brycean world can be animated, including materials. This tutorial shows you how to simulate ripples on the surface of a standard Bryce water material by modifying the offset and rotation of the texture component of the material. The three frames below illustrate the effect.
 |
 |
 |
| Start Frame | Time = 1.5 sec | Time = 3.0 sec |
Many of the steps in this tutorial are common to other situations where you need to create animations in Bryce. It is assumed that you have worked through the Keyframe Animation tutorial or are familiar with these techniques. In all cases where it exists, you will be pointed in the direction of supporting material. You can follow this tutorial either by downloading the sample 3DS model of a pool, used in the illustrations above, or you can use your own model. Either way, the process is the same.
Sample Data
We'll be using a 3DS file, created in AutoCAD. Objects have been derived by layer so that materials can easily be attached.
There are two download options, you can either download the 3DS file or you can download it as a compressed Zip file. The Zip file can be uncompressed with a utility such as WinZip.
![]() Pool.3ds (136KB) - 3DS model file
Pool.3ds (136KB) - 3DS model file
![]() Pool.zip (38KB) - Compressed Zip File (contains Pool.3ds)
Pool.zip (38KB) - Compressed Zip File (contains Pool.3ds)
Save the downloaded file to your work folder. Unzip if necessary. We're now ready to start.
FastTrack Animating Water
OK, maybe you've done this before but you just need a little reminder how the whole thing works. If this is the case, use the FastTrack steps below as a check list. If you have never done this before, the details below should give you a little more information and should help you get a good feeling for what we're about to do during the rest of the tutorial.
Step 1 In Bryce, go to File![]() Import Object… and select the Pool.3ds file.
Import Object… and select the Pool.3ds file.
Step 2 When the model appears, land it down. ![]()
Step 3 Assign the "Caribbean Resort" material to the "Water_1" mesh object. ![]()
Step 4 Make your animation settings, File![]() Animation Setup…
Animation Setup…
Step 5 Set a scale for the material and add a start keyframe in the Material Lab.
Step 6 Move to the end keyframe position.
Step 7 Edit Displacement and Rotation values.
Step 8 Add the end keyframe.
Step 9 Render the animation, File![]() Render Animation…
Render Animation…
If you have downloaded the Pool.3ds file, start the tutorial with Step 1. If you are working with your own model, assign a suitable water material to your water object and then proceed to Step 5.
 Import to Bryce
Start Bryce and select File![]() Import Object… from the pull-down menu. You will see a file Open dialogue box. Navigate to the folder where you saved the Pool.3ds file. Highlight the file and click the Open button. The model should appear in the center of your work area. The model is automatically selected so it appears highlighted in red.
Import Object… from the pull-down menu. You will see a file Open dialogue box. Navigate to the folder where you saved the Pool.3ds file. Highlight the file and click the Open button. The model should appear in the center of your work area. The model is automatically selected so it appears highlighted in red.
 Land the Model Down
Click the Land Object Down icon ![]() and the model will be placed exactly on the ground plane.
and the model will be placed exactly on the ground plane.
 Apply a Water Material
We must now apply a water type material to the mesh called "Water_1". We therefore, need to select Water_1. There are various ways to do this. You may want to ungroup the pool model and select the mesh directly. Although the model is quite complex and direct selection (by picking) may be difficult. A better method may be to retain the group and select the mesh from the Selection Palette or by using Ctrl + Pick. See Selecting Objects in a Group in the AutoCAD to Bryce tutorial for more information if you are not sure how to do this.
![]()
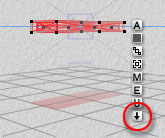
 Let's assume that you decide to keep the model grouped and make the selection using the Selection Palette. Proceed as follows. If you do not see the selection palette, click on the Time/Selection Palette toggle at the bottom right of the screen. Now, click the small down arrow on the Selection Palette to reveal the options menu and choose: Select Meshes
![]() Water_1. You should now see that the Water_1 mesh is highlighted red.
Water_1. You should now see that the Water_1 mesh is highlighted red.
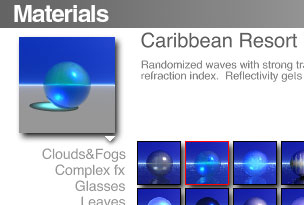
Now that we have made the selection, we can assign a suitable material to the mesh. The technique we are about to use will work with just about all the water materials in the Materials Library but we are going to use a material that works well for this particular situation. We need a material that will look like water in a shallow pool and the "Caribbean Resort" material is just right.
 Go to the Materials Library. Either, click on the Edit Material icon
 ![]() and then click the small arrow at the top right of the preview area in the Materials Lab or take the short-cut, click on the small arrow to the right of the word "Edit" on the toolbar.
and then click the small arrow at the top right of the preview area in the Materials Lab or take the short-cut, click on the small arrow to the right of the word "Edit" on the toolbar.
When you arrive at the Materials Library, click on "Waters & Liquids" in the list of material types. You will find the Caribbean Resort material second along in the top row. Click the material icon to select it and then click ![]() to apply the material to Water_1.
to apply the material to Water_1.
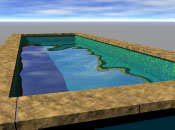
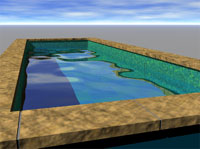
Check in the Nano Preview or do a quick render to make sure that the material has been correctly applied. If all is well, use the same technique to apply suitable materials to the other parts of the model. When you have completed this, you should have a scene that looks something like the one shown in the three illustrations below. All we need to do now is to animate the water material so that the surface appears to be moving with the breeze.
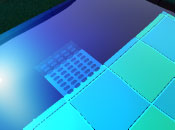 |
 |
 |
 Animation Settings
You now need to decide how long your animation is going to be and how many frames per second (FPS) will be used. Go to the Animation Setup dialogue box, File![]() Animation Setup… from the pull-down menu. Enter values for the Duration and FPS as required. If you are not sure about this, see the Animation Setup section of the Keyframe Animation tutorial for details.
Animation Setup… from the pull-down menu. Enter values for the Duration and FPS as required. If you are not sure about this, see the Animation Setup section of the Keyframe Animation tutorial for details.
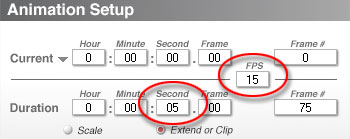 For the purposes of this exercise, we'll use a Duration of 5 seconds and a FPS rate of 15. Enter these values and click
 ![]() to apply them.
to apply them.
You may now want to scale the Timeline so that you can see the whole duration at the bottom of the screen. This makes working with keyframes a little easier. See Scale the Timeline for details.
 Set a Start Keyframe
First of all and to keep things simple, let's turn the Auto-Key feature off. See Turning off Auto-Key for details. Now, we need to set a start keyframe for those components of the water material that we want to change through time.
Select the Water_1 mesh and then click the Edit Material icon ![]() to go to the Materials Lab. You should see that the Materials Lab has its own timeline. This is scaled independently from the main timeline. Scale this timeline so that you can see the whole duration of the animation.
to go to the Materials Lab. You should see that the Materials Lab has its own timeline. This is scaled independently from the main timeline. Scale this timeline so that you can see the whole duration of the animation.

We must now set a suitable scale for the material and since the scale will remain unchanged throughout the animation, we must set a value at time zero and fix it with a keyframe. So, make sure that the Time Scrubber is at time zero, the Time Display should read "00:00:00:00". Next, click the Edit Texture button on the Texture A palette to reveal the Edit Texture/Transform Tools palette.
 |
 |
| Scale = 8% | Scale = 50% |
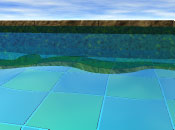
You should see that the default scale for the Caribbean Resort material is 12.9%. In Bryce, a larger percentage scale gives a finer or smaller appearance of the material texture. In most cases you will need to experiment to get the correct value for any given situation. The two images above give some indication of the range. In the case of water, 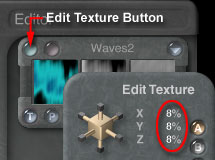 you will need to take into account the wind speed and turbulence. A higher speed and turbulence will give more small ripples on the water surface of a pool whereas a gentle breeze will give broader gentle ripples.
For our pool, a scale of about 8% looks good and gives the impression of a gentle breeze. So, change the X, Y and Z scales to 8%. You can do this by either clicking and dragging the golden cube of the Scale Control or by clicking on each of the three scale values and typing a new one in the edit box.
Once the scale values have been set, click on the Add Keyframe button and select Waves2![]() All Timelines. This will fix all the current settings for this texture at the start of the animation sequence.
All Timelines. This will fix all the current settings for this texture at the start of the animation sequence.
 Move to the End Keyframe
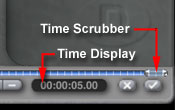
Drag the Time Scrubber to the end of the timeline in the Materials Lab. Check that the Time Display shows the correct time. In our case, it should read "00:00:05:00" (5 seconds).
 Edit Texture Settings
So far we have set a scale for the material but we haven't made any changes that will take place over time because the scale is the same at the start of the animation as it is at the end. In order to simulate the effect of a moving water surface, we need to make changes to the offset value of the material. Since offset was set to zero at the start of the animation, we can set any non-zero value for the end of the animation sequence. Then, as time passes, the value will gradually change from zero to the new value. The question is, what should this new value be?
Once again you will need to experiment. The more offset you apply over a given time, the faster the effect will be. The speed of the moving water surface will depend upon prevailing conditions such as wind speed.
It's best to consider the offset value as changing on a "per second" basis. That way, you can always apply the correct value regardless of the animation length. After some experimentation, it seems that a good value for Offset is about 1 Bryce Unit (BU) per second.
OK, so now you're thinking "…that seems reasonable but what exactly do these changes do to the material?" Well, the offset value is used to determine the speed and direction of the ripples. The offset value of 1 BU/Second will determine the speed. The direction vectors to which it is applied (X and Z) will determine the direction. A change of 1 BU/Second gives a gentle ripple that might be observed in a light breeze. If this value is applied in the X direction only, the ripples will appear to move in the X direction. If the value is applied to both X and Z directions, the ripples will appear to move diagonally between the X and Z axes. Remember that in Bryce, the XZ Plane is parallel with the Ground Plane.
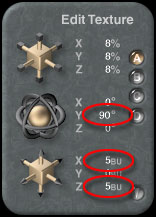
Although changing the offset value through time produces perfectly good ripples, the addition of a bit or rotation in the Y direction just gives that added feeling of realism. Don't ask me why. Unlike offset values, rotation has a limited range (90 degrees). So, rather than deriving a rotation per second value, just add a rotation value somewhere between 0 and 90 degrees.
So, change the Y rotation value to 90 degrees and change the X and Z offset values to 5 BU (1 x 5 sec). The scale values should all remain at 8%. The Edit Texture palette should now look like the illustration on the right.
 Add End Keyframe
We now need to add a keyframe at the end of the animation to fix the new texture values. Click the Add Keyframe button and select Waves2![]() All Timelines. To check that everything is working, try dragging the Time Scrubber along the timeline. You should see the values on the Edit Texture palette change as the scrubber is moved. That completes the set-up for the animation. Click the
All Timelines. To check that everything is working, try dragging the Time Scrubber along the timeline. You should see the values on the Edit Texture palette change as the scrubber is moved. That completes the set-up for the animation. Click the ![]() button in the Materials Lab to return to the drawing.
button in the Materials Lab to return to the drawing.
 Render Animation
The final part of the process is to render the animation so that we can see the effect we have designed. In truth, you probably need to do a couple of quick animation renders just to check that you are getting the required effect. Some modification of the end keyframe values may be required if you are after a particular effect. Unfortunately, there's no easy or quick way to preview changes to materials because the materials are only displayed when they are rendered.
From the pull-down menu, select File![]() Render Animation… and make the appropriate settings in the dialogue box. If you are not sure what settings to make, take a look at Render the Animation to File on the Keyframe Animation tutorial. Your rendered AVI file should look something like the one shown below.
Render Animation… and make the appropriate settings in the dialogue box. If you are not sure what settings to make, take a look at Render the Animation to File on the Keyframe Animation tutorial. Your rendered AVI file should look something like the one shown below.
Conclusion
Animating water is a relatively straightforward process. However, getting just the right effect can be very time consuming because there are lots of parameters to modify and the effects can only really be appreciated by creating a rendered animation. For this reason, it's a good idea to make a note of any good settings so that you can use them again in the future without having to experiment.
Although this tutorial has focussed on animating water materials, you can animate all materials in Bryce. From simple colour changes to complex changes in procedural textures, almost anything is possible. All you need is time and a willingness to experiment. Have Fun!
Tips & Tricks
Saving & Exporting Animated Materials
Although it's a good idea to note down your material settings so that you can use them at a later date, it's also possible to save your materials along with the keyframes you have set. This means that if you apply one of these saved materials, they are animation ready. No fiddling or experimenting!

You can add your new material to any of the sections in the Materials Library by clicking on "Add" and then giving the new material a name and a brief description in the Add Preset dialogue box.
You can also use the Export option to save your settings to an external file. This enables you to share your materials with other users. When you export a material, the settings are saved to a .MAT file.
A version of the material created during this tutorial can be downloaded below. The material is compatible with Bryce 4 and 5 and is keyframed for up to 2 minutes of animation.
![]() Tranquil Pool.mat (85KB) - Bryce material file
Tranquil Pool.mat (85KB) - Bryce material file
Once you have downloaded the file, use the Import option from the Materials Library to load it.
Donate to CADTutor
If you found this tutorial useful, you might like to consider making a donation. All content on this site is provided free of charge and we hope to keep it that way. However, running a site like CADTutor does cost money and you can help to improve the service and to guarantee its future by donating a small amount. We guess that you probably wouldn't miss $5.00 but it would make all the difference to us.
Local Navigation
Sponsored Links
The Basics
- Dual Dimensions in a Dim…
- UCSICON Options
- "Best of" Basics: Irreg…
- Tool Palette Basics
- Original Dimension Value
- Possible Solutions to th…
- Avoid Using 'Standard' i…
- Shorten the Plot Scales…
- Update the Source File B…
- User Increment Angles fo…
- Drawing Information
- 'Sign Language'
- Rotate with the Copy Opt…
- Use the INSERT Osnap on…
- To or From the Current L…


