Editing and Saving Materials
Introduction
Once materials have been created and edited in the Material Editor to suit a particular scene they no longer need to be kept in the Materials Editor. Materials can be saved in material libraries and retreived for use in any other scene. Often, materials are copied from material libraries or from objects in a scene for immediate use, or edited to suit other objects before re-saving them under different names. In this way you can catalog and use lots of quality materials collected over time, thus speeding up the process of creating realistic looking scenes
This tutorial focuses on how to retrieve a material for editing from an object in a scene or library and how to save materials in material libraries and maps on your system so you can start cataloging your most handy material assets
Download Sample Data
kf412_files.zip (805kb)
module_4_maps.zip (5.2mb)
Editing a Material on an Object in the Scene
Retrieving Materials from a Scene or Library
Materials can be retrieved and placed in the Material Editor from the Material/Map Browser or from the scene directly
- Open kf412_01.max. This scene has materials assigned to most objects and the Material Editor has been cleared of materials
- Open the Material Editor
- Open the Material Map Browser by clicking the Get Material button in the Material Editor
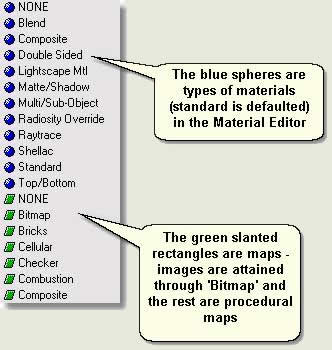
- Browse From > Check New. This is where you can start the process of creating a new material. For information, the items in the list that appears are as follows:
- Select a number of objects in the scene then:
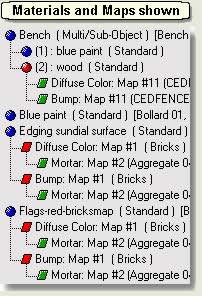
- Browse From > Check Scene. This displays all the materials on all the objects in the scene. Some materials are obviously assigned to a number of objects (editing these directly will change the materials on all the objects). Experiment with the Show checkboxes as described in the image below before reverting back to showing the Root Only
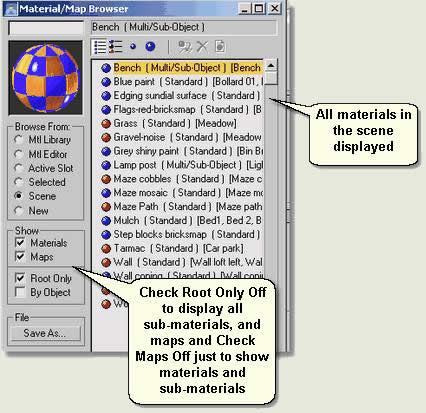
- Select a material in the Material/Map Browser and left click and drag to the first empty sample window in the Material Editor
- When prompted to Instance or Copy choose Instance if you need to edit the material in the Material/Map Browser and Copy if you want to create a separate material. This material is then available for editing
TIP: Materials can be assigned to any objects in the scene by dragging and dropping the material from the Material/Map Browser straight onto an object in the viewport
- Browse From > Check Selected. This picks up on the materials assigned to any selected objects
- Browse From > Check Material Library > File > Open. Navigate to the MAX/VIZ material libraries folder: [root]:\Program Files \ Autodesk \ [MAX/VIZ root folder \ materiallibraries folder. Select one of the material libraries and press Open. This accesses materials in a material library for use straight away or for editing and saving as new materials
- Close the Material/Map Browser
- In the Material Editor select an empty sample window. Press the Pick Material from Object button to the left of the material name box and pick an object in the viewport. This puts the material assigned to the picked object into the sample window for editing
Editing a Material Globally in the Scene
- Retrieve the material from one of the bollards in the scene via the Material/Map Browser Selected option or by using the Pick Material from Object button. Remember to select an empty sample window first
- Select the Blue paint material in the Material Editor
- Change the diffuse colour from blue to green. Notice in the viewport that the colour of all the bollards changes
- Rename the material to Green paint. This can now be saved if needed again (see below)
Editing a Material just on Selected Objects
- Retrieve the material from one of the bollards in the scene via the Material/Map Browser Scene option or by using the Pick Material from Object button
- Drag and place in a new sample window the Green paint material
- Rename the material Red paint and change the diffuse colour to red
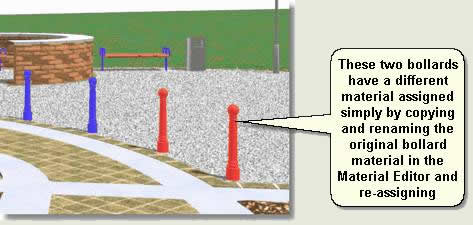
- With one or two of the bollards selected Assign Material to Selection. This effectively assigns a new material to the selected bollards in the scene
Saving Materials and Maps
MAX/VIZ references assets such as image maps on your system and does not keep these items in the scene. MAX/VIZ uses Material Libraries to store favorite materials that will be used over and over again. The downside of referencing image maps is that when you move a scene onto another computer without the image maps, then the scene will not display the maps straight away
NOTE: Use File > Archive to transfer project scenes to other users of MAX/VIZ. This bundles up all project assets such as image maps (textures) so the target user can simply use Customize > Configure Paths to configure their systen to 'pick up' the assets
Saving Materials
- Open kf412_02.max. This is the completed tutorial scene with all materials still present in the Material Editor
- Open the Material Editor and select Blue paint
- Press Get Material button to open the Material/Map Browser
- Browse From > Check Mtl Library
- If materials are displayed in the Material Map Browser ie if there is a library open the press Clear Material Library button

NOTE: Clearing the current Material Library does not delete the library. It merely clears the list so that a new library can be created
- In the Material Editor press Put to Library button

- When prompted to Put to Library press OK. This dialog gives the opportunity of renaming the material and warns if there is a material of the same name in the library. The Blue paint material is now stored in the Material Library window of the Material/Map Browser
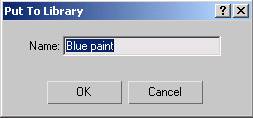
- Repeat this saving procedure for a number of materials in the scene, perhaps naming the materials less specific to the scene (rename 'Edging sundial surface' to 'Buff brick edging', for example)
- Material/Map Browser > File > Save As. Save the Material Library (these are .mat files) in your training folder
- Clear the Material Map Browser and make sure Mtl Library is checked
- File > Open. Open the same Material Library and add another material to the library as before
- File > Save. The Material Library will now contain the new saved material
NOTE: Use Merge to merge the contents of a material library into the existing material library window. This function gives the option of selecting which materials in the imported library are to be merged
Keep material libraries in well catalogued libraries that are easily retrievable and comprehensively named
Saving Maps
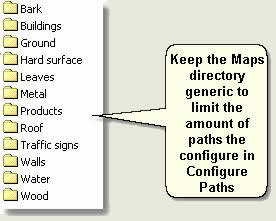
Because texture maps and other image files are referenced on your system it makes sense to keep those that are to be used over multiple scenes in one place and to copy relevant project image files to a central location for that project (for example, images of buildings and other site specific textures) and within the project files. Also, it is good practice to name the texture files so that the content is recognisable eg 'Dark grey concrete bumpy.jpg'
Below is an example of a folder structure within a centralised Map directory. It is prudent to keep the directory generic to limit the number of paths that need to be configured in Configure Paths
Donate to CADTutor
If you found this tutorial useful, you might like to consider making a donation. All content on this site is provided free of charge and we hope to keep it that way. However, running a site like CADTutor does cost money and you can help to improve the service and to guarantee its future by donating a small amount. We guess that you probably wouldn't miss $5.00 but it would make all the difference to us.
Local Navigation
Sponsored Links
The Basics
- Dual Dimensions in a Dim…
- UCSICON Options
- "Best of" Basics: Irreg…
- Tool Palette Basics
- Original Dimension Value
- Possible Solutions to th…
- Avoid Using 'Standard' i…
- Shorten the Plot Scales…
- Update the Source File B…
- User Increment Angles fo…
- Drawing Information
- 'Sign Language'
- Rotate with the Copy Opt…
- Use the INSERT Osnap on…
- To or From the Current L…


