

AutoCAD Tips & Tricks
Today's Tip
Oops is your friend
Most AutoCAD users know about the undo command, which allows you to step back through the command sequence. This is useful if you make a mistake and need to retrace your steps. But what if you deleted something a while back and in the meantime you did some useful stuff that you don't want to lose in order to recover your deleted stuff. Oops to the rescue!
The oops command recovers the last deleted selection set, without undoing everything in-between. It can also be used to recover objects removed after using block or wblock.
Yesterday's Tip
Add your name to the status bar
 Have you ever wanted to see your name or your company's name displayed on the AutoCAD status bar? If so, you need to know about the modemacro variable. Whatever value you set this variable to will appear on the status bar, just to the left of the dynamic co-ordinate display. To do this, enter "modemacro" at the command prompt and then enter the text you'd like to display.
The assigned value of modemacro remains set only for the current drawing session. If you's like to see your text displayed every time you start AutoCAD, simply add the following line to acad.lsp:
(setvar "modemacro" "text to display")
Sunday's Tip
Object Snap Cycling
 When drawings get crowded with lots of detail, it can be difficult to select the required snap point with running object snaps. Invariably, the snap point AutoCAD finds is not the one you want. This is where object snap cycling comes to the rescue. With running object snap turned on, hover the cursor close to the snap point you want and hit the Tab key on the keyboard to move between the various possible snap points near the cursor. Keep hitting the Tab key until you find the snap point you want. When you've got it, left-click to select the point.
Saturday's Tip
AutoCAD Expert
Are you an expert in AutoCAD? Well according to Autodesk you aren't, well not unless you tell the program otherwise. The EXPERT system variable (default 0) can be changed so that annoying "Are you sure?" commands will go away. Here is the list and what they do:
- EXPERT = 0
- Issues all prompts normally.
- EXPERT = 1
- Suppresses "About to regen, proceed?" and "Really want to turn the current layer off?"
- EXPERT = 2
- Suppresses the preceding prompts and "Block already defined. Redefine it?" (BLOCK) and "A drawing with this name already exists. Overwrite it?" (SAVE or WBLOCK).
- EXPERT = 3
- Suppresses the preceding prompts and those issued by the LINETYPE command if you try to load a linetype that's already loaded or create a new linetype in a file that already defines that linetype.
- EXPERT = 4
- Suppresses the preceding prompts and those issued by UCS Save and VPORTS Save if the name you supply already exists.
- EXPERT = 5
- Suppresses the prompt, "That name is already in Use, redefine it?" issued by the -DIMSTYLE Save option when you supply the name of an existing dimension style.
Friday's Tip
Using Imprint to sub-divide faces
 The Imprint command (Modify
![]() Solid Editing
Solid Editing![]() Imprint Edges) gives the first impression of nothing more than adding graffiti to solids. Upon closer investigation, however, we find that it actually modifies the face on which it is placed, effectively sub-dividing it. Sub-divided faces can then be extruded using the Extrude faces command (Modify
Imprint Edges) gives the first impression of nothing more than adding graffiti to solids. Upon closer investigation, however, we find that it actually modifies the face on which it is placed, effectively sub-dividing it. Sub-divided faces can then be extruded using the Extrude faces command (Modify![]() Solid Editing
Solid Editing![]() Extrude faces).
Extrude faces).
Procedure
- Create a box.
- Draw a line on one of the faces.
- Imprint that line on the solid.
- Use Extrude faces to extrude the sub-divided face.
To generate this modified part with Boolean operations would not be difficult but, as we all know, speed and accuracy are the name of the game. The procedure describe above can be auto-executed with the command macro:
^C^C_line;\\;_solidedit;b;i;\last;y;;;f;E;\;\\;;
The UI could benefit from some advanced programming, but if one pays attention to the Command Prompts, it's not so bad.
Note: This tip relates to versions of AutoCAD before 2007. Although the technique works with 2007 and above, the same operation can be achieved more easily using the Presspull tool.
Thursday's Tip
Take control of QNEW
Have you ever wanted to change your QNEW command or your "New" button to open a certain .dwt file? Here's how:
Go to the options menu and select the tab.
Go down to .
Select .
Select the .dwt file you want to use.
Now when you open AutoCAD or hit the "New" button this .dwt will load every time.
Wednesday's Tip
Shift + Right-click menu
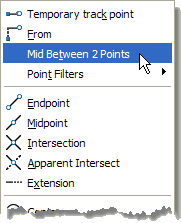 Object snaps are really inportant in AutoCAD and in addition to the running object snaps, many AutoCAD users have the Object Snap toolbar permanently docked on their screen. However, as screen space is often at a premium, you might like to consider accessing the object snaps from the Shift + Right-click menu. If you didn't know about this, you'll find that it's even better than the Object Snap toolbar because it takes up no space and it contains all the object snaps including "Mid Between 2 Points" and the Point Filters.
Tutorials of the Moment
The most recently viewed tutorials
AutoCAD 2010: Ground Shadows
|
AutoCAD 2010: Ribbon Basics
|
|
Last visited: less than one minute ago |
Last visited: less than one minute ago |
|
AutoLISP Quick Start
|
Object Snap
|
|
Last visited: less than one minute ago |
Last visited: 1 minute ago |
Local Navigation
Tutorials
Helping you to learn more of the skills you need, for free.
Featured Tutorial:
AutoCAD 2010: The User Interface - Part 3
![]()
CADTutor tutorials are comprehensive lessons, designed to give you a deeper understanding.
Total tutorials: 108
Michael’s Corner
Michael Beall shows you how to work smarter and faster.

Each month, Michael’s Corner presents a series of useful articles that help you use AutoCAD more efficiently.
Total articles: 592
Sponsored Links


