

Navigation Techniques
Introduction
Gaining the skill to navigate efficiently around a scene and around objects and parts of objects (sub-objects) efficiently and with ease is of paramount importance to good modelling. Most new users of MAX / VIZ need to get over this first hurdle before feeling comfortable in the 3D environment.
Fear not, MAX / VIZ has a host of tools for the purpose. This tutorial descibes the most useful navigation techniques.
Download Sample Data
kf103_files.zip (552kb)
module_1_maps.zip (11kb)
Active Viewport
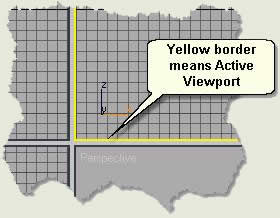
Only one viewport can be used at any time for modelling. You must make a viewport 'Active' before running any routine. Get into the habit of simply making a viewport active before doing anything at all in it
- Open kf103_01.max. This scene contains a floor box and four objects
- Notice that the Active Viewport has a yellow border around it
- To make another viewport active move the cursor into the viewport and right click
- Notice that if you right click in a viewport that is active a menu is displayed. This does not happen, however, the first time you right click to make an inactive viewport active
TIP: Get into the habit of right clicking in viewports whenever moving to another. Also left click in a blank space or press Esc to deselect an object (covered later). If these 'right click in a new viewport' and 'left click in a blank space' actions do not become an ingrained habit, objects can be inadvertantly transformed (moved for example) by mistake and sometimes without noticing
Resizing / Minimise / Maximise
As well as using the standard viewport layouts, viewports can be resized throughout the modelling process and minimised or maximised often to gain a much clearer view of what is beng modelled
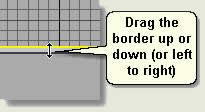
- In kf103_01.max place the cursor over one of the viewport borders (not the central meeting place of borders)
- The cursor changes to a Move Icon. Left click and drag the border up or down
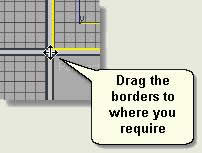
- Move the cursor to the centre where the viewports meet
- The cursor changes to a Move General icon. Left click and drag the viewport borders anywhere you require
- Right click (to make active) in the Top Viewport
- Navigation Tools > Min / Max Toggle
- This maximises the viewport
- Press the Min / Max Toggle again - this minimises the active viewport
- Practice resizing and minimising and maximising viewports of your choice
Navigating around the Scene
MAX / VIZ has a number of navigation tools that become available when in different viewports. The following tutorials explore the tools available for navigating around the scene depending on which type of viewport is active
Top, Left, Front, User
The Top, Left, Front and User viewports share the same navigation tools
- Open kf103_01.max if not already open. Maximise the Top Viewport
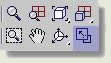
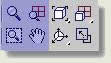
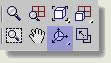
- Navigation Toolbar - place the cursor over the four highlighted icons shown above to read the tooltips
- Explore the functionality of these navigation tools thus
- Press Zoom Place the cursor (now a magnifying glass) at the centre of the viewport. Left click and drag the cursor up and down. The viewport zooms in and out
- Keep the cursor in the centre of the viewport and zoom out so that the site occupies about 30% of the screen. Place the cursor over the car. Left click and drag the cursor up. The cursor zooms to the car
NOTE: If the object is not 'zoomed to' change the zoom setting thus: Customize > Preferences > Viewports Tab > Mouse Control > Check Zoom About Mouse Point for both Orthographic and Perspective
- Zoom out again and repeat, this time placing the cursor over another object
- Right click to exit the command
- Minimise the Top Viewport and Press Zoom All
- Zoom in and out in one viewport and notice that all other viewports respond in the same way
- Right click to exit the command
- Make the Left Viewport active and press Pan
- Left click and drag to pan around the scene
- Right click to exit the command
- Press Region Zoom
- Left click and drag a region window around an area of interest
- Press Zoom to zoom out again
- Right click to exit the command
Zoom Extents of the Scene
- Make the bottom right viewport active and User
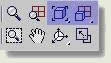
- The above buttons have a small arrow to the bottom right of the icon. This arrow means that when you left click and hold sub buttons appear enabling you to move the cursor to the one required as default. Left click on the first button and make sure the tool tip is Zoom Extents (this is the grey image)
- Press Zoom Extents and notice that the viewport zooms to the extents of all the objects in the scene
- Press the next button making sure the button tool tip is Zoom Extents All (this is the grey image) and notice that all the viewports zoom to the extents of all the objects in the scene
TIP: Most if not all modellers use a wheel mouse. With a wheel mouse you can press on the wheel to pan and roll the wheel to zoom. This is an invaluable addition to your hardware when modelling in 3D
Perspective
- Make the bottom right viewport Perspective View and maximise the viewport
- Notice on the Navigation Toolbar and extra icon
- Press Field-of-View This operates rather like zoom, but keeps the display stable as you zoom in and out
Camera
- Type C to change the viewport to a Camera View
- Notice that a new set of icons appear

- Key Fundamentals does not cover these buttons, however get a feel for them by experimenting
Navigating around an Object
As well as navigating around the scene comfortably and efficiently, the modeller needs to gain skill in selecting objects and parts of objects and moving in the viewport to the premium position for editing anything. The following tutorials detail common procedures for navigating around an object
Zoom Extents Selected
Navigating around an object requires an object to be firstly selected by either left clicking over it in the viewport or selecting it in the Select by Name dialog
- Open kf103_01.max if not already open
- Make the bottom right viewport User and maximise this viewport
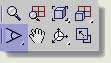
- Select the car (the bounding box will be visible and the mesh will turn white once selected) and go to the Navigation Toolbar
- Make sure the tool tips on the two highlighted buttons show 'Zoom Extents Selected' and 'Zoom Extents All Selected'
- Press Zoom Extents Selected The viewport zooms to the extents of the car
NOTE: Sometimes you have to press this button twice to get a full zoom extents
- Minimise the User Viewport and then press Zoom Extents All Selected This zooms to the extents of the selected car object in all the viewports
- Practice zooming to the extents of objects, then using other navigation tools such as pan, zoom and region zoom to go to different parts of the scene
Arc Rotate Selected
Finally, once you are skilled at zooming to objects that need attention the use of Arc Rotate Selected can be explored. Once selected, the object has become effectively 'anchored' and then you would probably want to rotate around the object
- In kf103_01.max select the lamp post
- Maximise the User Viewport and Zoom Extents
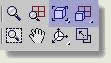
- Zoom Extents Selected then look at the final button in this tutorial. This is the Arc Rotate Selected button. Use the sub button fly-out to select this button (it has a white centre) and make sure the tool tip is correct
- Press Arc Rotate Selected Notice a circular gizmo (or helper) in the viewport

Place the cursor inside the cursor and left click and move the cursor around, still keeping the cursor inside the circle. This alows you to effectively revolve around any selected object
TIP: Do not operate the cursor outside of the circular gizmo at this only serves to 'keek' the scene left and right. This has no real use in landscape work
TIP: Get into the habit of navigating using select, then Arc Rotate Selected plus other zoom and pan tools. There is no excuse for 'losing your way' in a scene once you have a solid grasp on the navigation tools
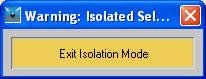
Isolate Selection
This is a very useful tool to temporarily hide all objects apart from the selected object. The object is also 'zoomed to
Tools Menu > Isolate Selection
Press Exit Isolate Selection to unhide the objects that were hidden. The zoom keeps on the object
Donate to CADTutor
If you found this tutorial useful, you might like to consider making a donation. All content on this site is provided free of charge and we hope to keep it that way. However, running a site like CADTutor does cost money and you can help to improve the service and to guarantee its future by donating a small amount. We guess that you probably wouldn't miss $5.00 but it would make all the difference to us.
Local Navigation
Monday
21st April 2025
Sponsored Links
The Basics
- Dual Dimensions in a Dim…
- UCSICON Options
- "Best of" Basics: Irreg…
- Tool Palette Basics
- Original Dimension Value
- Possible Solutions to th…
- Avoid Using 'Standard' i…
- Shorten the Plot Scales…
- Update the Source File B…
- User Increment Angles fo…
- Drawing Information
- 'Sign Language'
- Rotate with the Copy Opt…
- Use the INSERT Osnap on…
- To or From the Current L…


