Leaderboard


Popular Content
Showing content with the highest reputation on 12/16/2024 in all areas
-
This is an update still a few bugs but sorts the rectangs now when selecting all. Missing llabelling 1st box not sure why not. Once current bugs fixed will do the out to Excel that is the easy bit. ; https://www.cadtutor.net/forum/topic/94594-thanks-to-the-lisp-that-outputs-coordinates-in-clusters/ ; BY AlanH Dec 2024 (defun lotsofholes ( / box cnum co-ord co-ords ent entn lst lst2 lst3 oldsnap pi45 pre pt rad ss vla xlsetcelltext) ;; Thanks to fixo ;; ;; = Set Excel cell text = ;; ;; ;; (defun xlsetcelltext ( row column text) (setq cells (vlax-get-property (vlax-get-property myxl "ActiveSheet") "Cells")) (vl-catch-all-apply 'vlax-put-property (list cells 'Item row column (vlax-make-variant (vl-princ-to-string text) vlax-vbstring))) ) (setq pi45 (* pi 0.25)) (setvar 'textstyle "Standard") (setq oldsnap (getvar 'osmode)) (setvar 'osmode 512) (setq box 0) (setq lst3 '()) (setq pre (getstring "\nEnter prefix B etc ")) (setq pt (getpoint "\nPick bottom left corner ")) (command "UCS" "OB" pt) (command "PLan" "") (command "zoom""C" (trans pt 0 1) 6.0) (prompt "select all rectangs use window enter to stop ") (setq ss (ssget '((0 . "LWPOLYLINE")))) (if (= ss nil)(progn (Alert "no rectangs found \nwill now exit ")(exit))) (setq cnum (vlax-ldata-get "Circles" "NUM")) (if (= cnum nil) (setq cnum 0)) (setq co-ords '()) ; sort rectangs re order here so remake ss (repeat (setq x (sslength ss)) (setq entn (ssname ss (setq x (1- x)))) (setq co-ord (mapcar 'cdr (vl-remove-if-not '(lambda (a) (= (car a) 10)) (entget entn)))) (setq co-ords (cons (list (car (car co-ord)) (cadr (car co-ord)) entn) co-ords)) ) (setq co-ords (vl-sort co-ords '(lambda (a b) (cond ((< (car a) (car b))) ((= (car a) (car b)) (< (cadr a) (cadr b))) ) ) ) ) (foreach val co-ords (setq lst2 '()) (setq co-ord (mapcar 'cdr (vl-remove-if-not '(lambda (a) (= (car a) 10)) (entget (caddr val))))) (setq co-ord (cons (last co-ord) co-ord)) (setvar 'osmode 0) (foreach pt co-ord (setq lst2 (cons (trans pt 0 1) lst2)) ) (command "text" (cadr lst2) rad (* 0.25 pi) (strcat pre (rtos (setq box (1+ box)) 2 0))) (setq ss2 (ssget "_CP" lst2 (list (cons 0 "CIRCLE")))) (setq lst '()) (repeat (setq K (sslength ss2)) (setq ent (entget (ssname ss2 (setq k (1- k))))) (setq rad (cdr (assoc 40 ent))) (setq cen (cdr (assoc 10 ent))) (setq cenucs (trans (cdr (assoc 10 ent)) 0 1)) (setq cx (atof (rtos (car cenucs) 2 4)) cy (atof (rtos (cadr cenucs) 2 4))) (setq lst (cons (list cx cy rad) lst)) ) (setq lst (vl-sort lst '(lambda (a b) (cond ((< (car a) (car b))) ((= (car a) (car b)) (< (cadr a) (cadr b))) ) ) ) ) (foreach val lst (setq cen (list (car val)(cadr val))) (setq rad (caddr val)) (setq str (rtos (setq cnum (1+ cnum)) 2 0)) (command "text" (polar cen pi45 (+ rad (* rad 0.2))) rad 0.0 str) (setq lst3 (cons (list (strcat pre (rtos box 2 0)) (strcat str) (trans cen 1 0) rad ) lst3)) ) (vlax-ldata-put "Circles" "NUM" cnum) ) (setvar 'osmode 512) (command "ucs" "w") (command "plan" "") ; now do excel lst3 (or (setq myxl (vlax-get-object "Excel.Application")) (setq myxl (vlax-get-or-create-object "excel.Application")) ) (vla-put-visible myXL :vlax-true) (vlax-put-property myxl 'ScreenUpdating :vlax-true) (vlax-put-property myXL 'DisplayAlerts :vlax-true) (vlax-invoke-method (vlax-get-property myXL 'WorkBooks) 'Add) ; opens a new xl (setq row 1) (setq lst3 (reverse lst3)) (foreach val lst3 (xlsetcelltext row 1 (nth 0 val)) (xlsetcelltext row 2 (nth 1 val)) (xlsetcelltext row 3 (car (nth 2 val))) (xlsetcelltext row 4 (cadr (nth 2 val))) (setq row (1+ row)) ) (princ) ) (lotsofholes)1 point
-
Have not forgotten may have time today.1 point
-
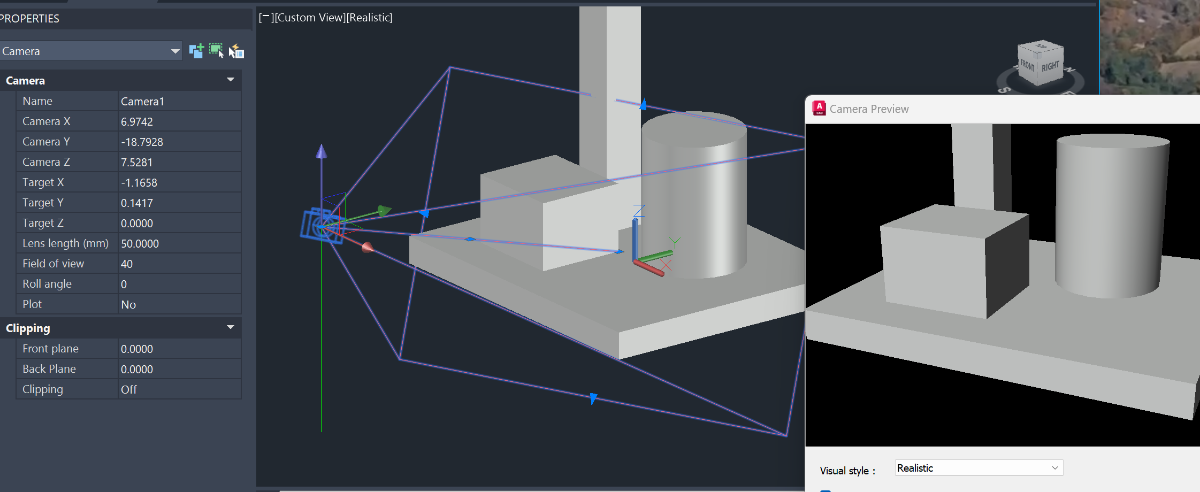
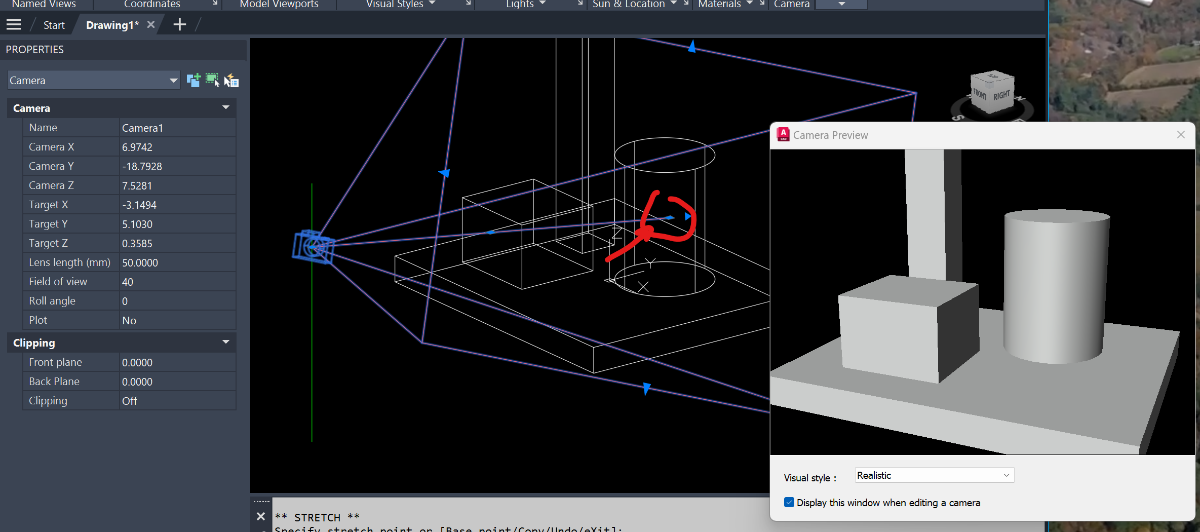
I would start as follows. Create a vertical line (pole) at the x,y location where you would like to place a camera then use the camera command to create and place the camera. Using object snap nearest, click on the vertical line at a point where you would like to position the camera. For the target position click at a point in your model that will be the approximate center for the perspective view. Select the camera and you will see something like this. Change to wireframe visualstyle and move the target point around so the the Camera Preview shows an acceptable croppig of the scene. YOU can also adjust the view by changing the camera values (e.g., camera and target location, lens focal length) in the properties panel. Issue the render command and evaluate the results and when you like what you see click the Save icon in the render window. Assigning and mapping materials, and then creating appropriate lighting can be a time consumg and complicated task. I'd start by assigning basic solid colors to each object in your scene and use the sun option for lighting. If you have specific questions post them here.
 1 point
 -
Hi Chilidawg, See if this is what you are after. Click "off" the leader for input. Must esc to exit. Number variable set as global, so it will pick up where you left off. ;|SEQUENTIALLY NUMBER AN MLEADER P. DuMONT 06/19/2017 |; (defun c:MLI ( / *error* cmde ldr doc ent ent_obj new_num ) (defun *error* (msg) (if (and msg (not (wcmatch (strcase msg t) "*break*,*cancel*,*exit*")) ) ;_ end of and (princ (strcat "\nError: " msg)) ) (if cmde (setvar 'cmdecho cmde) ) (if ldr (setvar 'cmleaderstyle ldr) ) (if doc (vla-endundomark doc) ) (princ) ) ;_ end of defun (setvar 'cmdecho 0) (setq ldr (getvar 'cmleaderstyle)) (if (and (setq dic (dictsearch (namedobjdict) "ACAD_MLEADERSTYLE")) (setq dat (dictsearch (setq dic (cdr (assoc -1 dic))) "NOTES")) ;check your Leader style here ) ;_ end of and (setvar 'cmleaderstyle "NOTES") ;set your Leader style here ) ;_ end of if (setq doc (vla-get-activedocument (vlax-get-acad-object))) (vla-startundomark doc) (inputnum) (while (initcommandversion) (command "MLEADER") (while (= 1 (logand 1 (getvar 'cmdactive))) (command pause) ) ;_ end of while (setq ent (entlast) ent_obj (vlax-ename->vla-object ent) new_num (itoa *!num!*) *!num!* (1+ *!num!*)) (vla-put-TextString ent_obj new_num) ) ;_ end of while (vla-endundomark doc) (setvar 'cmleaderstyle ldr) (setvar 'cmdecho cmde) ) ;_ end of defun (defun inputnum () (setq *!num!* (cond ((getint (strcat "\nStarting number? <" (itoa (setq *!num!* (cond (*!num!*) (1) ) ;_ end of cond ) ;_ end of setq ) ;_ end of itoa ">: " ) ;_ end of strcat ) ;_ end of getint ) (*!num!*) ) ;_ end of cond ) ; setq ) ;_ end of defun1 point