Leaderboard


Popular Content
Showing content with the highest reputation on 02/26/2023 in all areas
-
Now after adding the missing Lee Mac function LM:getsyntax the program and changing the folder works fine1 point
-
doesn't look like dxfout isn't supported. use this command instead. https://help.solidworks.com/2021/english/DraftSight/html/hlpid_block_wblock.htm1 point
-
I don't have draftsight, but you can do this manually? So what steps do yo do to do this maunally? Copy from, the command line maybe1 point
-
Need an image. Like Steven P (setq plent (entsel "\nPick pline")) (if plent (setq co-ord (mapcar 'cdr (vl-remove-if-not '(lambda (x) (= (car x) 10)) (entget (car plent)))))) (princ co-ord)1 point
-
Dont forget ATTSYNC.1 point
-
1 feet = 305 mm No 1 feet = 304.8 mm the mms can add up 20' = 4mm difference. Potent be careful when AUS changed to metric stuff was supplied still in imperial but slowly it has changed, if you draw something as 1 foot wide you may not be able to buy material that is 304.8mm wide, Bolts etc are still available in both metric and imperial.1 point
-
Thank you Steven P for your idea. I have improved the lisp from Lee-Mac. It also works for LWPolyline inside block with alternative NEnsel. Please take a look. Copying part of Polyline2.dwg PLP - Copying part of LWPolyline.lsp1 point
-
1 feet = 305 mm 1 inch = 25.4 mm 1 mm = 1/ 25.4 inch or 1 mm = 0.0393700787401574 inch1 point
-
You'll have to check this but comment out these ( use a ; at the beginning of the line) and it should create a line on top of the original ;; (vl-catch-all-apply 'vla-offset (list o d)) ;; (vl-catch-all-apply 'vla-offset (list o (- d))) ;; (vla-delete o)1 point
-
Also strongly suggest never ever use the same password for different sites. That way when one site gets hacked, they can't use the password on other accounts.1 point
-
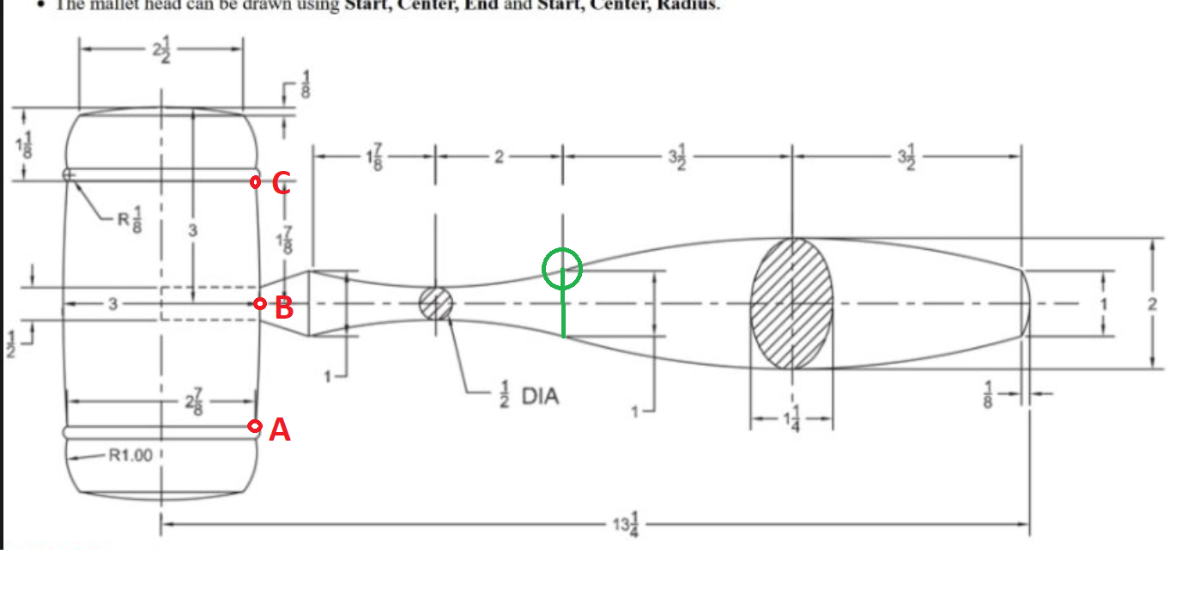
However, using the supposition that the end of the band is in line with the mallet head, one can take an arc of radius 1/8", such that the perpendicular bisector of the arc to the chord (saggita) is 1/16". This gives a chord length (height of the band) of 55/256" which is tricky to dimension when seemingly the accuracy is 1/8". Picture doesn't look too bad.
 1 point
 -
That is certainly a solution, but would make the side to side dimension of the band 3' 0 1/8" which is wider than the mallet head. Perhaps that is what is wanted, but one could say that this is not a first class example of a drawing exercise.1 point
-
The spacing of the two horizontal band is the diameter of the arc = 1/4".1 point
-
Still you lack a height of the two horizontal bands. Perhaps this is partly an exercise in initiative! Draw the bands to any dimension that looks good.1 point
-
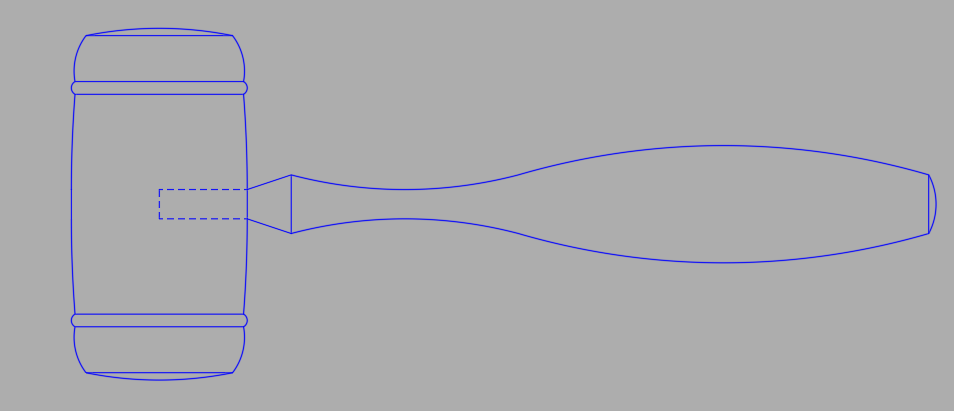
After creating the straight construction lines as suggested by @ReMark, you can create several of the arcs by specifying the start point, a point along the arc, and an end point. Be sure to specify these points in a counter clockwise direction. For example, use points A, B and C as shown below. Note, there is a minor error in the drawing. The two arcs that meet at the green circle are not tangent and therefore there should be a vertical line (green) on the handle as noted.
1 point
-
I would start by drawing all the straight lines starting from the top (or bottom), and side to side, including the centerlines since, per the included image, as you are provided distances between lines and in a couple of cases the length of the line(s).1 point
-
The instructions give you most of what you need to know. The ARC command can be used several ways--the method you use depends on the information you have available and where the arc has to go. It may help to draw some construction lines. There's a dashdot line through the center of the mallet, for instance, that you can offset (use the OFFSET command) to get the outer limit of the long arc in the center. By drawing a centerline through the handle, you can create an intersection at the center of each arc and use those to locate the center points. (Hint: use the SNAP filters.) As always, there are multiple strategies for any task in AutoCAD. Find the one that you're most comfortable with.1 point